Slice of Happiness

Woo hoo!

Today I finally get to share Slice of Happiness!

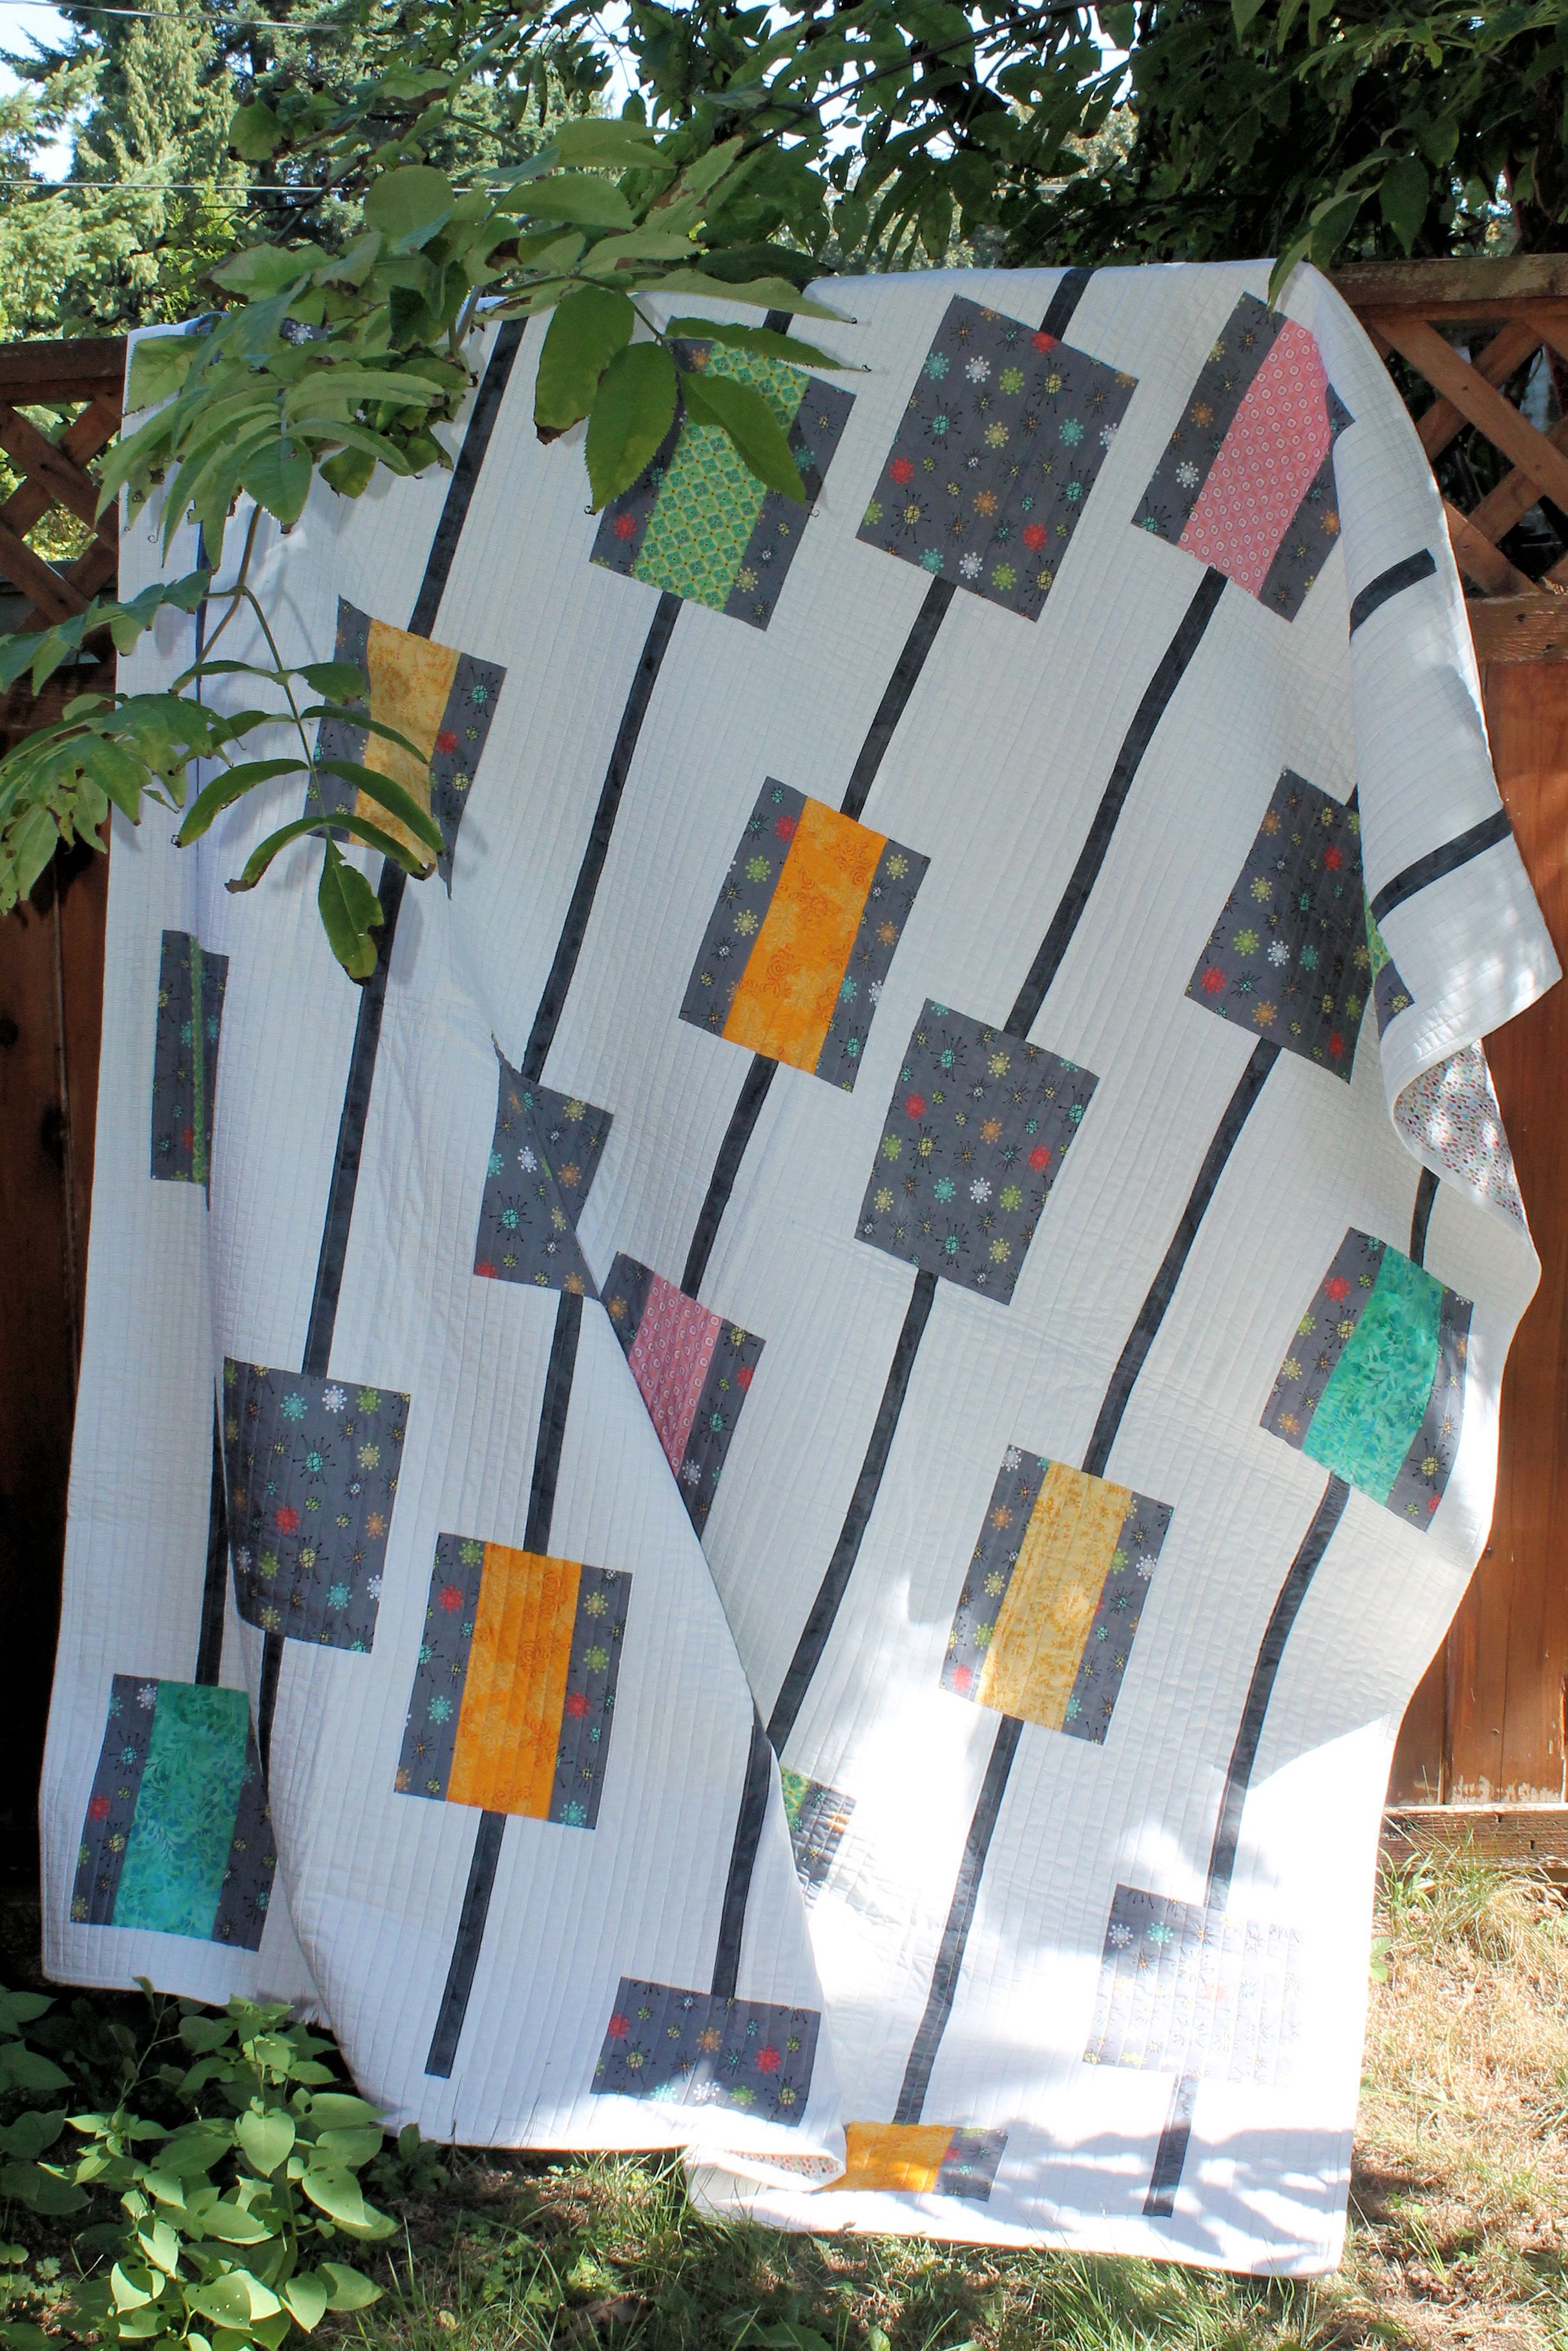
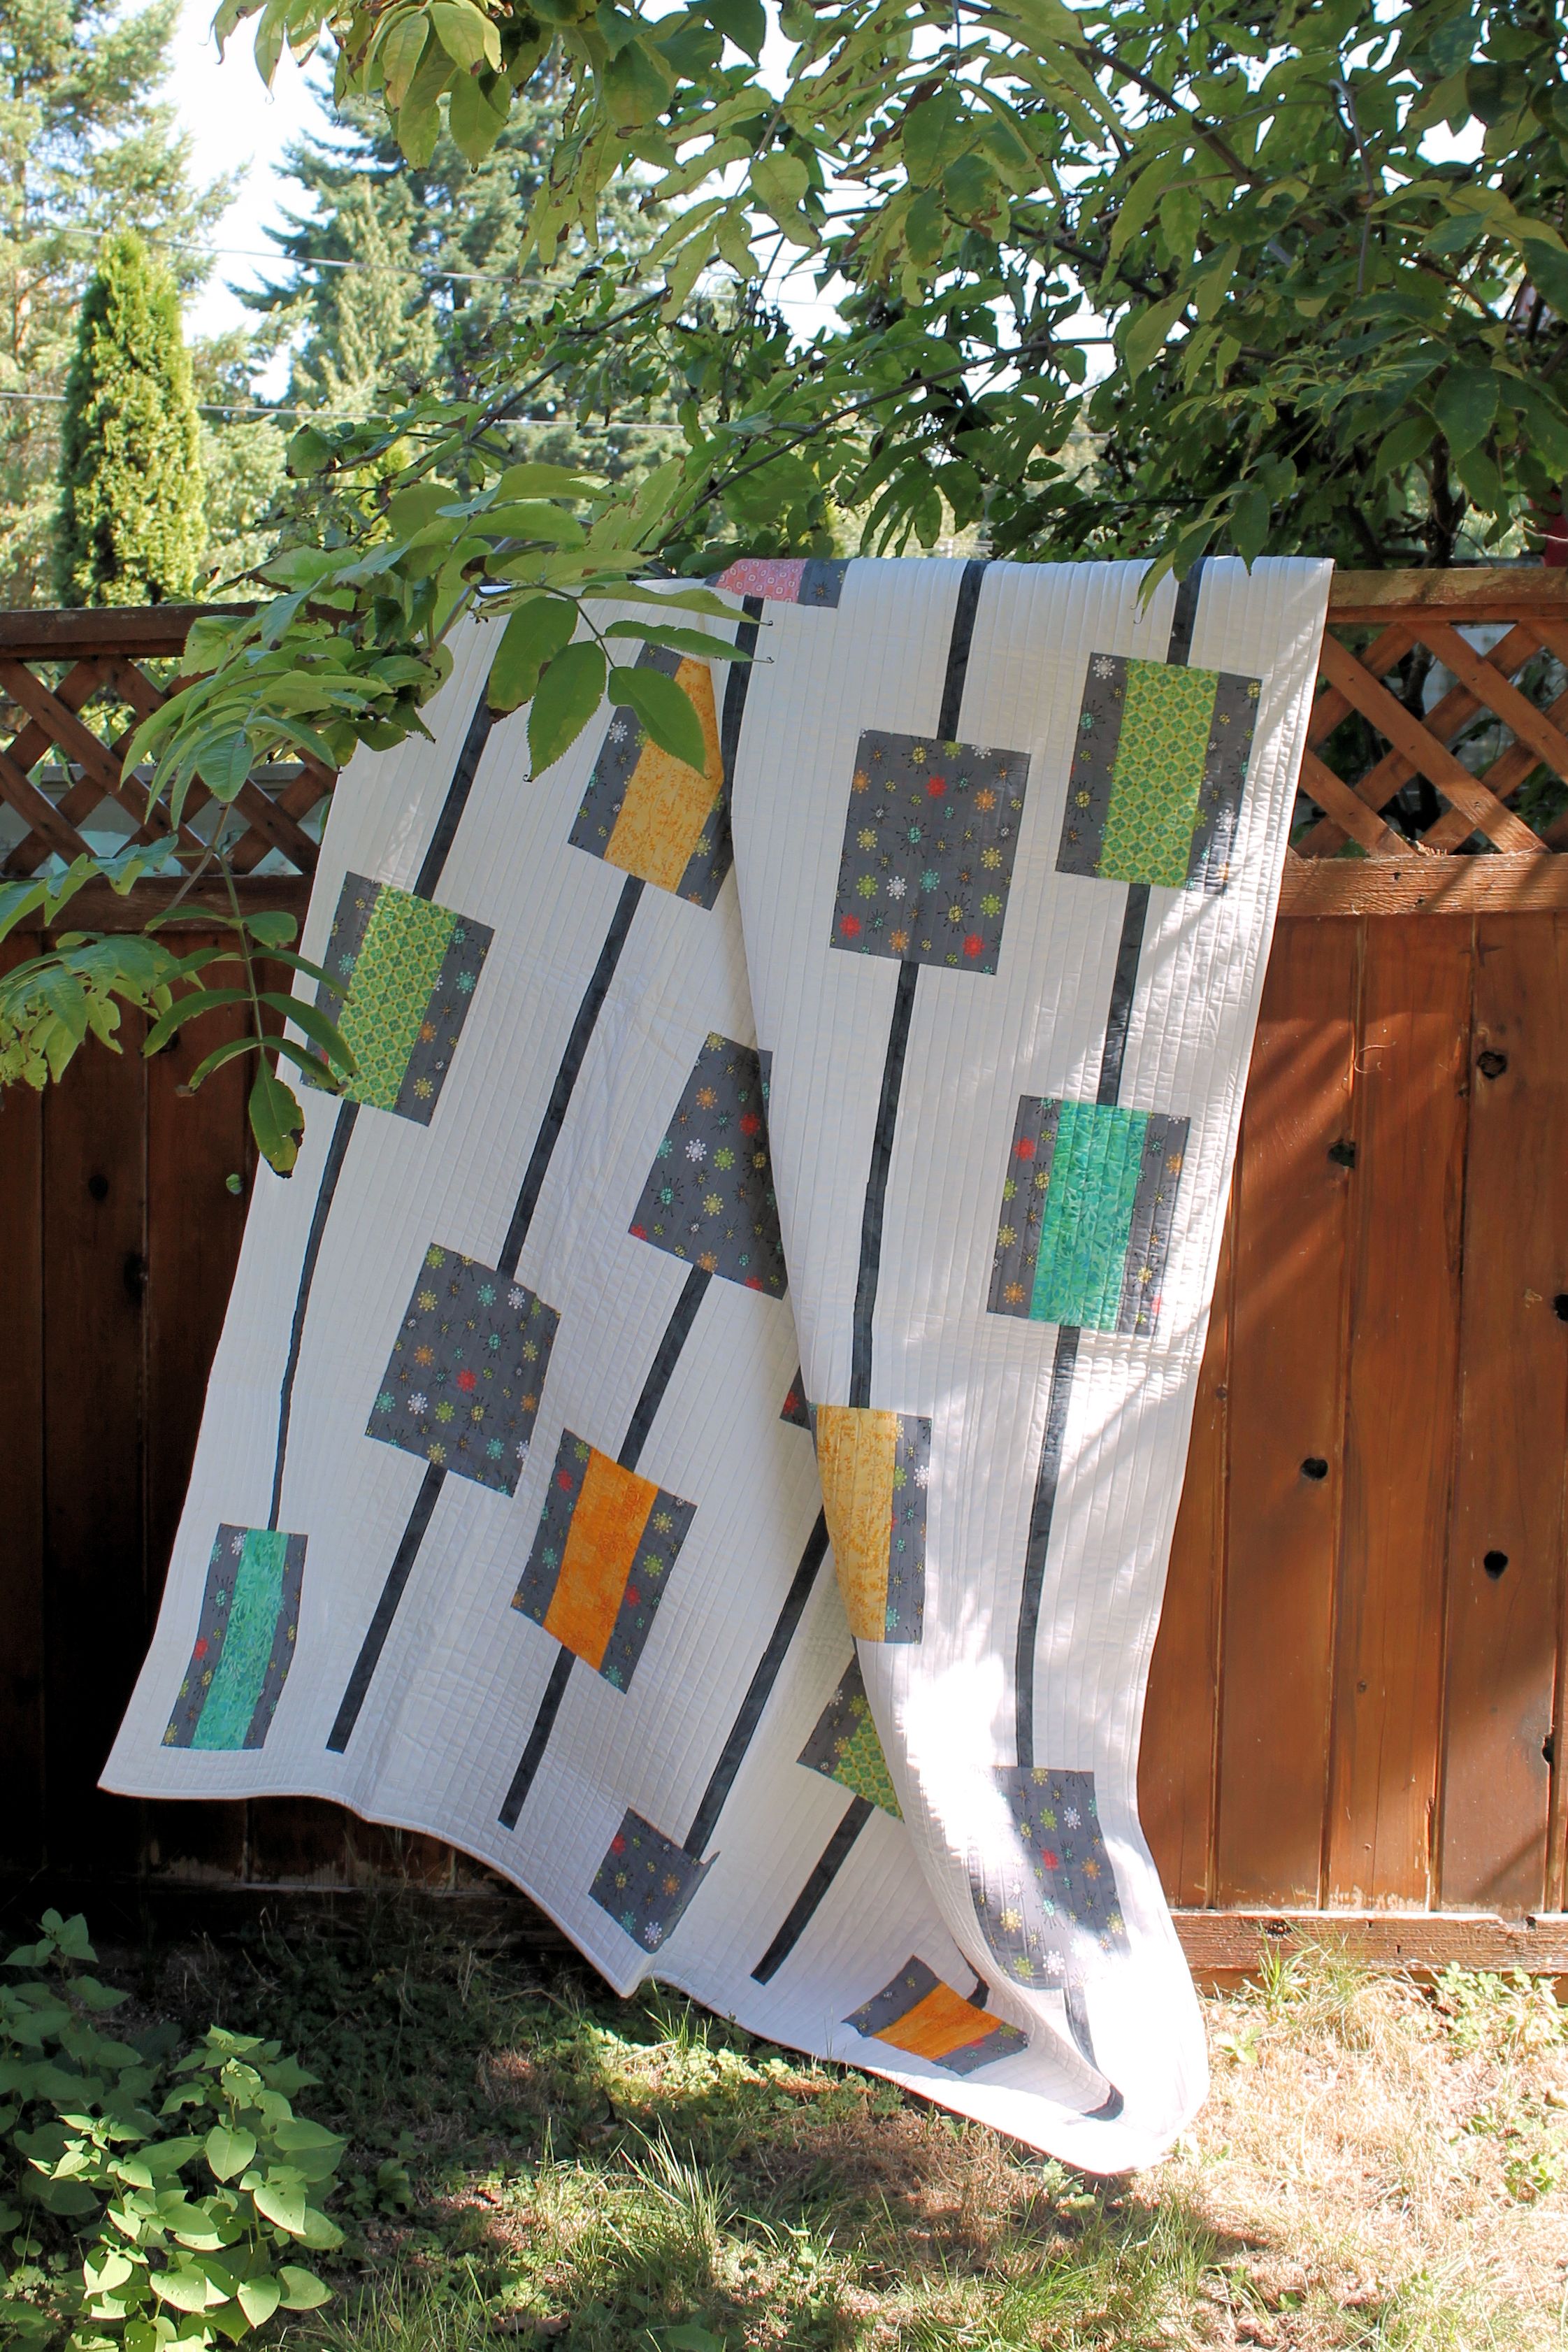
For Slice of Happiness, I was inspired by a picture of a glass of lemonade. The picture reminded me of warm summer days, sitting in the backyard, sipping a cold drink and having nothing else in the world to do but relax. The 3/4 circles represent both the condensation on the glass, and the slices of citrus inside. I chose colors that both made me happy and worked well together, and I decided to use a lot of negative space to have fun playing with the quilting. The simplicity of the design works well with any quilting style-from minimalist straight lines to feathered flourished, and anywhere in between. The 3/4 circles look great as solids, but are also the perfect size to let you show off your favorite prints.

Image1

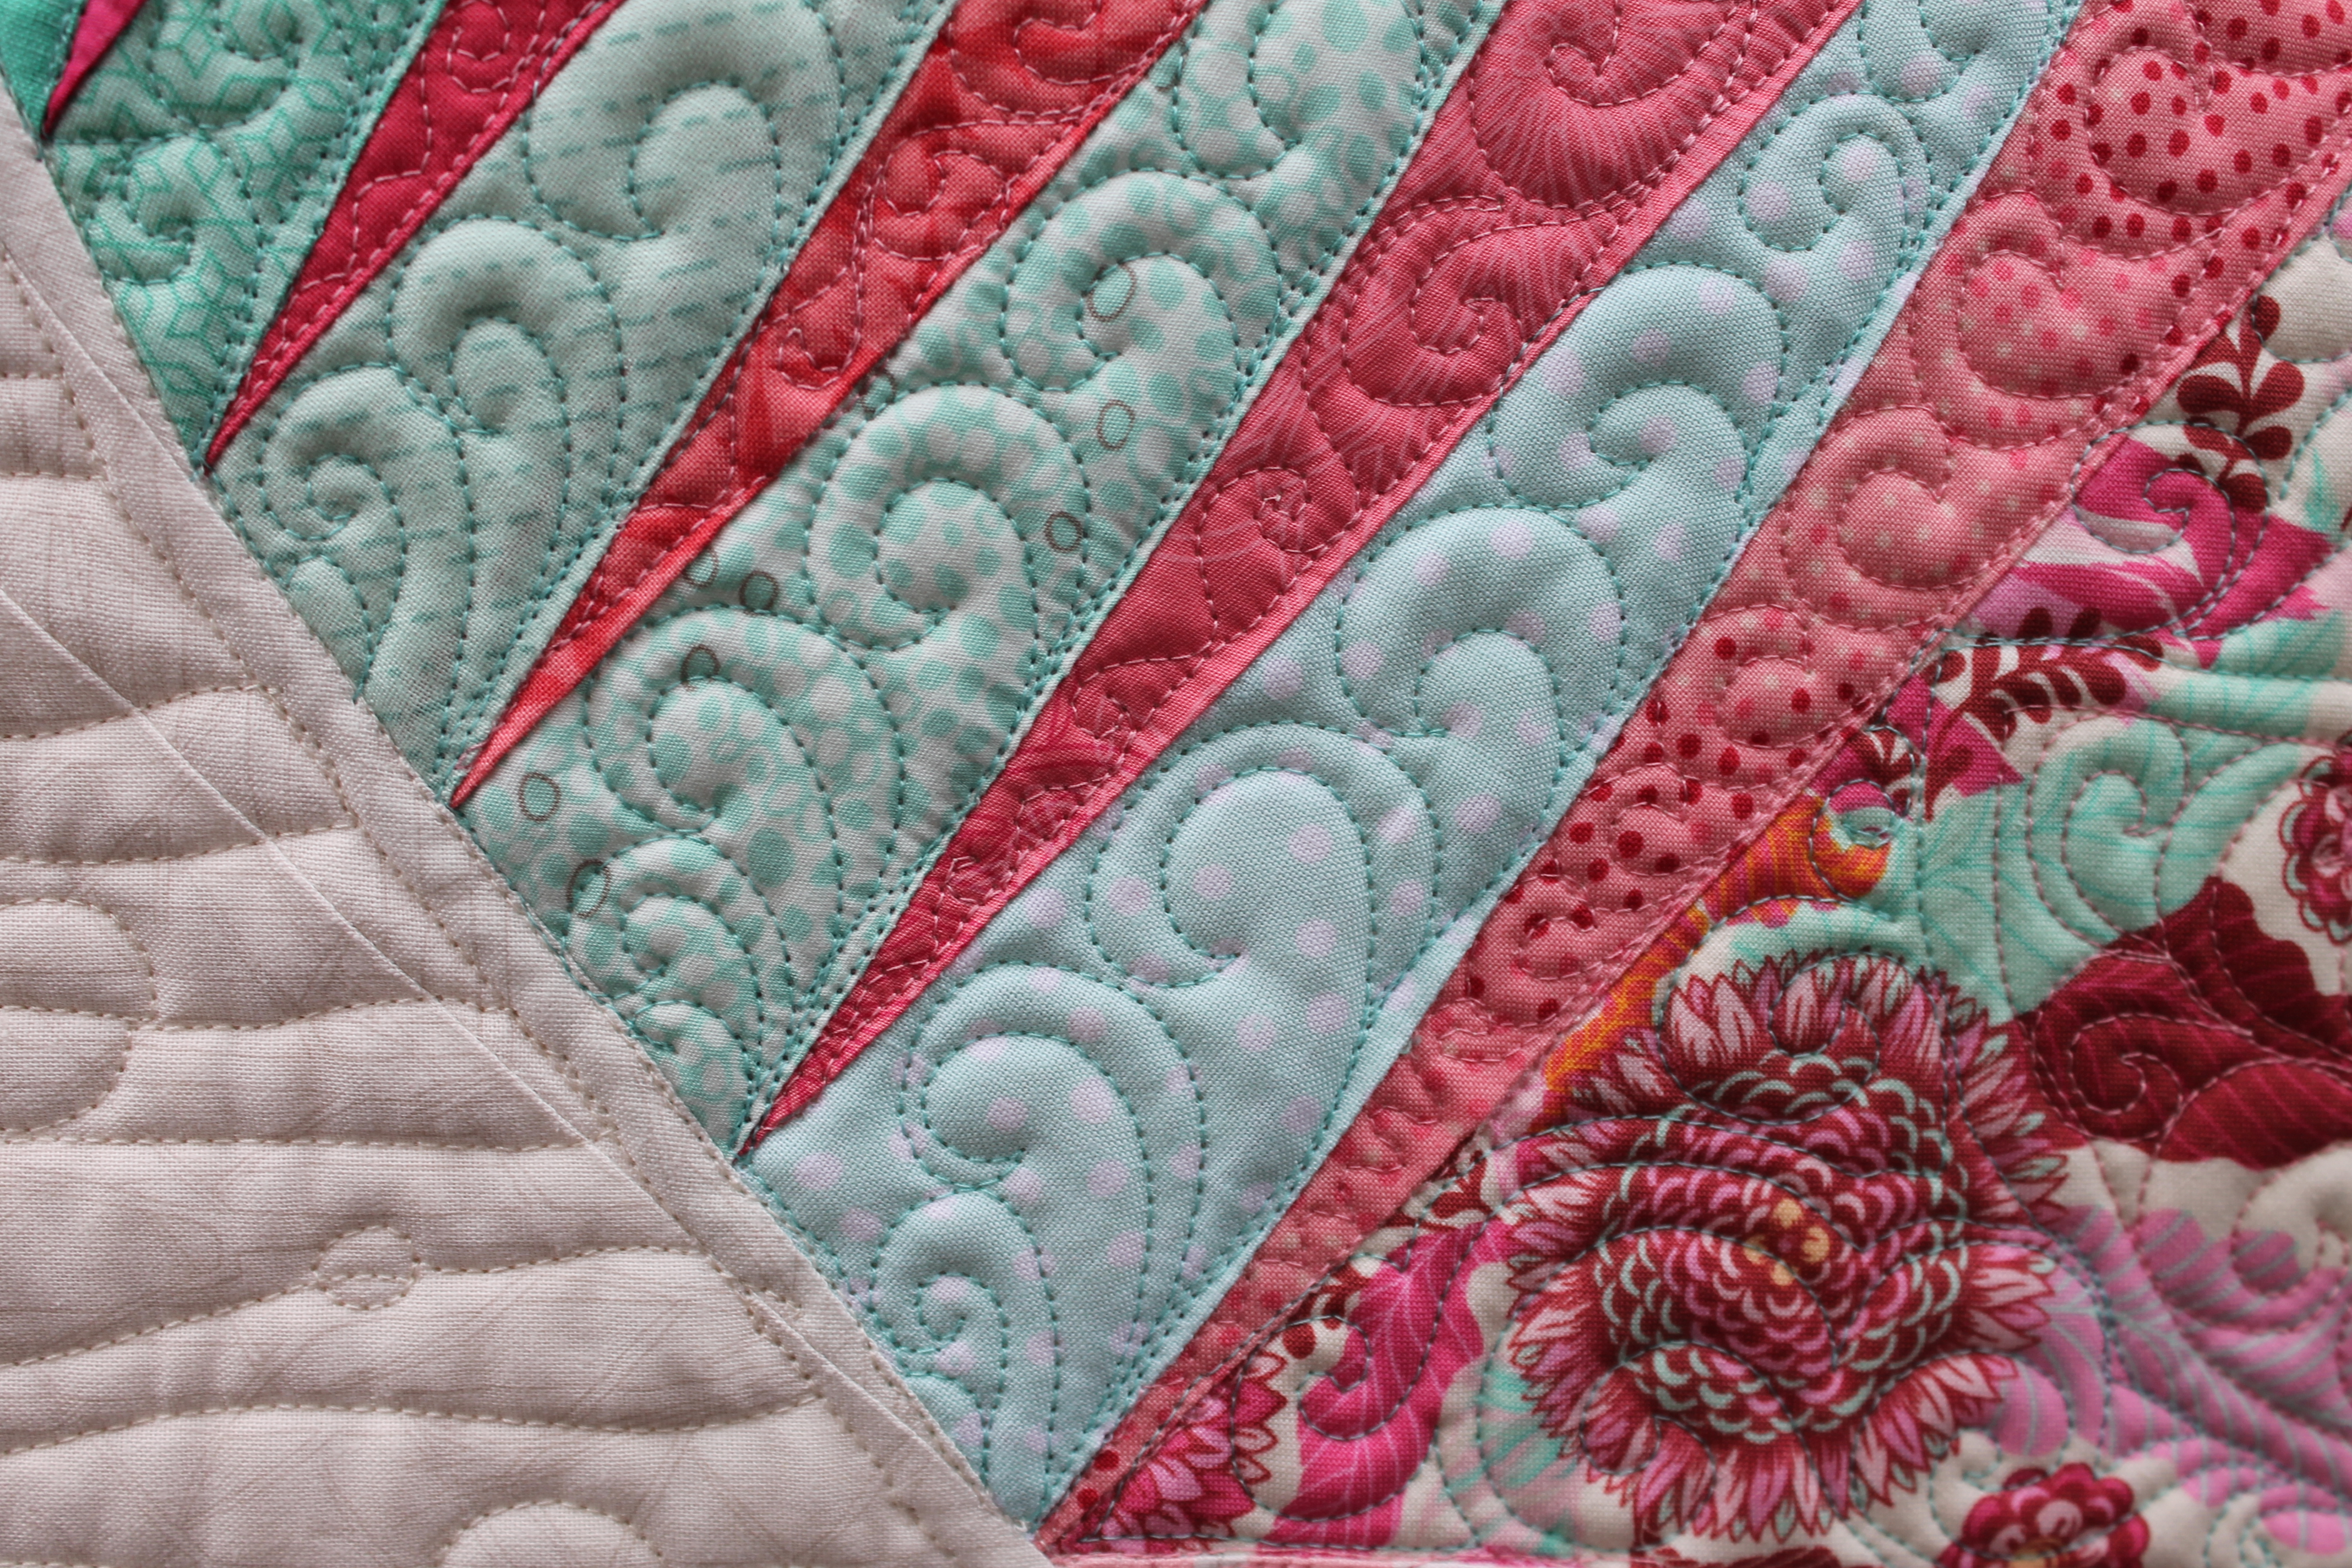
I’m not sure if you can tell from the photos, but I had the BEST time quilting this one! I used a modified motif that I call Zephyr, which is an allover design of swirls and straight lines combines. I first tried it out on Trade Winds, and then refined the design for Flashy. I have used it a few times now on other quilts (to be shown soon!) and its always different every time.

IMG_4718

I also tried out a technique I learned from Krista Withers. I am not the best at ruler work, so I tend to freemotion most of everything. I am definitely going to be making more channels and filling them with pretty fillers in the quilts to come, it’s a great way to break up a quilt.

IMG_4717

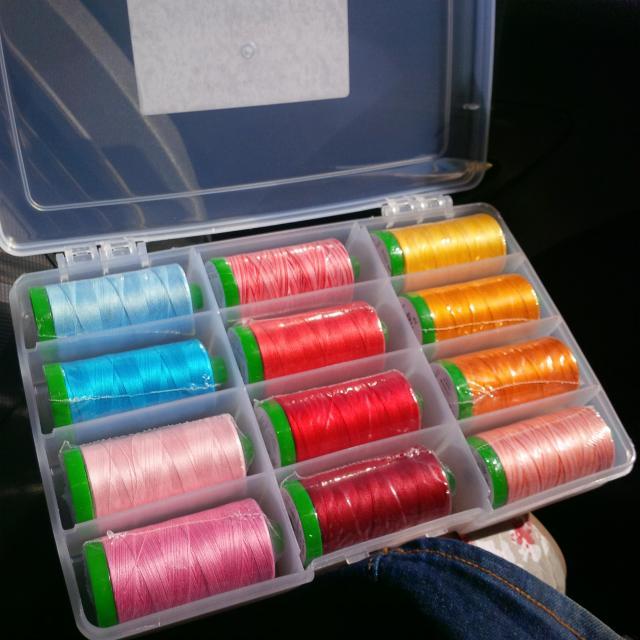
I chose a selection of Oakshott Cottons, sent by the amazing Michael Oakshott himself! HUGE THANK YOU! Oakshotts are a tightly woven crossweave fabric, meaning that the warp threads and weft threads are two different shades or colours, resulting in a fabric with remarkable color, shine, and drape. They are fully washable, I actually prewashed these ( and I NEVER prewash my fabric!). The fabrics are also 53″ wide, so you get way more out of them than normal solids. I absolutely adore the Oakshott cottons, and I have a small stack of cool colours I cannot wait to dig in to. When you order from the website everything is sent overnight from the UK, so it’s as close to instant fabric gratification one can get without physically leaving the house. They are absolutely worth every single penny (or, I guess, Pounds)

IMG_4711

Those of you who are members of the Modern Quilt Guild will be able to download the pattern for free from the Community area of the MQG website. For those that aren’t, patience! The quilt pattern will be available to everyone from me in about 3-4 months (just be sure to send me a friendly reminder and I will get it up and running!) I am currently working on editing Sunshowers to be available soon.


My favorite part of the whole process was when I photographing the quilt. Little H wanted SOOOOO BAAAAAAAD to help hold the quilts, that little hand showed up in every single shot. And I love it!

IMG_4714

I hope you all enjoy making your Slice of Happiness quilt! I love to see pictures, so make sure you tag me on Instagram @staceyinstitches or send me an email!

I am going on a Texas Adventure this week to Quilt Market, and you can follow along on Instagram #staceygoestomarket

Happy Stitching!

StaceyDay_Logo

Hoffman Challenge 2015- Mariposa

Phew!

The last few months have been a whirlwind! Thank goodness for Instagram, or no one would ever see anything! (I am @staceyinstitches for those of you on IG)

Waaaaaaay back in July, I finished up and sent off my Hoffman Challenge Quilt. for the first time ever, my challenge quilt was finished and mailed more than three days before the deadline. Did you know it’s way less stressful to send things before the deadline? Cuz I do now!

Usually I mail so close to the deadline there is no time for pictures or ground shipping, its a 3-day or bust nail biting marathon of RUSH.

So this year was an immense pleasure. And, I also LOVE the quilt!

IMG_4568

My quilt, Mariposa, is a super enlarged version of the Lillyella Stitchery “Take Wing” pattern. The original finishes at 18″x 24″, a perfect mini quilt size. My version finished at 35″x50″!

One of the biggest factors in finishing early was being able to quilt this on the longarm myself, and some excellent color and design advice/support from my friends. I agonize over color choices sometimes, and this was a doozy. There are over 32 different prints!

2015 fabric texture

2015 Challenge Fabric

I knew I wanted to play up the base colors of the Challenge Fabric. I was drawn to the bright fuchsia pink the most. Then I wanted to contrast and play with the prints until I had an ombre effect, with the body the darkest and the wings the lightest. I pulled about 55 fabrics and had to start paring down from there.

selection

The first pull

11195266_10155519947350367_1670985350_n

Finale, finally!

This was the last of about 15 different photos. Amy, Anne, Gillian and Kim (My QDAD peeps) were hugely patient and helpful in narrowing it down to this.

And then I started sewing. First the body, because it was small and easy for me to work my way into. I fussy cut the different textured indigo areas of the challenge fabric to create  different sections of the body, and threw in some of the prints. I used and indog Hoffman 1895 batik to make the textured pieces stand out.

body

Next came the wings. I started with the bottom wings because there were less pieces,and the color gradient for that was a bit easier. i incorporated some more of the indigo into the wings to balance out the center.

IMG_20150506_163624_hdr_edit

And then the big part, the top wings. It took me a week to make each wing, because the pattern pieces were huge, and each section was very large. I don’t normally use pins when paper piecing, but I had to with these pieces. It helped keep the large pieces of fabric steady.There are a lot of bias edges, and some of the pieces were as long as 22″. I could only piece one or two sections at a time before it got too ungainly and I moved on to other things.

But finally, FINALLY! I finished the top wing sections.  And. I. hated. it.

The fabric that I had pulled for the central wing focus, section 1 of 24, did not work at all. It was a print I LOVE for things ( my Rubix quilt, which I will talk more about in a few days, uses it for the background and it’s amazing)

For a split second I panicked. And then I remembered a technique taught to me at Quiltcon by Cristy Fincher, paperless paper piecing! Part of this technique involves glue baste and piecing from the outside in. So in that vein, section 1 would be the last section pieced. So with that in mind I removed some paper, firmly grasped my seam ripper, sent up a small prayer, and began some quilt surgery.

quilt surgery

Once the offending fabric was removed, I carefully grafted in the new section. I used the main print from Tula Pink’s Foxfield collection. I have tons of it, and it had both the pink and aqua accents in it. I fussy cut the fabric to show off my favorite parts. It worked perfectly, and I couldn’t be happier! I then took my new sugical skills ot the body, where I replaced the accent fabric with more of the fussy cut challenge fabric.

wing

Then I took the quilt off to the long arm. I froze for a bit, I knew what I wanted in the wig sections, but the background had me stymied. After a quick consultation with the amazingly talented Mandy Liens I outlined the butterfly and then used my favorite background filler from Christina Cameli’s book Step-by-Step Free Motion Quilting. This particular design is called Effervescent. Its super simple,and super effective.

IMG_4574

Following Mandy’s advice, I made curled feathers. I love how they look like feathers, but don’t require all the back and forth outlining of real feathers.

IMG_4573

The body I had fun with. I used contrasting thread to create patterns and used mostly straight lines. SUper effective!

IMG_4575

I used a custom box of Aurifil Threads that I picked up at a quilt show on the Sunshine Coast, from Carola’s Quilt Shop booth. I love that you get to build the box yourself from any thread in the shop!

IMG_20150502_161048

Then it was binding, labeling, and off to the front yard for photos. I thought in front of the rose tree would be lovely, but alas, no roses in bloom at the time. (you should see that tree now!)

IMG_4572

I mailed it off and waited. Then in late August the winners list was published, and there was Mariposa in Third place in the Pieced Category! I couldn’t believe it! I got this lovely ribbon (new for the challenge), letter, and two boxes of Aurifil thread as well as the participant packet of fabric and a beautiful enameled pin.

11853984_10155912479220367_1761151762_nprixe

I am so happy with Mariposa. She is winging her way around the USA for the next year as part of the Hoffman Challenge Trunk Show. If you spot her in the wild, snap a picture and sent it to me! or tag me on instagram @staceyinstitches #gianttakewingquilt

Happy Stitching!

StaceyDay_Logo

A Day of Thanks

Up here in the Great White North it’s Thanksgiving day. Time for family, friends, and turkeys so huge that they were probably velociraptors in another life.

My favorite part of Thanksgiving is when you go around the table and name the things you are thankful for. It’s just myself and H for dinner this year, so there won’t be a much of a roundtable as usual. So I thought I would share Thanks with all of you!

IMG_4568

“Mariposa” Hoffman Challenge 2015-3rd place pieced category

I am thankful for my family. Without their continuous love and support I wouldn’t be able to accomplish all that I do.

I am thankful for my friends. I have met so many new and awesome people in the last couple years, and each one has had an influence on me in some way, whether it’s in ‘real life’ or online, I am happy to have them!

I am thankful for the opportunity to do what I love every day. I still cannot believe that such a large part of my life gets to be quilting.

And finally, I am thankful for all of you for reading along with my adventures and giving me a reason to blog!

Happy Thanksgiving!

StaceyDay_Logo

The Incomplete Quilt

This quilt tells a story. It’s not an easy one to tell.

Incomplete represents my emotional state over the last few months.  I found it hard to be excited about anything. I no longer enjoyed the things I used to. I was surviving my days. The worst part is I didn’t fully realize how deep into this melancholy I was, or how it was affecting my life and the people I love. I was disconnected and empty. Then about the middle of July I had an eye opening experience, and I was finally able to see what was happening. At about the same time, my friend Amy asked if I wanted to test a block series for her, and another friend had a close family member pass away. Everything clicked for me, and “Incomplete” was born.

IMG_4583


Every part of this quilt represents something. Many of which are personal, and it’s hard for me to open up and talk about things sometimes (this post has take me months to write). From the disconnected little guy in the corner, to the “empty” spaces in the blocks and quilting, and the straight lines across the rest of quilt, everything means something to me.

The one thing  I want to talk about are those blank spots in each block. If you look closely you will see that they are pieced with a white solid that is not the same shade of white as the rest of the quilt. Those blank spaces were really pieces that were still there, but just had to be rediscovered. Parts of me weren’t actually missing, I just needed to see them in a different light in order to find them again. It took patience, understanding, and help from my family and close friends. I will forever be grateful to them.

Incomplete- A quilt about feelings

Now I can happily say that if I were to test this block again, it’d be a lot more full and colorful.

The rest is hard to put into words. This quilt serves as a reminder of what’s behind, and what’s ahead, and no matter what, you will never actually lose yourself. Sometimes you only need a little need help to see.

Thank you all.

StaceyDay_Logo


Going Up- A Free Pattern Download

Its been a long busy summer, with so many things that I just cannot share at the moment. So I thought I would carve some time out and do something that I could share with you!

Meet “Going Up”

IMG_4690

I used some of my favorite fabrics from my stash, and it was lovingly pieced by Holly Broadland @hollybroadland . The quilting is a medium grey thread, and Joan of Maple Leaf Quilters did a great job straight line quilting this on her long arm for me.

IMG_4687

Going Up is one of the patterns from the book that never was. I finally got motivated enough to illustrate it and try to take some pictures (solo outdoor pictures with a white quilt on a sick day? Yeah, that was really smart of me) But they turned out not half bad and I was rewarded with a visit from an actual real live bumble bee. I took more pictures of him than I did the quilt!


That bumblebee was exactly what I needed today. I have been sick for a few days, and feeling overwhelmed with responsibilities at home and at work. Watching that little guy, standing in the warm summer sun, I felt a peaceful calm fall over me. I was able to relax and enjoy the moment. It has been a dry, hot summer with severe drought conditions, so its no small miracle that we have these teeny tiny flowers for him to enjoy. Some shots even show the pollen as it bursts from the flower while he works.

I feel busy as the little guy for sure!

Going up is available as a free download from my Craftsy Pattern Shop. I have some other great patterns there too, so have a look around and enjoy!

Happy Stitching

StaceyDay_Logo


The Flashy Quilt- A free pattern

A few weeks back I was contacted by Michael Miller Fabrics, to see if I wanted to make up a free pattern for a new line of metallic prints, “Glitz Garden”.The fabrics are gorgeous and have metallic detail, which I love.  The catch was that they only wanted the “Glitz Bars” fabric in the quilt. Well, you all know how much I love a fabric challenge, so of course I said yes!

A little frame block and fussy cutting later, I came up with “Flashy”.

IMG_4459

The name comes from the layout, to me it looks like the flash of a strobe light or set lighting. I used the metallic bars (which are evenly spaced! woot!) to create a secondary pattern. The blocks all have mitered corners, so fussy cutting is really effective.

The quilting for this one gave me pause. I was determined to do an all over swirl, but Fashy was made when I was still learning the art of the long arm, and swirls were getting a little….boring. It needed something to break the swirls up and compliment all the striaght lines. So, add some straight line quilting!

This was the first quilt where I combined the swirls and straight lines, the motif I used in my Trade Winds quilt, only these lines went vertical instead of horizontal. It was liberating and a lot of fun. I used a white Aurifil thread, and it hides well over the colored fabric.

IMG_4462

The metallic details in the Glitz Bars are suprisingly soft and easy to sew with. The quilt comes together fast ( I made most of it at my frind Kristie’s house during one of our late night sewathons) and the white space means there are tons of quitling options, from simple to sublime.

You can find a permanent link to the pattern in the Free Patterns section of the blog.

Happy Stitching!

StaceyDay_Logo

AQS Pattern Series Launch

I am so happy to be writing tonight, because I finally get to tell you all about my new online only pattern series with American Quilter Magazine!

We set this up back in November, when I made the Whirlpool quilt, and I have been working away since then on a 5 quilt series. The patterns are downloadable on the American Quilter website, just click here for a direct link. The pattern series will use a variety of techniques, from applique to paper piecing, and will cover a broad range of skill levels.


First in this series is Photobomb.

photobomb

Photobomb is one of my favorite designs. Originally for the book that never was, AQS liked it a lot and agreed to use it as the first quilt in the series. It combines traditional lone star construction with raw edge applique and an improv layout. I always thought this quilt would look great resized as a baby quilt in rainbow colors, so I might have to make one and see if I am right!

The quilt was inspired by one of my favorite placed to take photos. The walkways are cement square tiles with inlaid rock mosaics spaced out around the center fountain. The fountain has a beautiful carved sunburst, which always appeal to me and my love of stars.

IMG_4345My good friend Joan at Maple Leaf Quilters did an amazing custom job for me. The white areas are all quilted in a freehand paisley, the black borders have a ribbon candy pattern, and the stars segments are filled with orange peel echos. I just love it!

IMG_4353


The layout possibilities are endless with Photobomb. The background can be plain solid, or pieced with smaller sashes, the stars can be put anywhere you want, borders can be replaced with facings, the list goes on!

I am going to be offering this quilt as a workshop, so if you or your guild is interested, please feel free to contact me. I have a lot of tips and tricks to share and techniques to teach.

As usual, I want to see what you are making! Tag me on Instagram @staceyinstitches, #photobombquilt, send me an email, or upload your quilt to the Stacey Day Quilts group on Flickr.

Happy Stitching!

StaceyDay_Logo


It’s Worth WHAT?!?- The Feather Quilt and a retreat

Last weeked I had the immense pleasure of attending one of Krista @poppyprint wonderful Quilting By the Bay retreats. Its a 13 hour day full of sewing, great food, and great friends. I managed to find a sitter for the entire day, so I was off and away bright and early that morning.

SDQ retreat

A gorgeous view in beautiful Lions Bay!


As usual, I brought waaay to much stuff with me, but I would rather have it and not need it, than need it and not have it. My biggest goals for the day were to finish up a longterm project, by BTW challenge quilt for the Pacific NorthWest show, and do my Riley Blake MQG challenge quilt. If I had time, I was going to play with making some Anna Maria Horner feathers, since I love them so much! I was reminded of them from a recent Molli Sparkles post and decided I really wanted to make some at one point in the day.

SQD table

A table with a view, amidst my fellow VMQGers!


I did manage to get most of my blocks sewn together from the long term project, but got bored waiting for the iron, and decided to put the rows away ( I know, I know, only 5 seams left, it’s just not a priority right now) and star on my BTW challenge quilt. I made up a design using only the Black to White fabrics, in a very effective grayscale. I had purchased a whole bunch of Cotton and Steel Black and White fabrics, and ended up with none of them in the final design for the quilt. By the time I finished sewing up the 256 Half Square Triangles, I was pretty bored of that too. I just wasn’t feeling it (To put some perspective on my strange mood, this was the first time in almost 2 weeks that I actually spent any time on my machine. I was burned out, and feeling it. I made a skirt at some point in there, but it doesn’t really count. Garment sewing is a whole ‘nother creature from quilting).

SDQ Trimmings

Holy Trimmings Batman!


I had a big, bright bundle of Hadley by Denyse Schmidt in my bag, and the templates and instructions for the Anna Maria Horner feathers, and I decided to play around with that. Only, as I was digging for the big, colourful bundle, I instead pulled out the Cotton and Steel fabrics that didn’t make it into the first quilt, paired with a lime green C+S basic (Dotties Cousin is the name of the print). It hit me then, that these particular fabrics together would look exactly like seagull feathers! Living on the coast, seagulls are a stable fixture in the environment. At the beach, in the parking lot at the store, or pretty well anywhere there is a chance of free food. Especially along the pier and beach at White Rock, which is a favorite spot for us.

A table full of feathers

A table full of feathers

I worked my way through the pattern, made a couple tweaks, and had enough strips cut from my fat quarters to make 11 feathers. Perfect for the baby quilt size. I had just enough white to make the surrounds, but had to borrow the solid black for the insides because I mistakenly grabbed an old poly-cotton blend that just didn’t work with the other fabrics (Thanks @FelicityQuilts!). I finished sewing the feathers together at home the next morning, added strips to the sides to make the quilt wider, and then backed it in another C+S print. The next day I booked my time on the longarm, and got to it! I chose a pattern of curved/straight lines and bubbles. I believe its is called Effervescent? Either way, it’s from the book Step-By-Step Free Motion Quilting by Christina Cameli.

Day.Stacey-Feathers-FULL

Feathers (Unofficially called Squack!)


IMG_4567

Quilting detail! This is one of my new favorite background fills

I color bombed the binding, and then hand sewed the whole thing, label and sleeve notwithstanding. I love my Feather quilt so much, I decided to completely forgo the original design and use this in place as my BTW entry. As I was filling out the entry form, I got to the section that asks if you want to sell your quilt. I decided to use the Molli Sparkles spreadsheet to see just how much, exactly, this quilt was worth.

Feathers Cost Sheet

HOLY CRAP! ITS WORTH WHAT!!!!

Let me clarify a couple points in this spreadsheet. I am an award winning quilter, an author, teacher and lecturer. I have more than 15 years of experience quilting. $33/hour is reasonable for a skilled and experienced artist. Quilting cotton in Canada is expensive, with solids starting around $10/yard and designer prints upwards of 17.99/meter, and Cotton and Steel in particular is at the upper end of the scale. The shop I purchased them from charges 16.99/yard, and I only charged for the actual amount of fabric used. The longarm rental is a flat rate of $60/day. There technically would have been the cost of babysitting and the retreat in there, since thats where I was sewing, but I didn’t include it. Then there is the 23% that the PNW takes as commission for selling your quilt (12.5% for two NFP entities) so that 30% markup is really only 7% for myself. Not much, considering most businesses mark up their products 50% or more ( I worked at a shoe store once, and made the mistake of checking the invoice. Our cost, $5.00, our retail price, $89.99, that’s an 1800% markup!) And Canada Post is mega expensive, even with my discount card, and that cost is a low estimate based on what it usually costs me to package and send off quilts to the lower US.

I never would have put this quilt at almost $900, but there it is! Personally, when I make a quilt for myself and as gifts, I don’t take cost into account. Especially with gifts, because friendship is priceless. But if you go and read through the We are Sew Worth It series from Hunter Studios, Molli Sparkles, and Sew Mama, Sew, it starts to make sense. When someone seeks out out to request a quilt, you are spending a lot of time, energy and money to make said quilt. Our time and skill has worth!

StaceyDay_Logo

The Rose Medallion Quilt

Back in October I was asked by Freespirit to come up with a quilt design for one of the new collections they were unveiling at market, Lulu Roses by Tanya Whelan. The quilt was made, it was displayed, and then the lovely people at McCall’s Quilting picked it up for a future issue.

Rose Medallion for Lulu Roses Collection By Tanya Whelan for FreeSpirit

Rose Medallion for Lulu Roses Collection By Tanya Whelan for FreeSpirit

Finally, I can tell you all that the Rose Medallion Quilt pattern is available! You can find it in the July/Aug issue of McCall’s Quilting magazine, and on the front cover no less! I probably don’t have to tell you how thrilled I was, but I will! And surprised! Rose Medallion was a lot of fun to make,and I am very happy with how it turned out, and the quilting. I did everything on my domestic machine. Pre-marked and with a walking foot. That crosshatching was painstakingly calculated and carefully drawn, then quilted so that it didn’t stretch the background. All those lines are stitched on the bias.If I had thought too hard about it, I might have done something different, but I am glad I went with it. It reminds me of a garden trellis, and the medallion is a giant flower on display. The mitred borders are the best feature of the entire quilt. The tiny inside border is actually 3D!

Cover-500px

The magazine should be available very soon on your local newsstands, but for those of you who cannot wait, you can get the digital issue from the McCall’s website, just click here! The issue has some great projects for any style and skill level. There are a couple in there I want to make for H’s new bed, and for a lap quilt (though of course for me a lap quilt is pretty much a queen!)

You can see all the gorgeous projects, including my own Rose Medallion, in the Issue Preview video on the McCall’s Facebook page. And if you love the quilt just that much, McCall’s is even offering it as a kit! Woot!! You can pick yours up on their website, or clicking here. 

Rose-Medallion-600px


I hope you all enjoy the magazine! As always, I love to see what you are making. Tag me on instagram @staceyinstitches, add your picture to the Stacey Day Quilts Flickr group, or send me an email with your Rose Medallion!

Happy Stitching,

StaceyDay_Logo