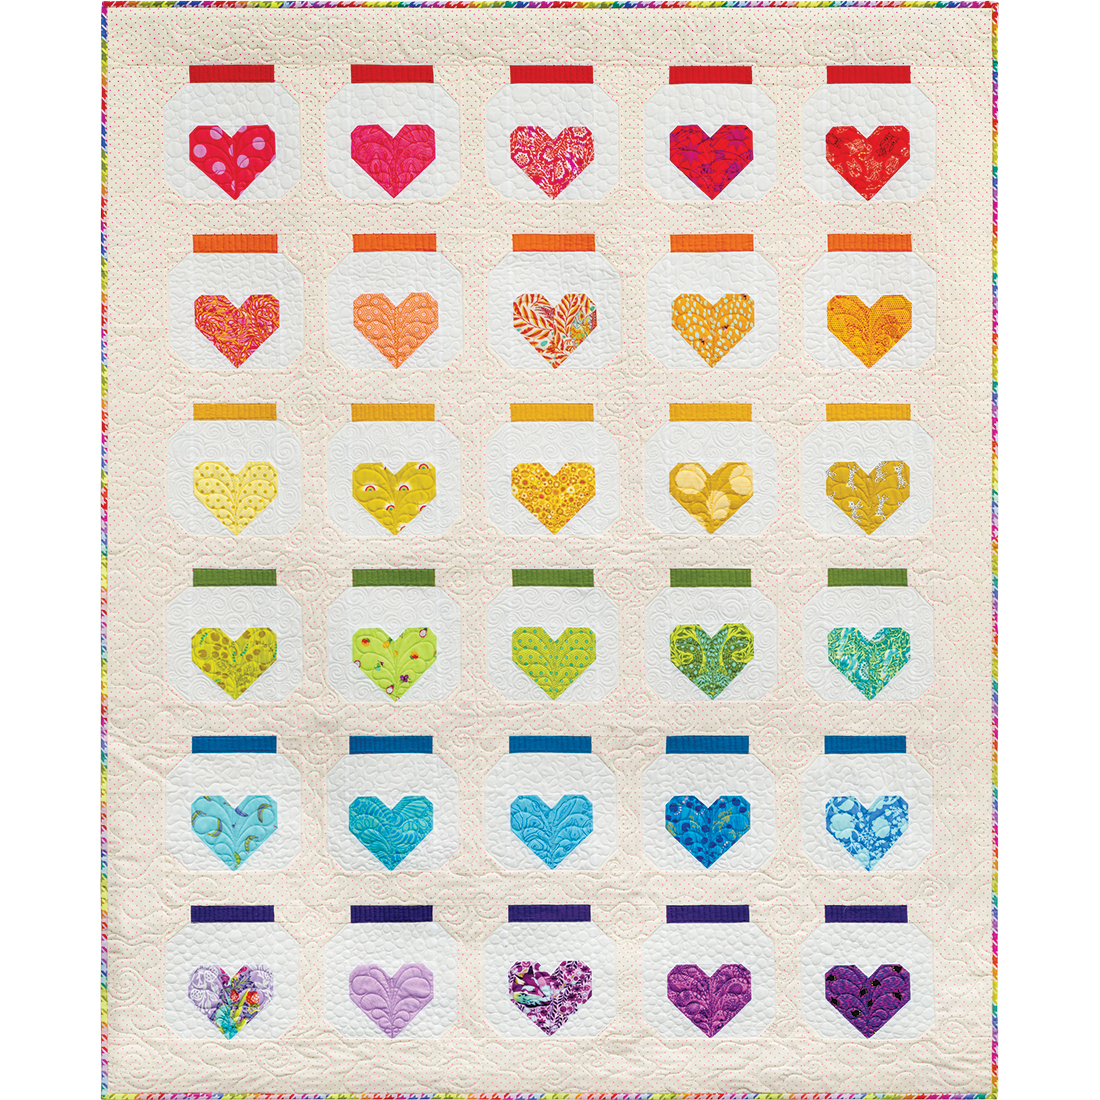
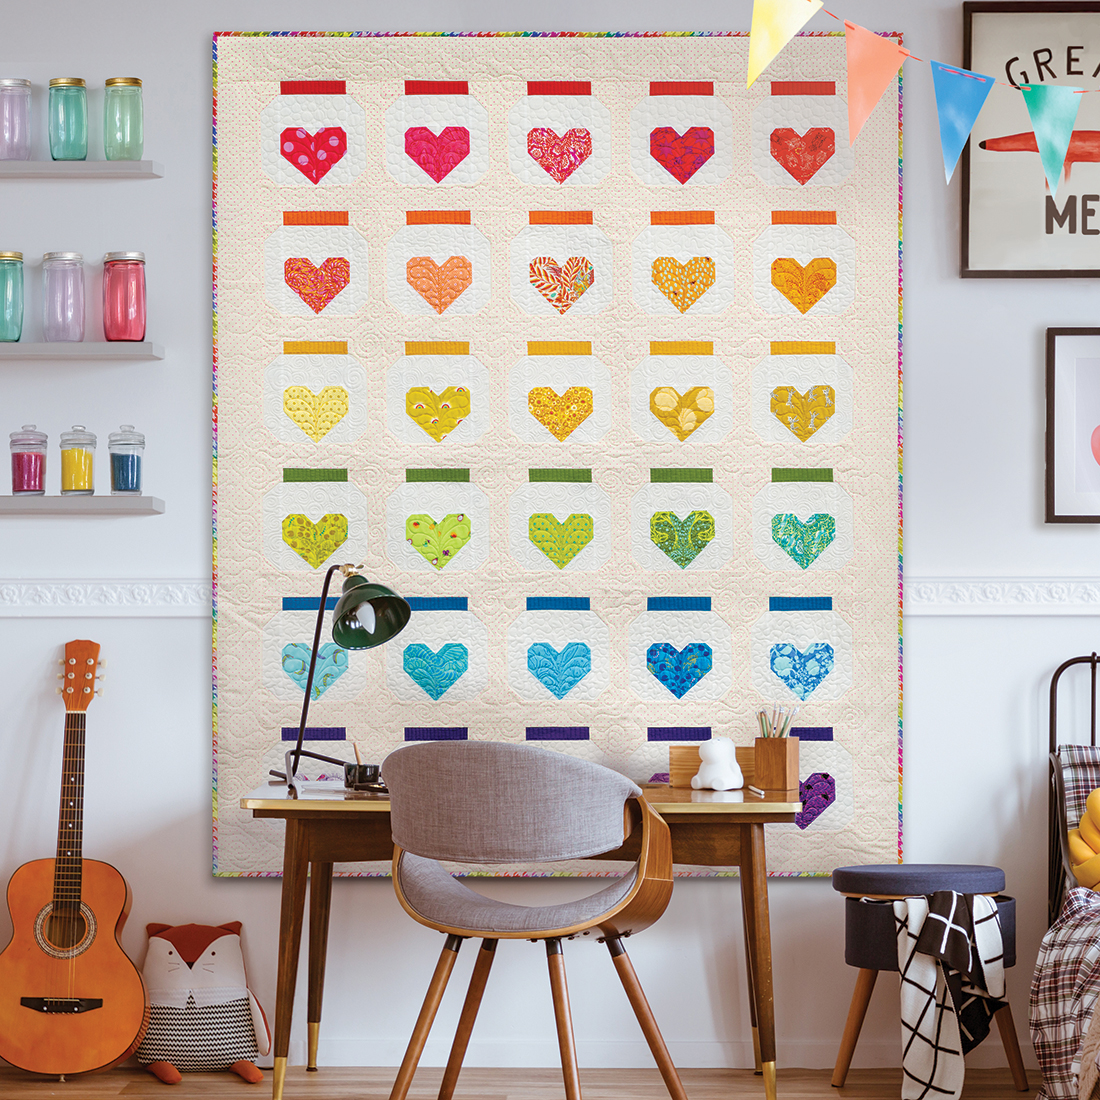
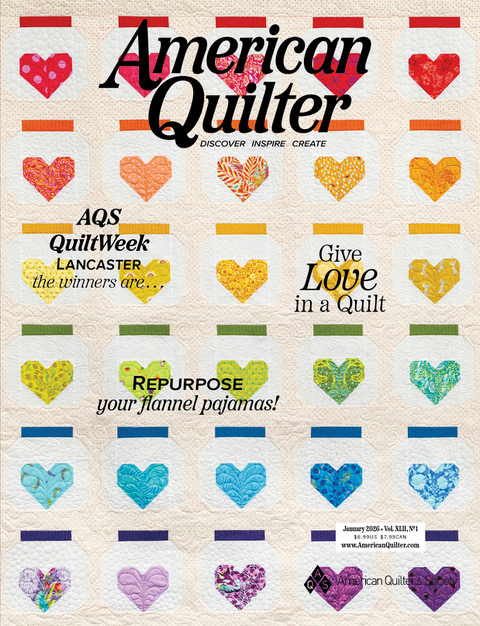
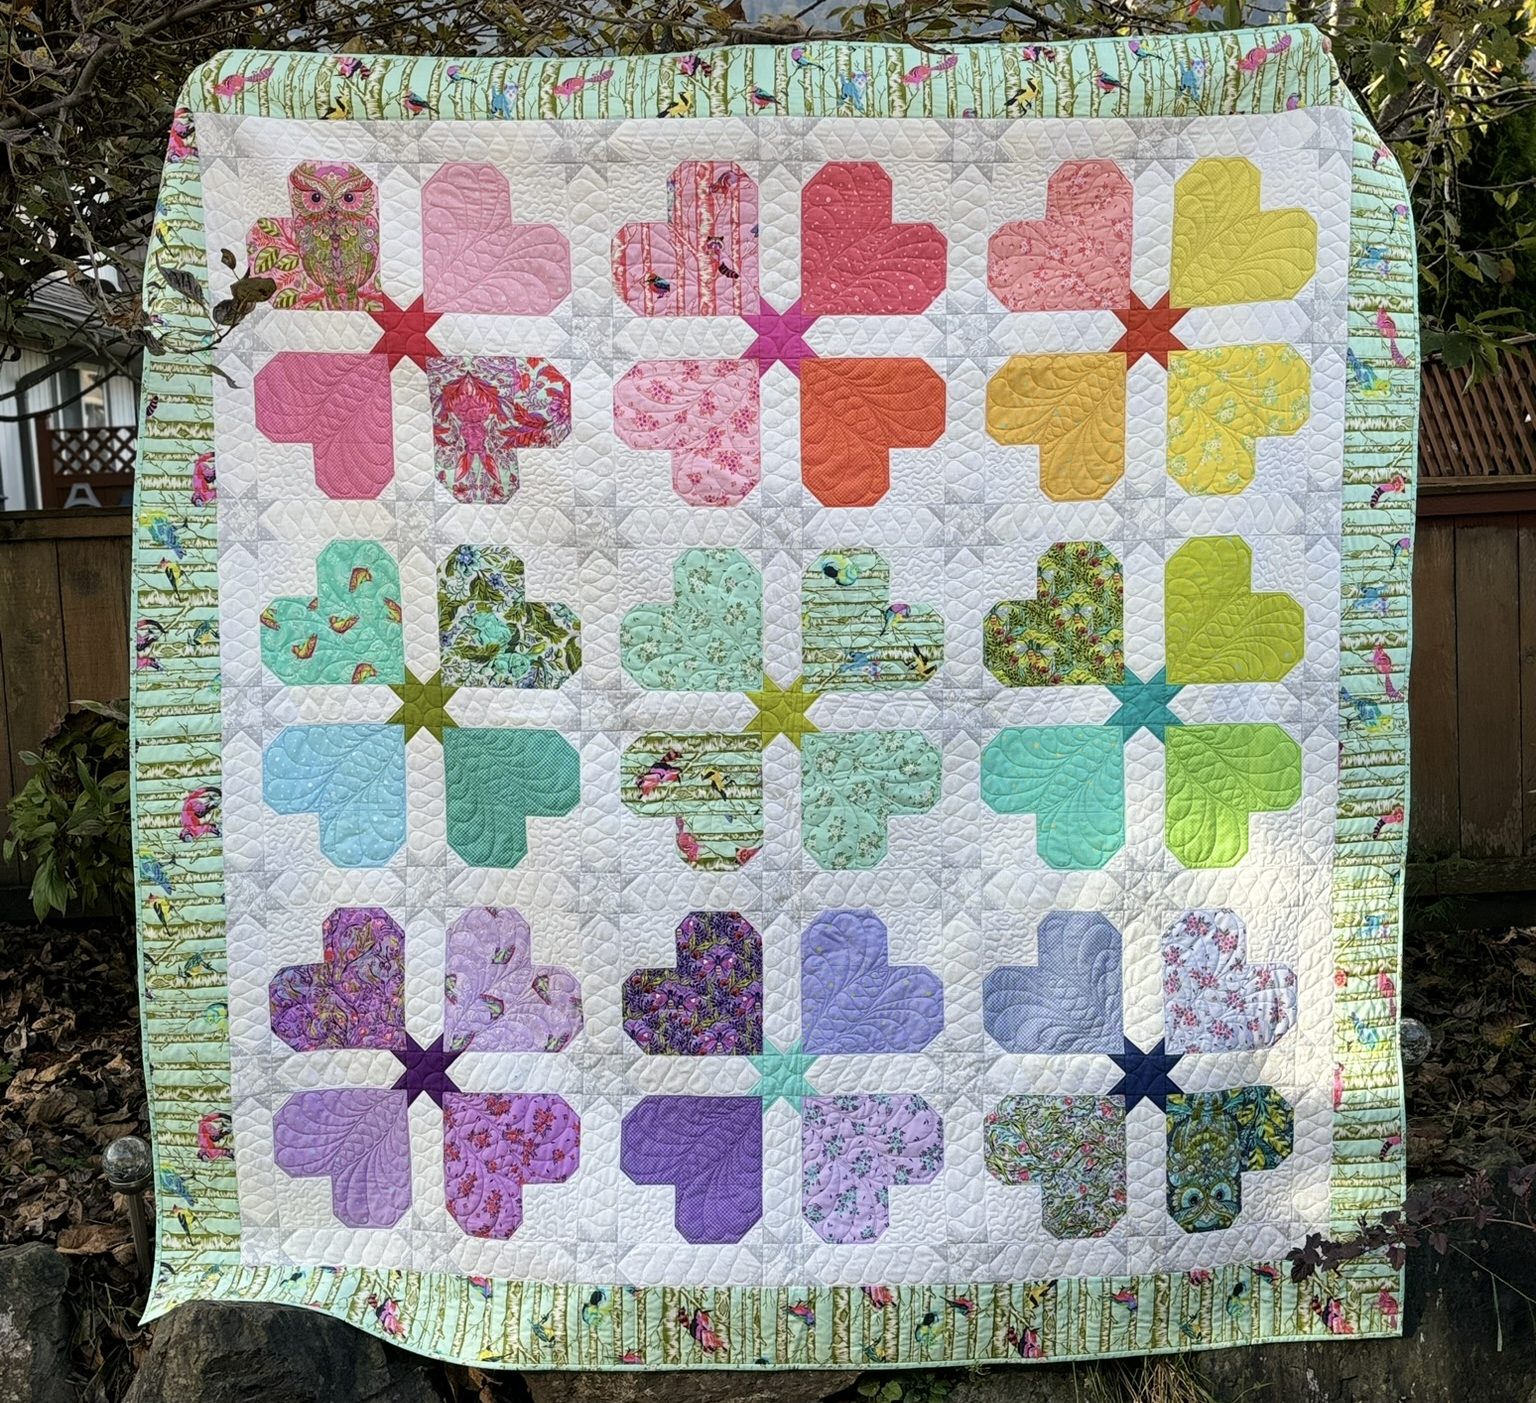
We are kicking it off strong here at Stacey In Stitches, with a brand new quilt and pattern! Presenting Jar of Hearts, my contribution to the January issue of American Quilter Magazine. I am so thrilled to be featured on the cover. May this year bring you love, peace, and happiness!
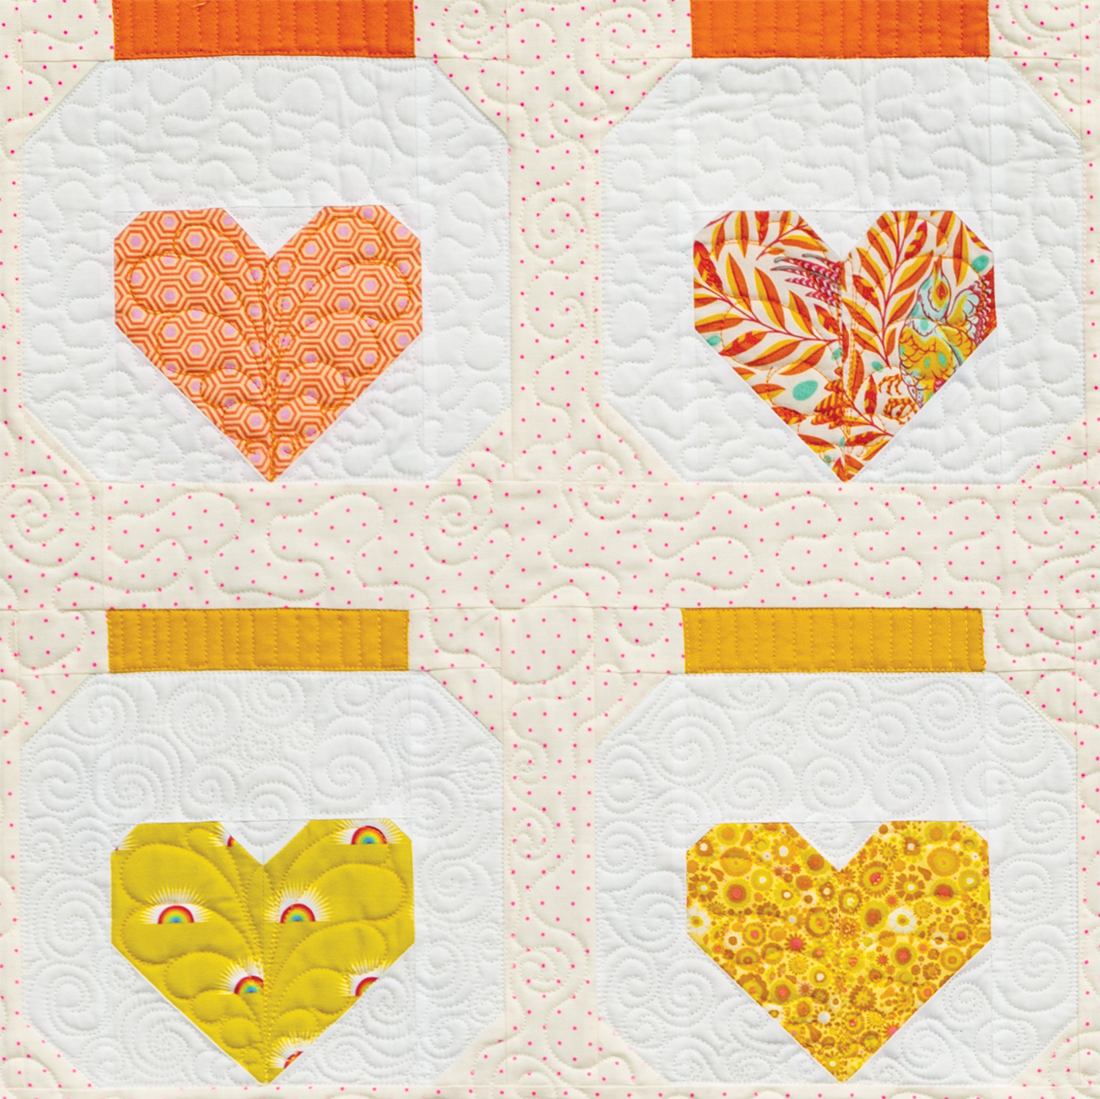
Jar of Hearts is bright, colorful, and full of my favorite fabrics from the past few years. Each jar block holds a memory perfectly preserved in fabric. This quilt is perfect for using scraps of your favorite fabrics. It finishes lap size, but can be resized quickly and easily by making more blocks.
My version is definitely a child friendly version with its bright rainbow fabrics and layout. The best part of this quilt as a memory quilt is no two will look the same. Try subsituting the solid jar “lids” with a stripe or metallic print. Change up the background fabric to a bold or bright solid. The possibilities are endless.
For my quilting, I used a combination of stipple/swirls for the background, my feathered butterfly for the hearts (the same one I used on Sweethearts) and a different dense filler for each row of jars.
The January issue of American Quilter is available now! I cannot wait to see what you make!
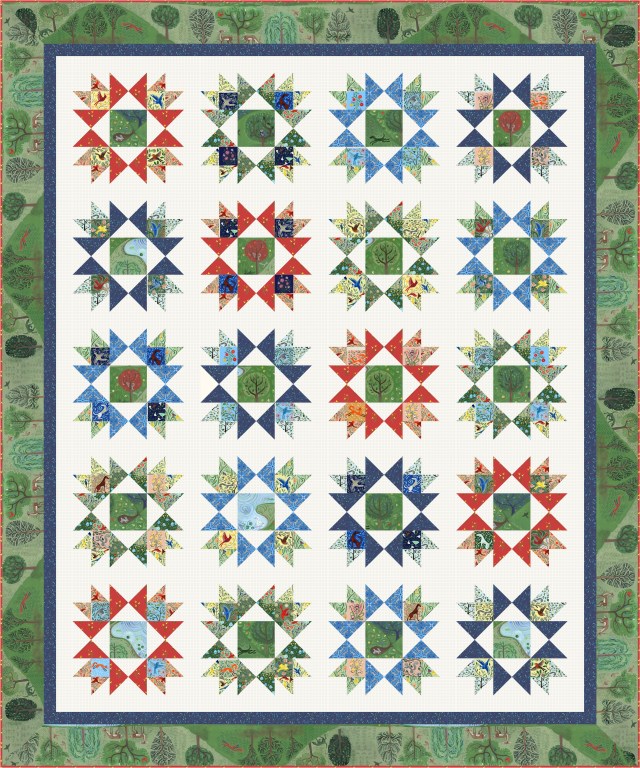
Grayworks by Tula Pink is a follow up collection to her 2020 black and white collection Lineworks. Designed to fill in the spaces between black and white, Grayworks adds depth and dimension – and a classic Tula pop of color- to your quilts.
Grayworks has 8 feature prints – all animals that “live their lives in shades of grey”. From polar bears to puffins, leopards to seals, there is something for everyone in this collection. As a Canadian, it was a great feeling designing with animals that call Canada home. Yes I know, leopards don’t hail from this far north, but we are home to other large cats, so I am counting it!
By far my favorite print is the Puffin. Tula managed to represent them as both adorable and elegant, which is no small feat! (also, they have small feet, tee hee!!)
Huffin & Puffin
I designed two quilts for this collection. Normally for Tula I create extravagant over the top quilts with dozens of colors. For Grayworks, I really wanted designs that were accessible to all levels of maker.
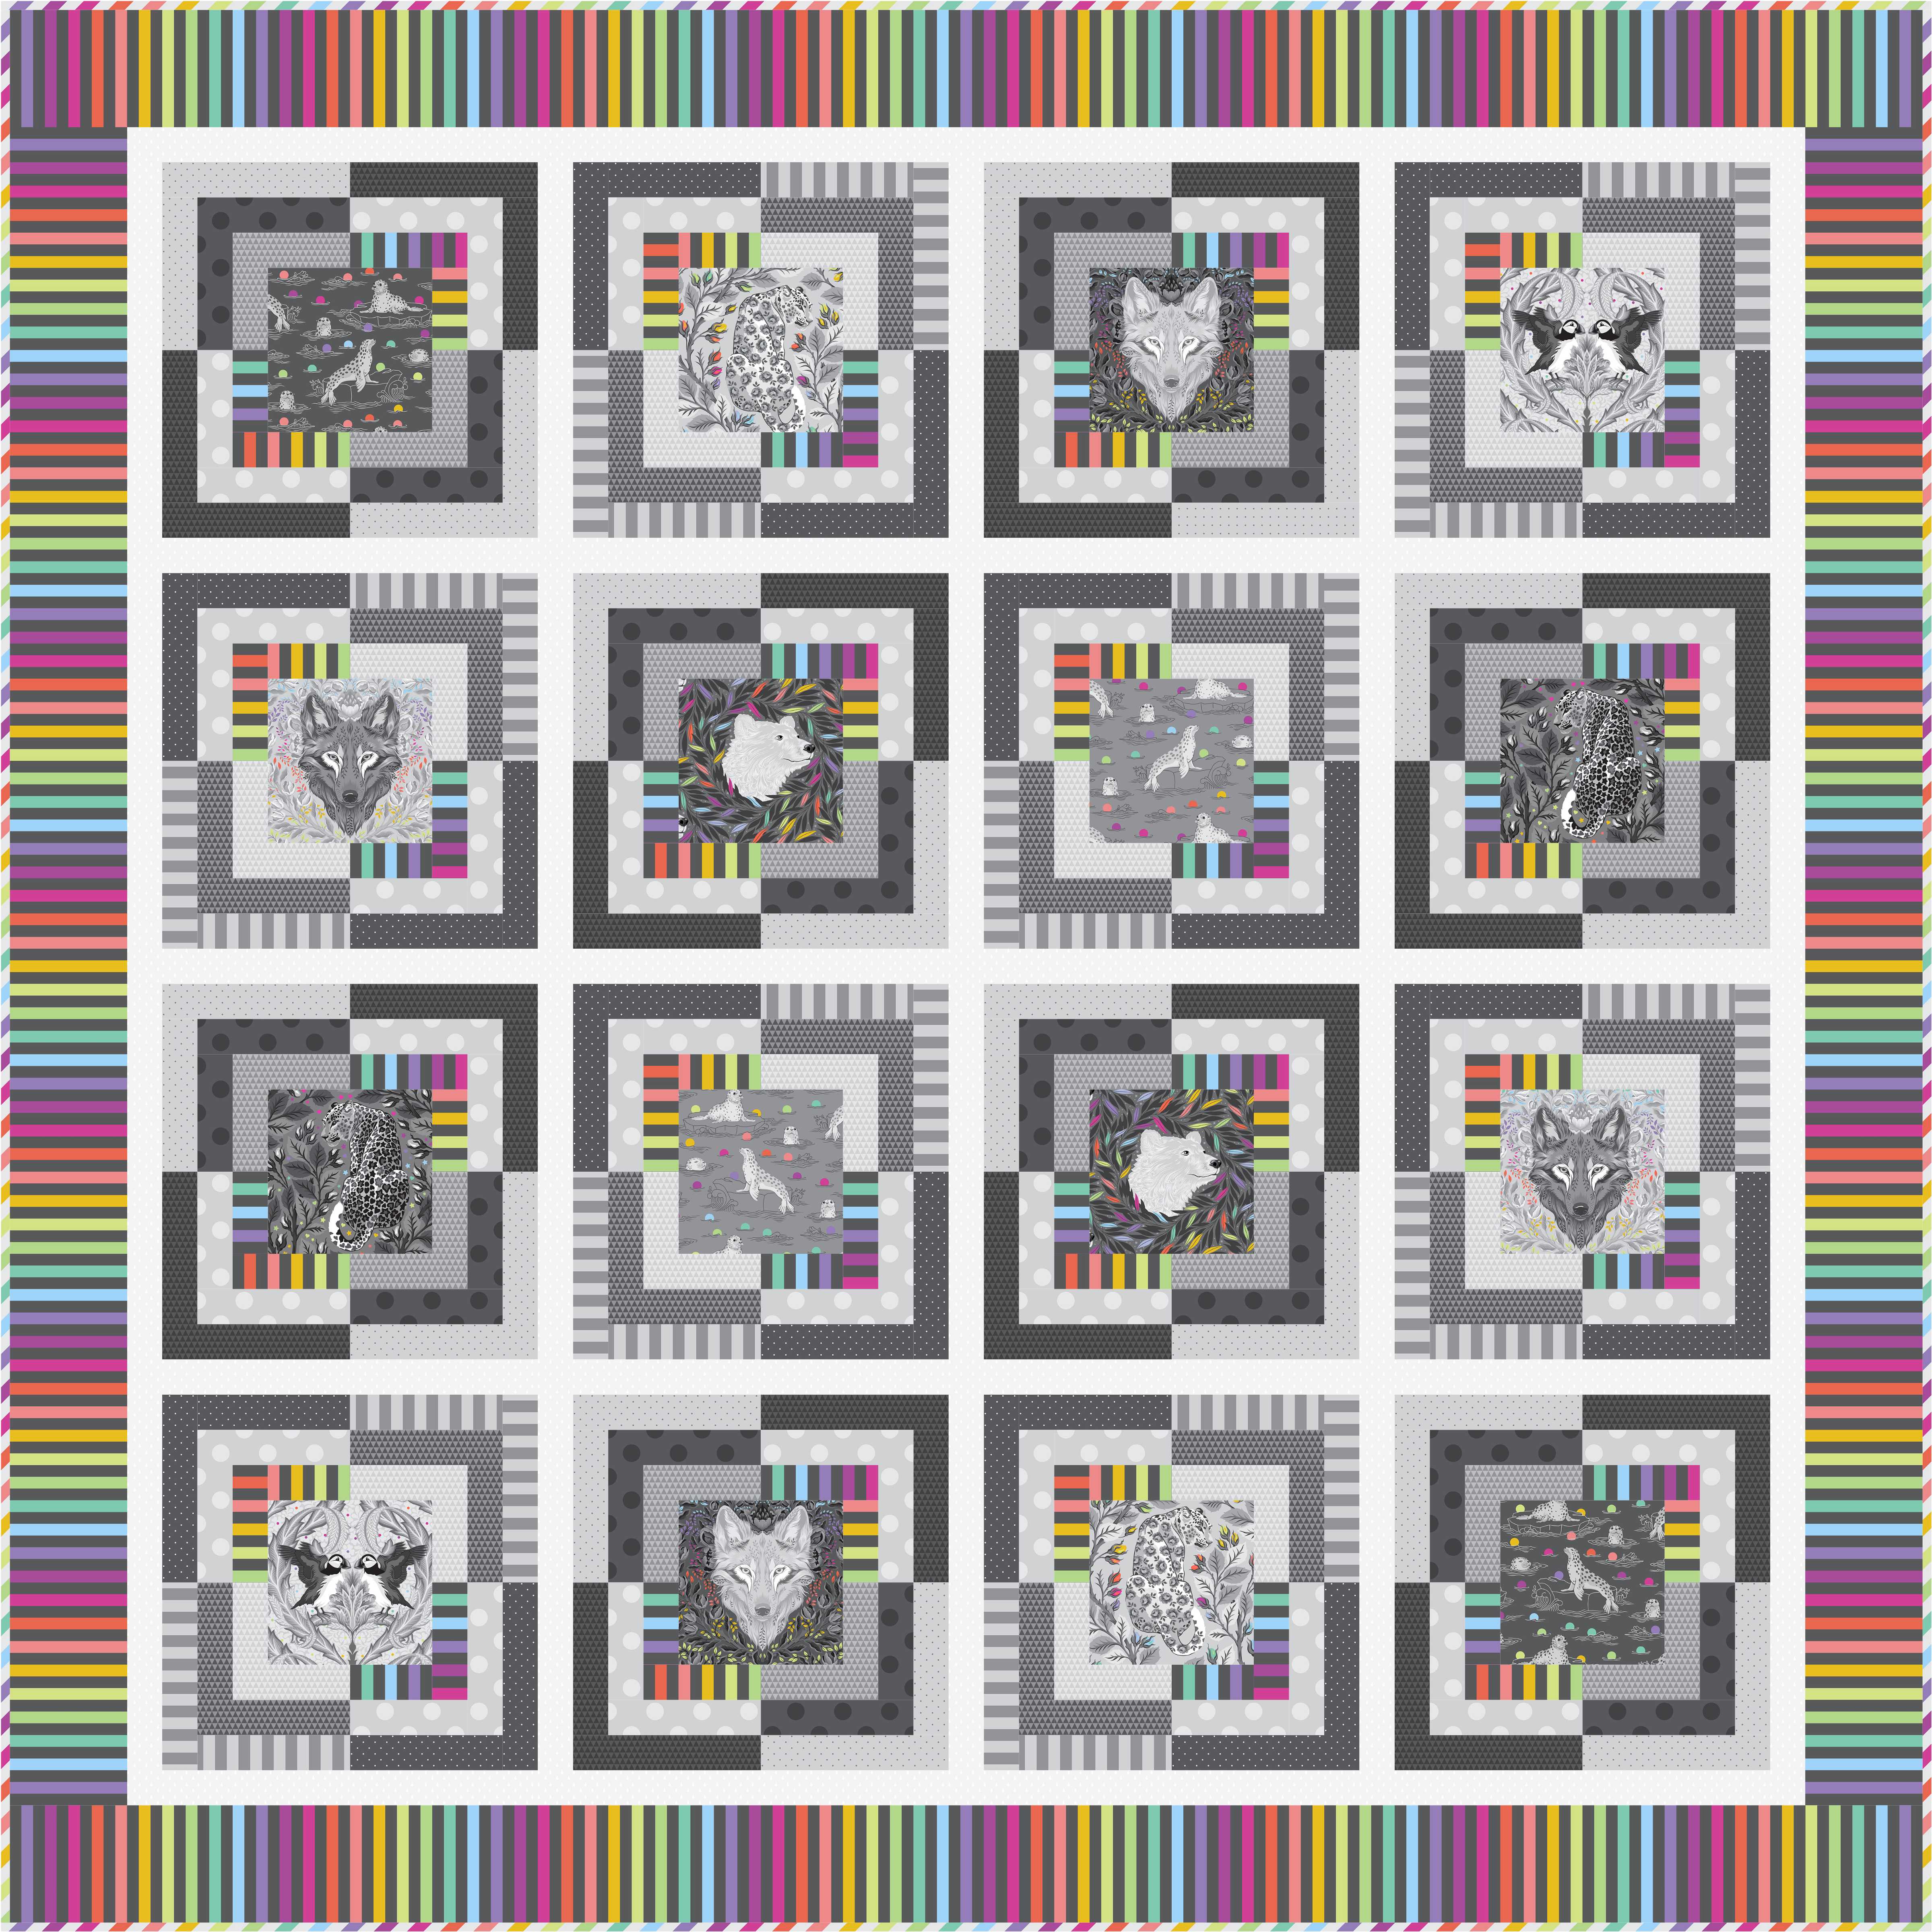
First up is Cool Vibrations. I wanted to capture the feeling of the northern lights, but in a modern way. I used the Disco Stripe for my pop of color, and fussy cut all the creatures for the centers.
Next is Crossroads. It’s a fussy cut extravaganza that sews up quickly and easily. I love the Disco Stripe, and wanted to use it as much as possible.
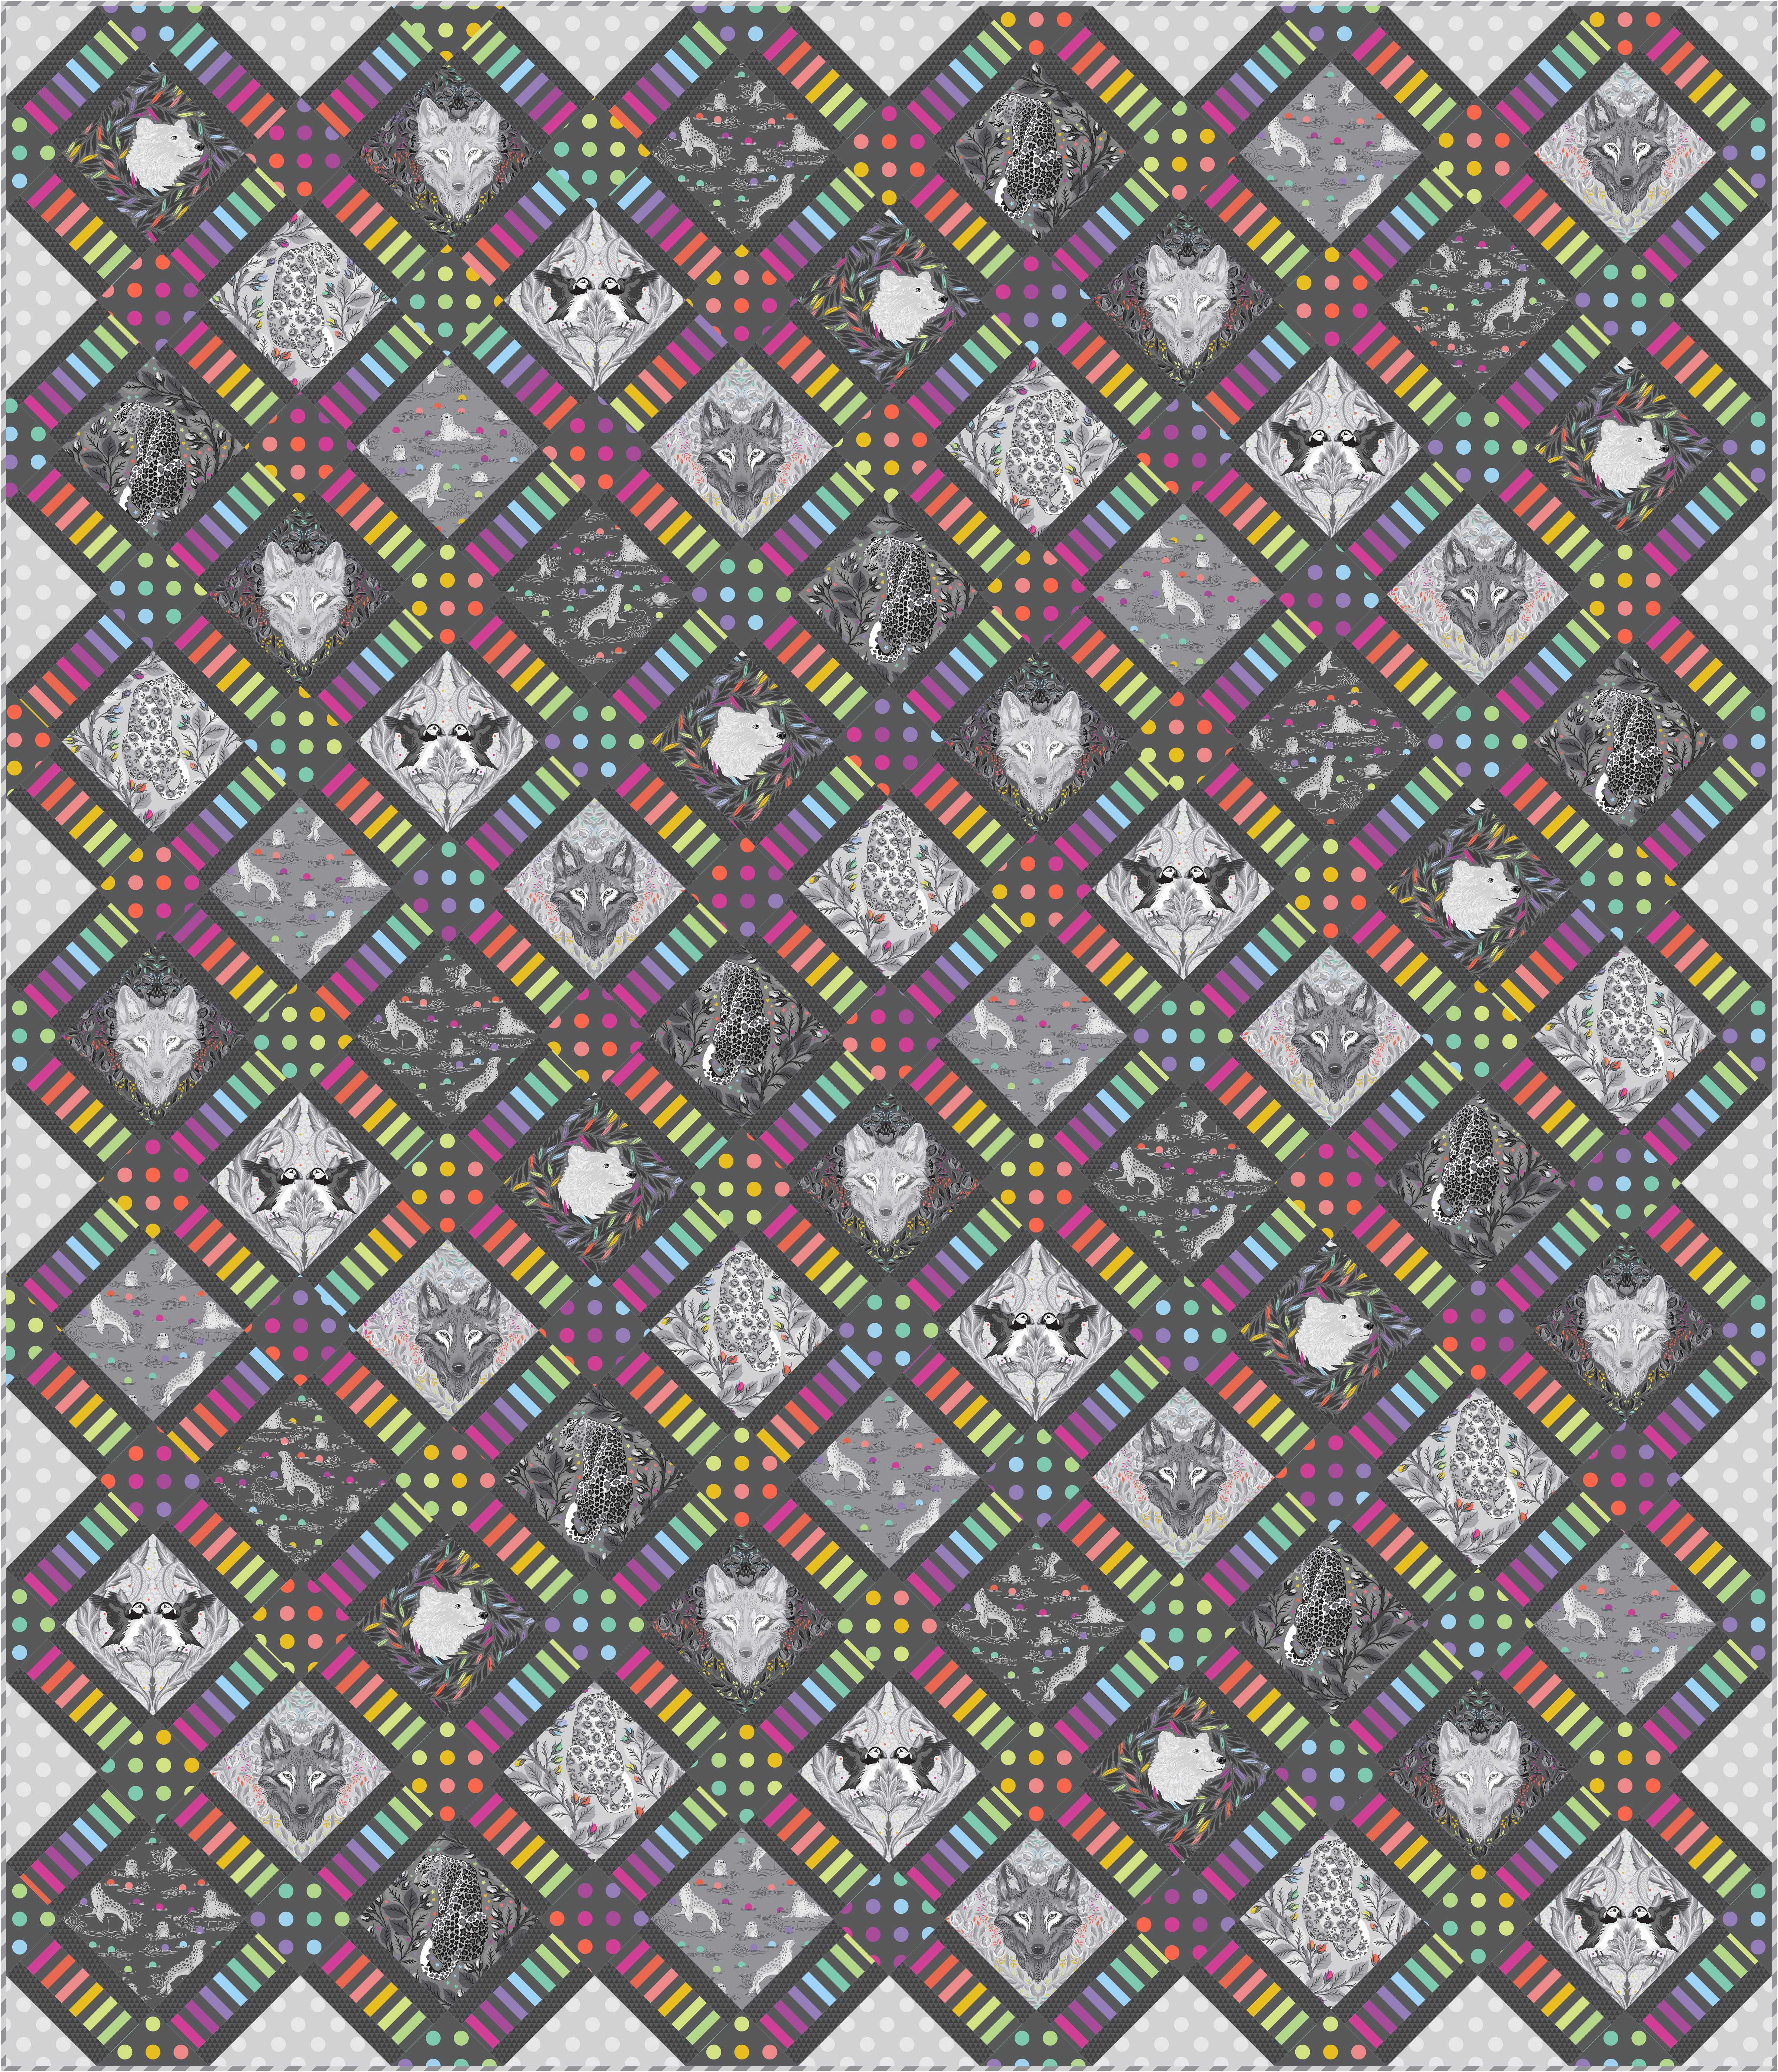
Finally, we have a reimagining of an different pattern. This is an exclusive kit for my next cruise with Stitchin Heaven!
Arctic Party
Arctic Party is the Grayworks and True colors version of Jurassic Party. I will be teaching this quilt on my next quilting adventure to Alaska! I am thrilled to be heading back to Alaska, and hope some of you would like to join me. It’s the time of year when the whales are migrating, so you get the amazing mountains and clear waters and sea life everywhere you look. My first quilt cruise was an Alaska Cruise with Tula, so it holds a special place in my heart. You can find more information and sign up to join me HERE!
It’s that time of year, where we close the chapter of the year and get ready to ring in the next. For me, that means making one last post of patterns! 2025 has been a busy one for quilts. I have been blessed to work with so many amazing new designers this year, as well as some of my usual favorites.
First up we have Adam Trest’s debut collection with FreeSpirit Fabrics – Backyard Wonder. Adam is a fine art painter and illustrator. Backyard Wonder is a fantastic collection of woodland flora and fauna with a large aesthetic range from soft and whimsical to bold and classic.
Promenade is a beginner level quilt featuring the Walk In The Woods print, which is versatile enough to use as a border stripe, a full panel, or individual fussy cut squares. The possibilities are endless.
Meadowbrook is an advance fussy cutting extravaganza. The corner squares are fussy cut from the Storyteller Patchwork print. This particular print has hundreds of small stamps/patches that I wanted to feature. The Walk in the Woods print is fussy cut, and makes up the center squares and borders.
Blue Garland uses only three prints, and is also heavily fussy cut focus. The Racing Rabbits print is the focus of this quilt, and is that perfect classic blue and white quilt for the discerning quilter.
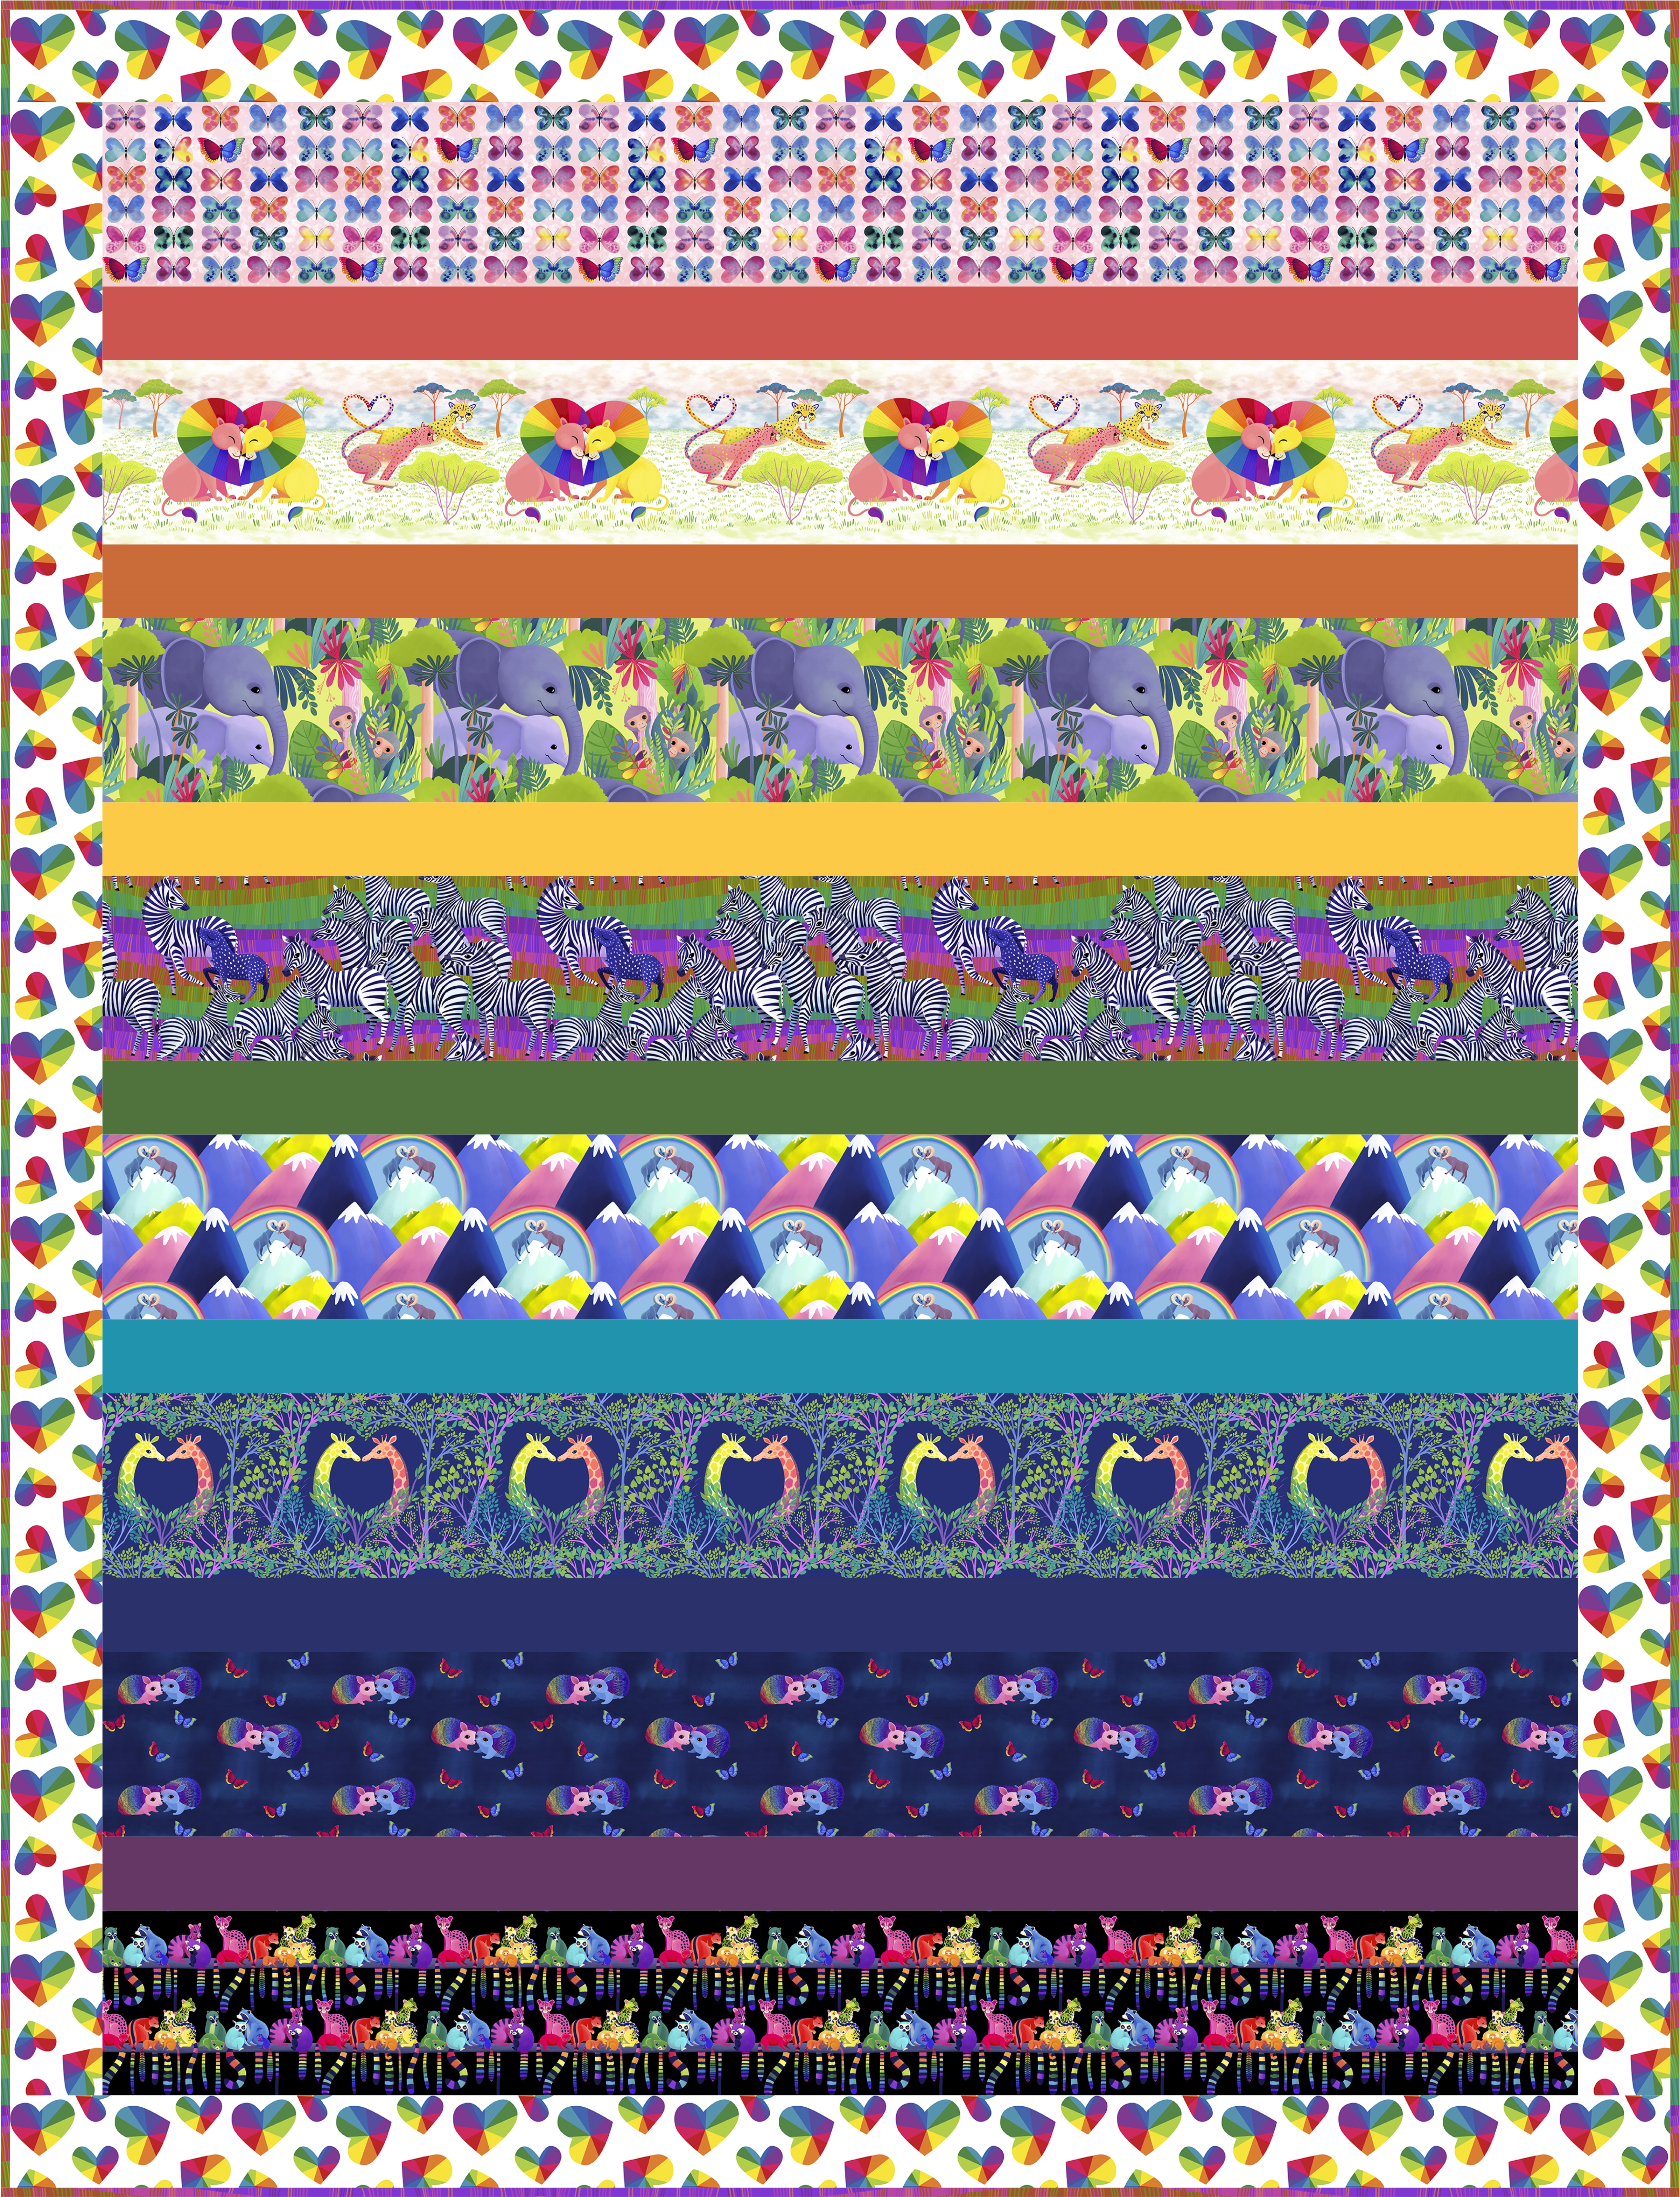
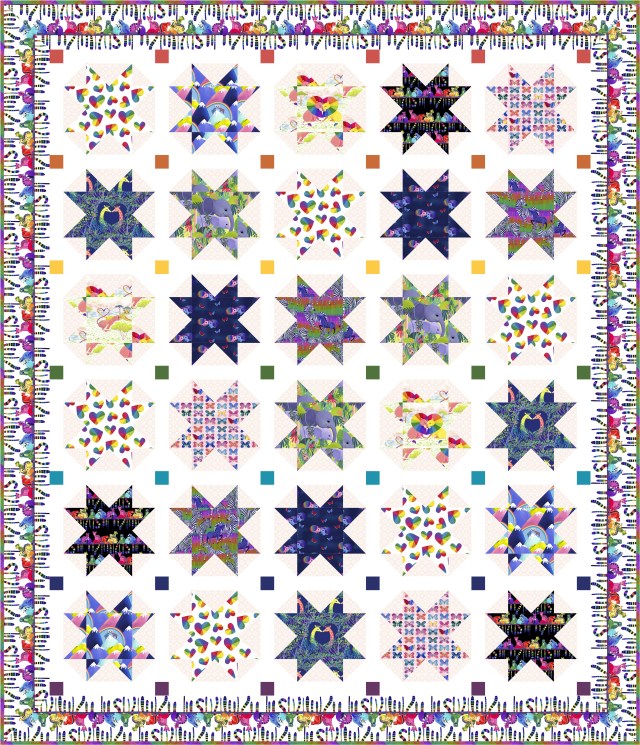
Next up is the debut collection for FreeSpiritFabrics from Katy Tanis – Love In the Wild. Katy is a children’s book author and illustrator. Her fabrics are bold, bright, colorful, and whimsical menagerie sure to capture the imagination.
The first quilt features the Love in the Wild panel from the collection. This quilt is the perfect baby gift, with its bright rainbow of colors and adorable creatures. It was designed with simplicity and gifting in mind.
The next quilt is Love For All, an easy strip quilt. Its the perfect quilt to introduce quilting to a beginner, whether its your own child, niece, nephew, grandchild, or your best friend that you finally talked into sewing with you!
Lastly we have Let Love Shine. Designed with an older child in mind, and featuring the Ringtail Love Day border print.
Finally we have Clare Youngs debut collection with FreeSpirit Fabrics – Flying South. Clare is an artist from the UK specializing in collage and paper crafts, as well as creating with different printing methods to make her art.
Flying South is a vibrant eclectic mix of birds of all varieties. From woodpeckers and owls to fantastical feathered friends straight from Clare’s imagination.
Each of these new designers has a very unique style, and it was a joy working with each of the collections. Which is your favorite?
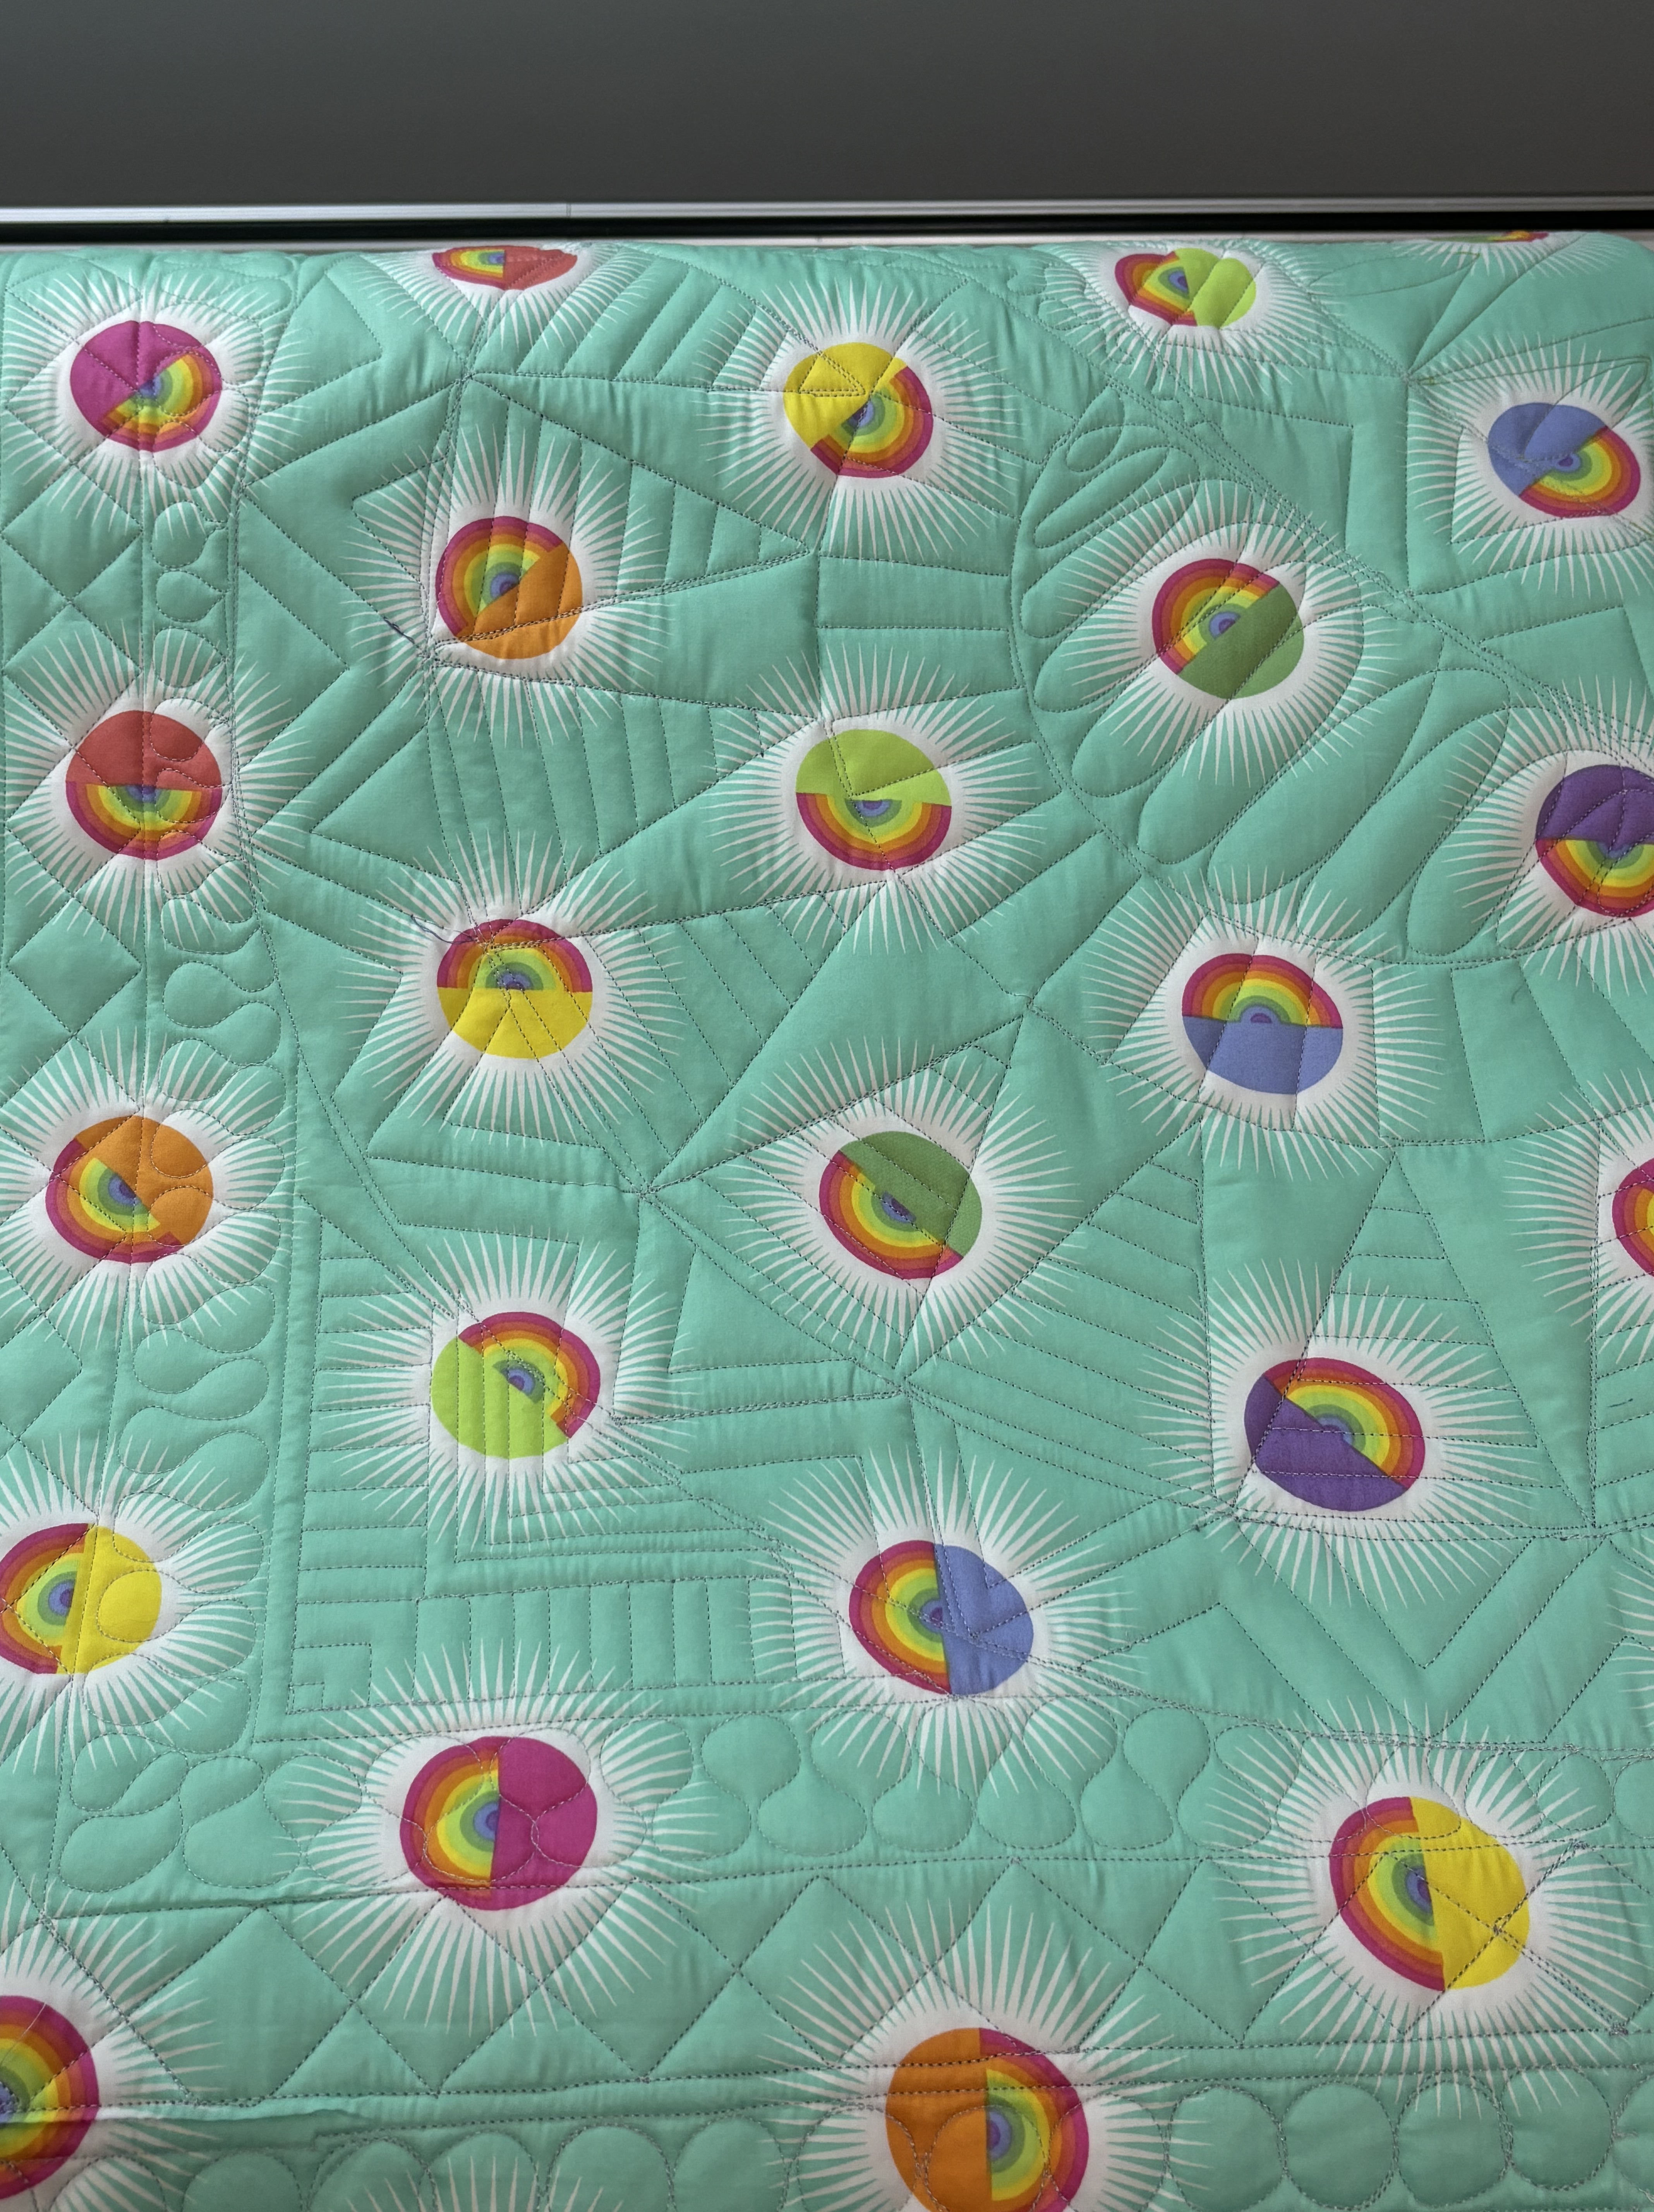
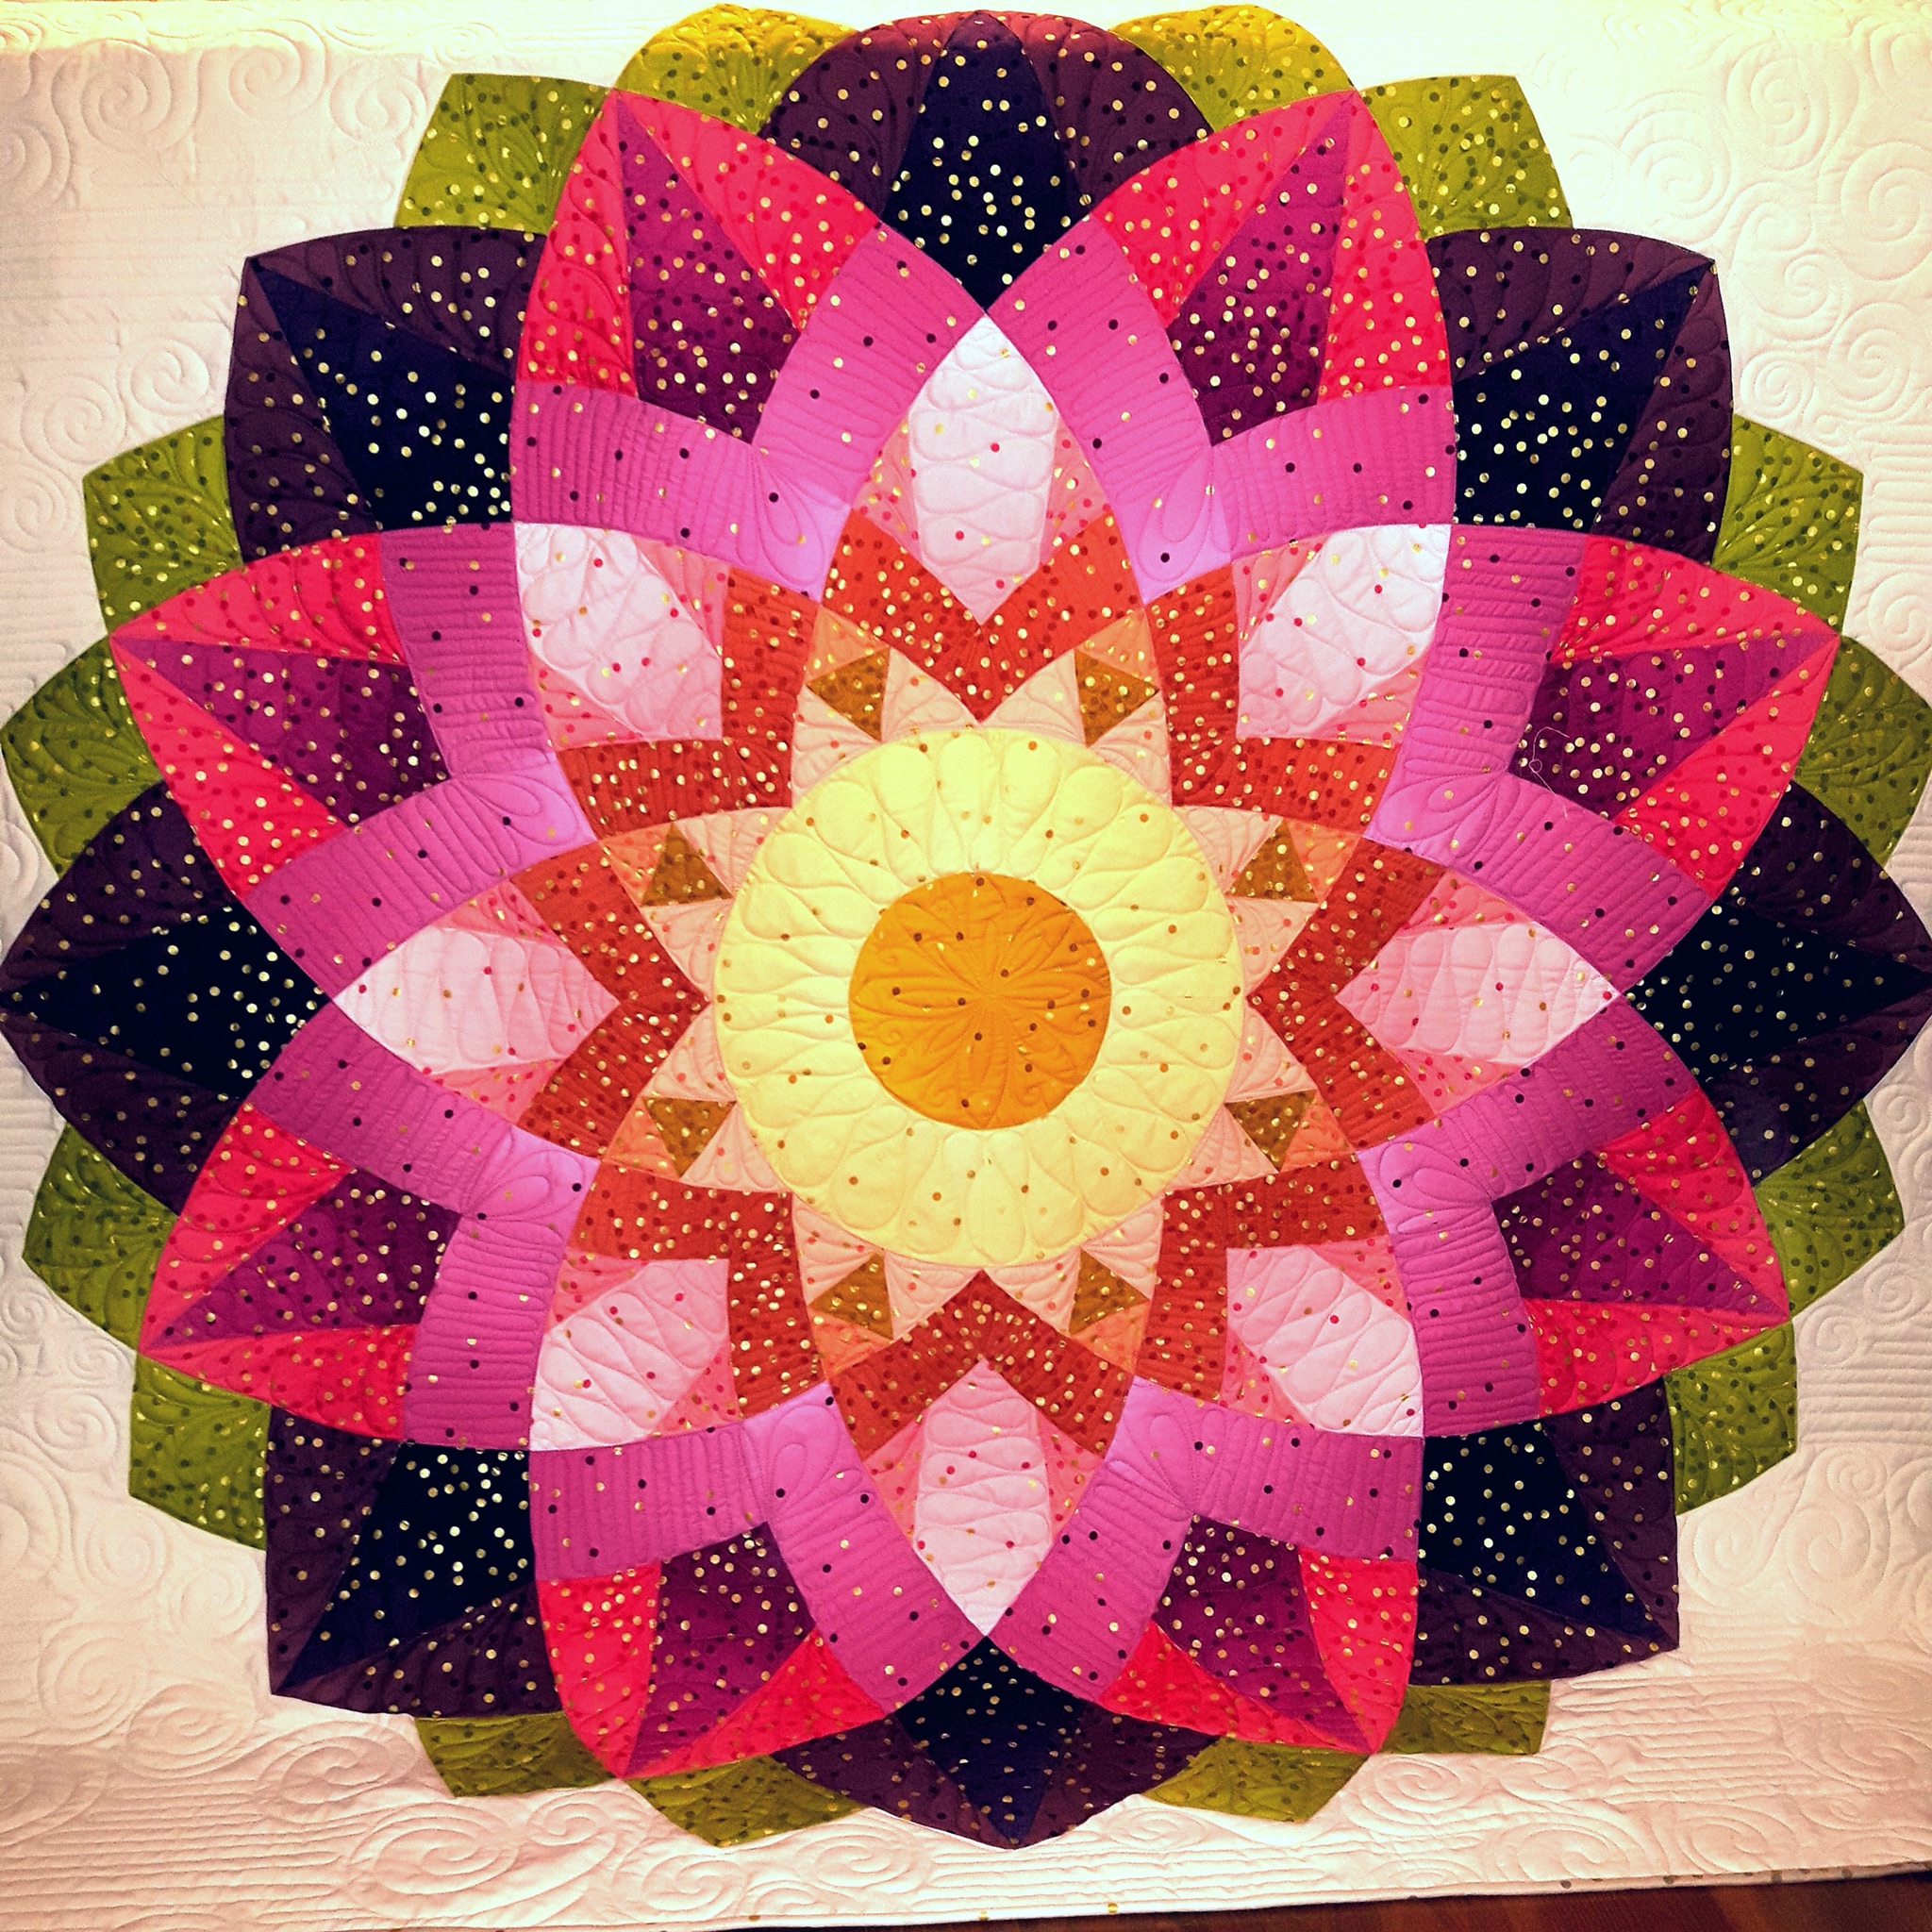
Today I am featuring the quilts for Tula Pinks 50th Fabric Collection. I have been working with Freespirit Fabrics and Tula pink for over a decade now. My first collection with Tula was Nest. I entered a jelly roll challenge with my Grandma at her LQS, and I was faster than she was and grabbed the brightest rainbow roll before she could. I was instantly drawn to Tula’s fabrics. They were like nothing I had seen before. Bright, colorful, bold, unique, and everything I had ever wanted to sew with. You can find the finished challenge quilt here.
When I decided that designing quilts was something I wanted to do, my goal was to design for Tula. I always made my best work with her fabrics, and I wanted to share my love of her designs with as many people as possible. My first design was released with FreeSpirit in 2015, and here we are 10 years, 31 collections, and at least a hundred patterns later. This collection was a celebration of 50 collections for Tula. For me, it was the realization of a dream, and I am so excited for what the next 10 years will bring!
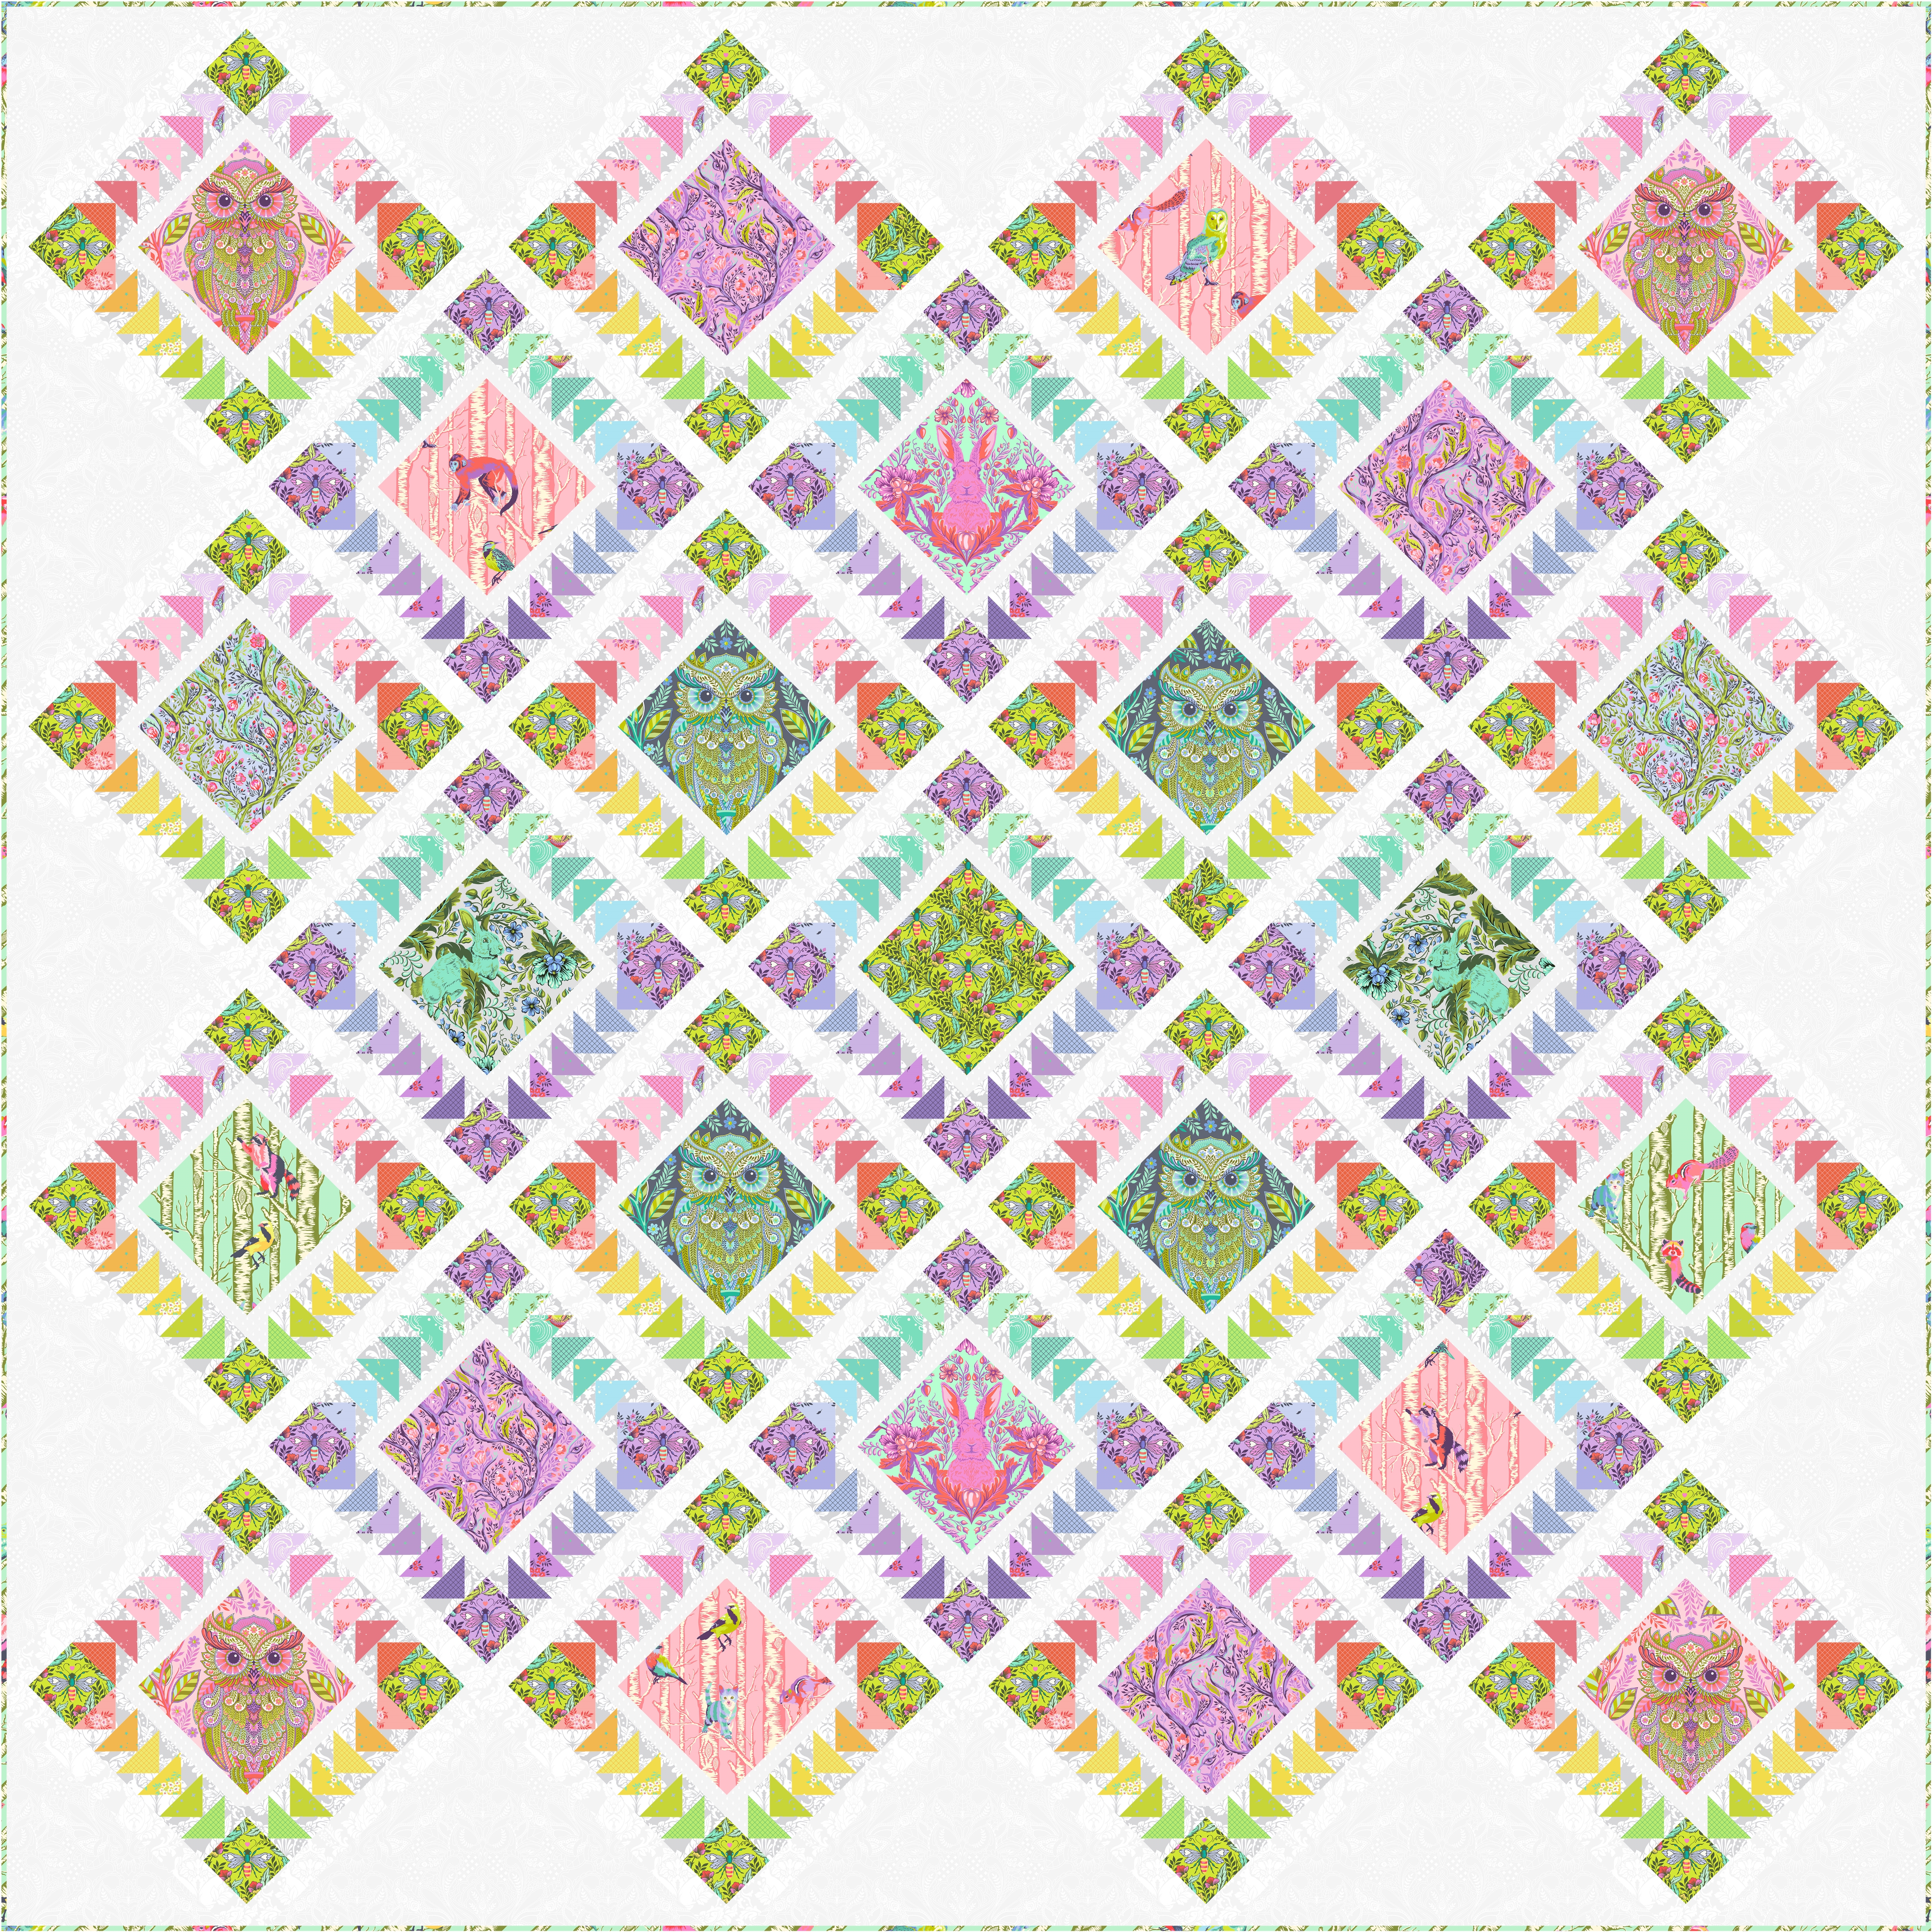
The first quilt in the collection is Rainbow Forest. Its a classic SiS design – fussy cutting, flying geese, and rainbow layout! The centers of the blocks were large enough to feature the owl print, which is one of the largest motifs to date in a Tula collection. There are so many fussy cuttable elements!
The collection consisted of 8 prints, and went wand in hand with the release of the next selection of True Colors prints – 22 rainbow blenders and 6 low volume. I adore the low volume prints, they are the original Full Moon Forest owls, bunnies, and raindrops. What a perfect way to show love for the original while celebrating the new! I made two quilts using the True Colors only. The prints were so pretty and make perfect rainbow quilts.
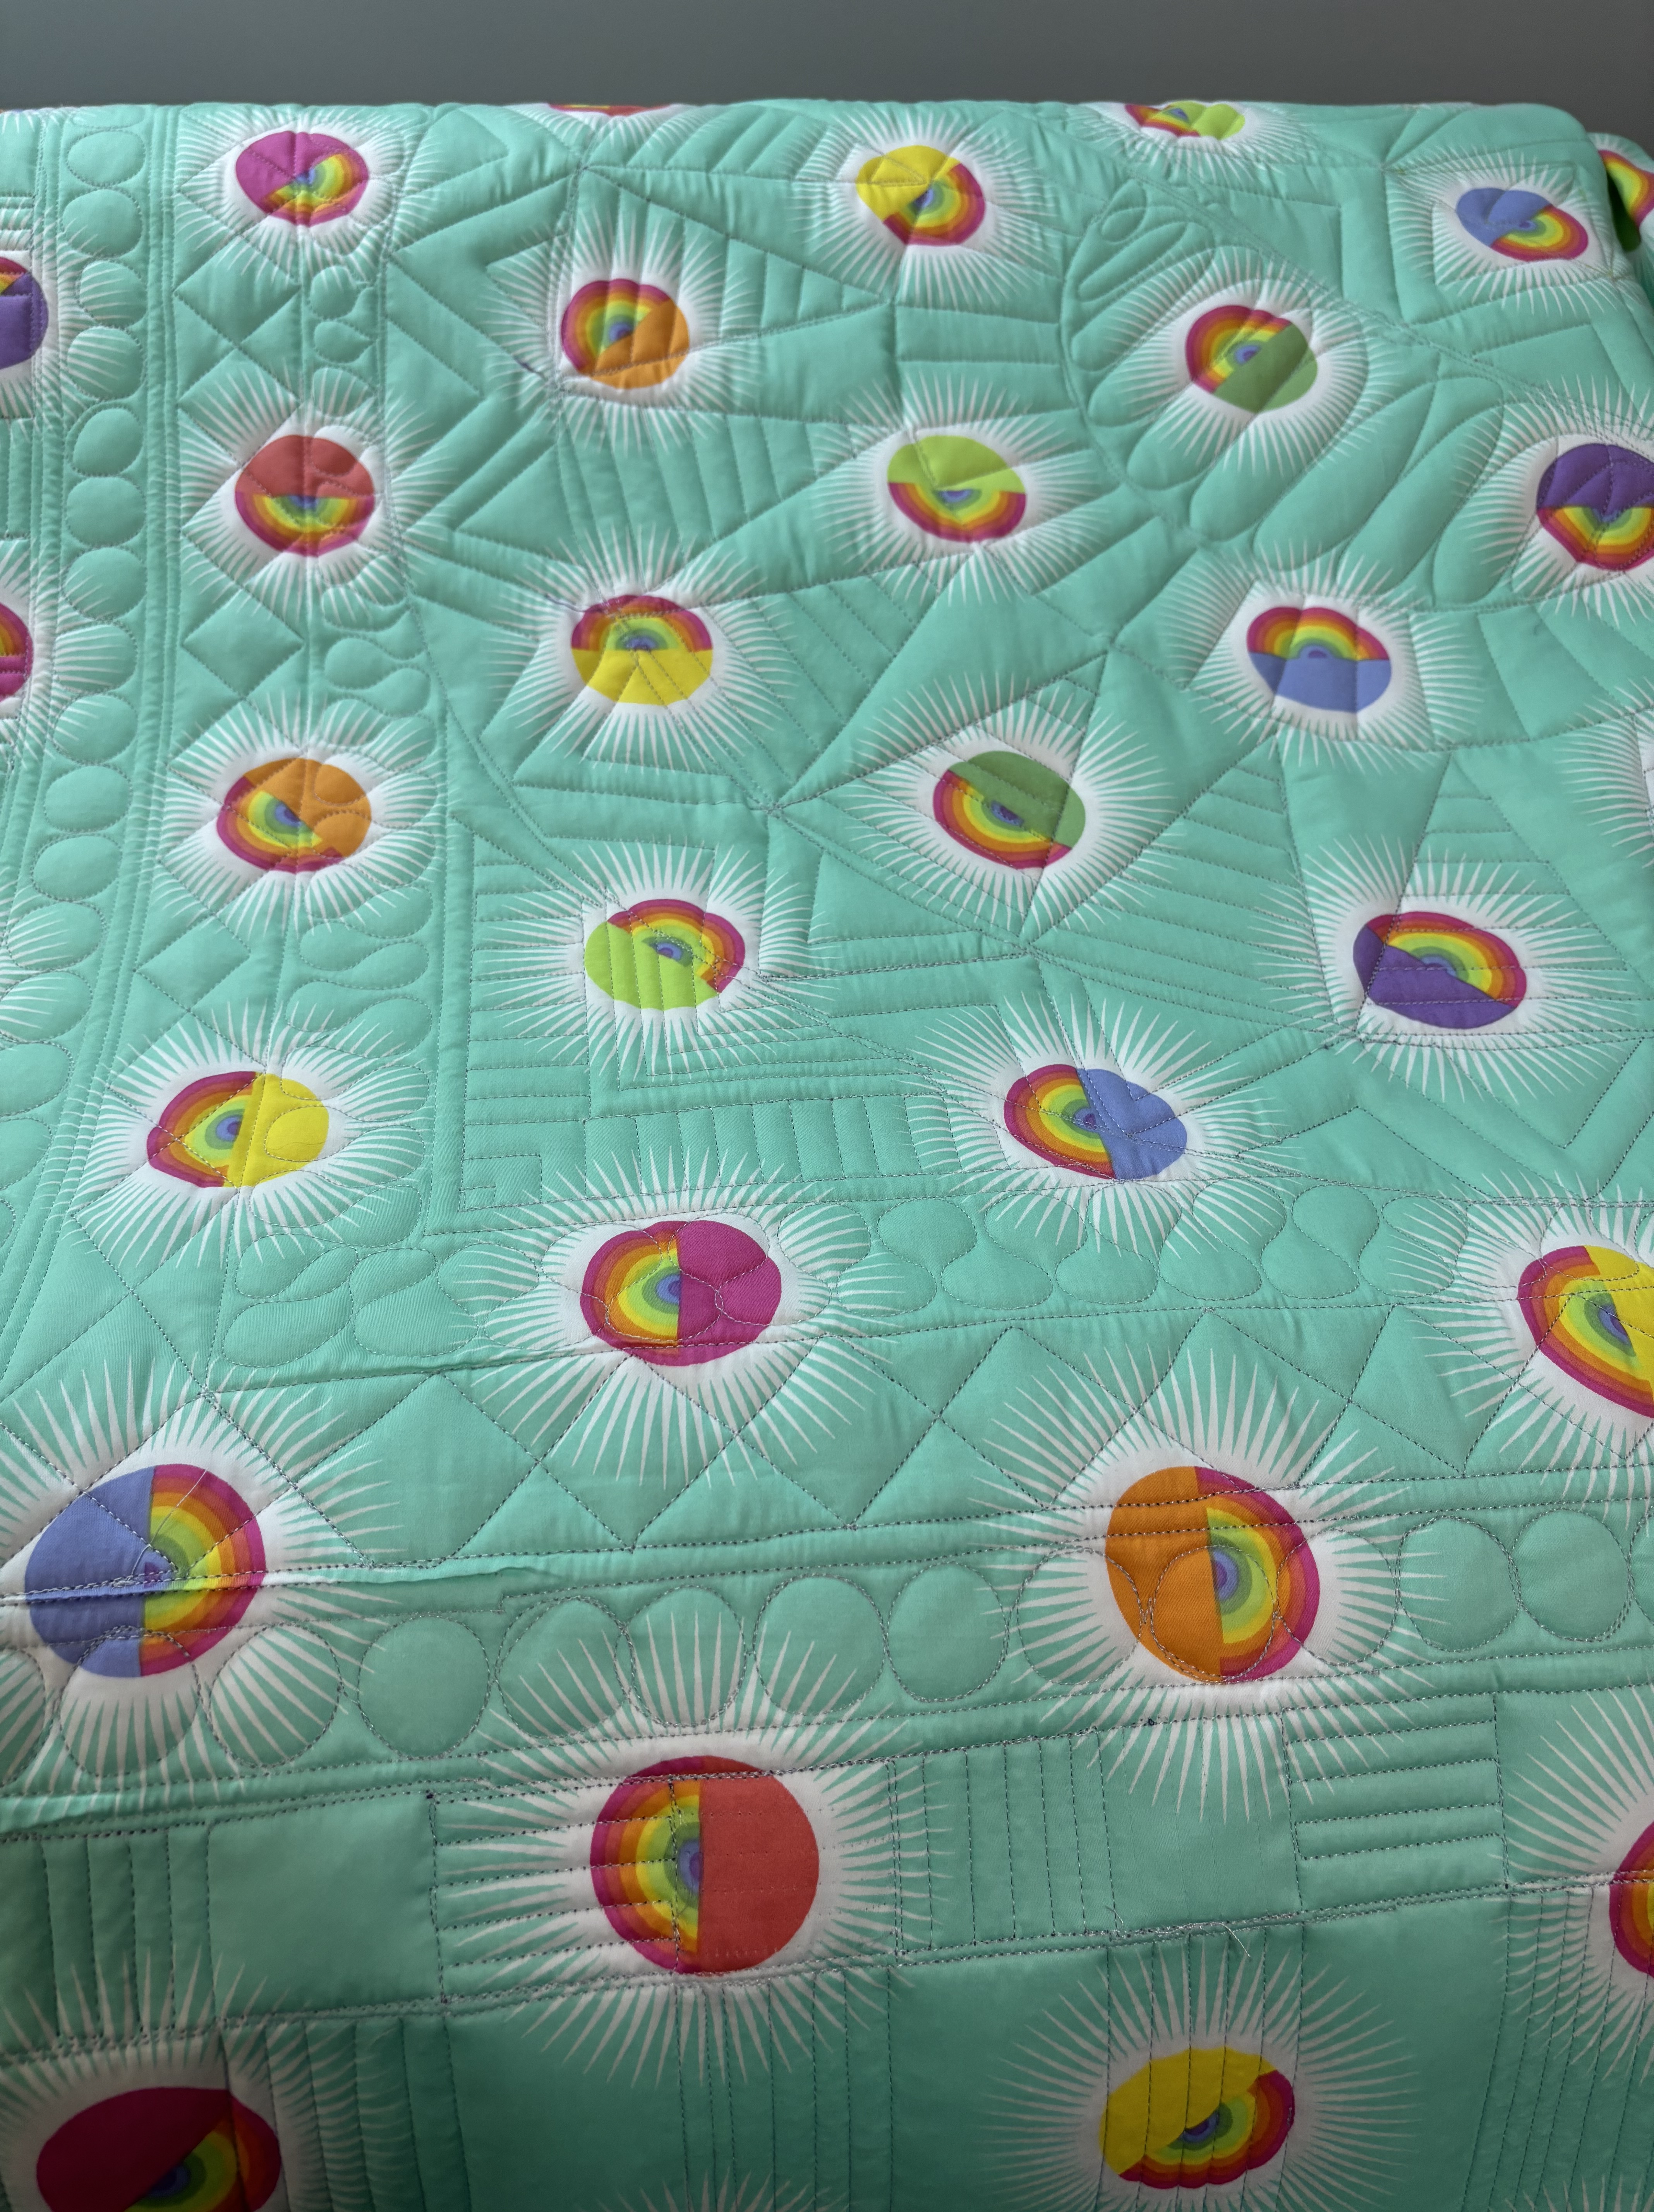
The final quilt is my personal favorite. It is a love letter to Tula’s fabrics, and the joy that designing quilts brings me. I am truly blessed to do what I love, and be able to share that love with others.
I custom quilted the entire thing. It took me hours. It was a labor of love, and I am overjoyed with the final result! The true colors blocks show the quilting the best, so I came up with a quilting design that would compliment the collection without overwhelming the pieces. I love feather quilting, so I played around on paper until the pattern emerged – a butterfly flitting through the colorful garden of the quilt.
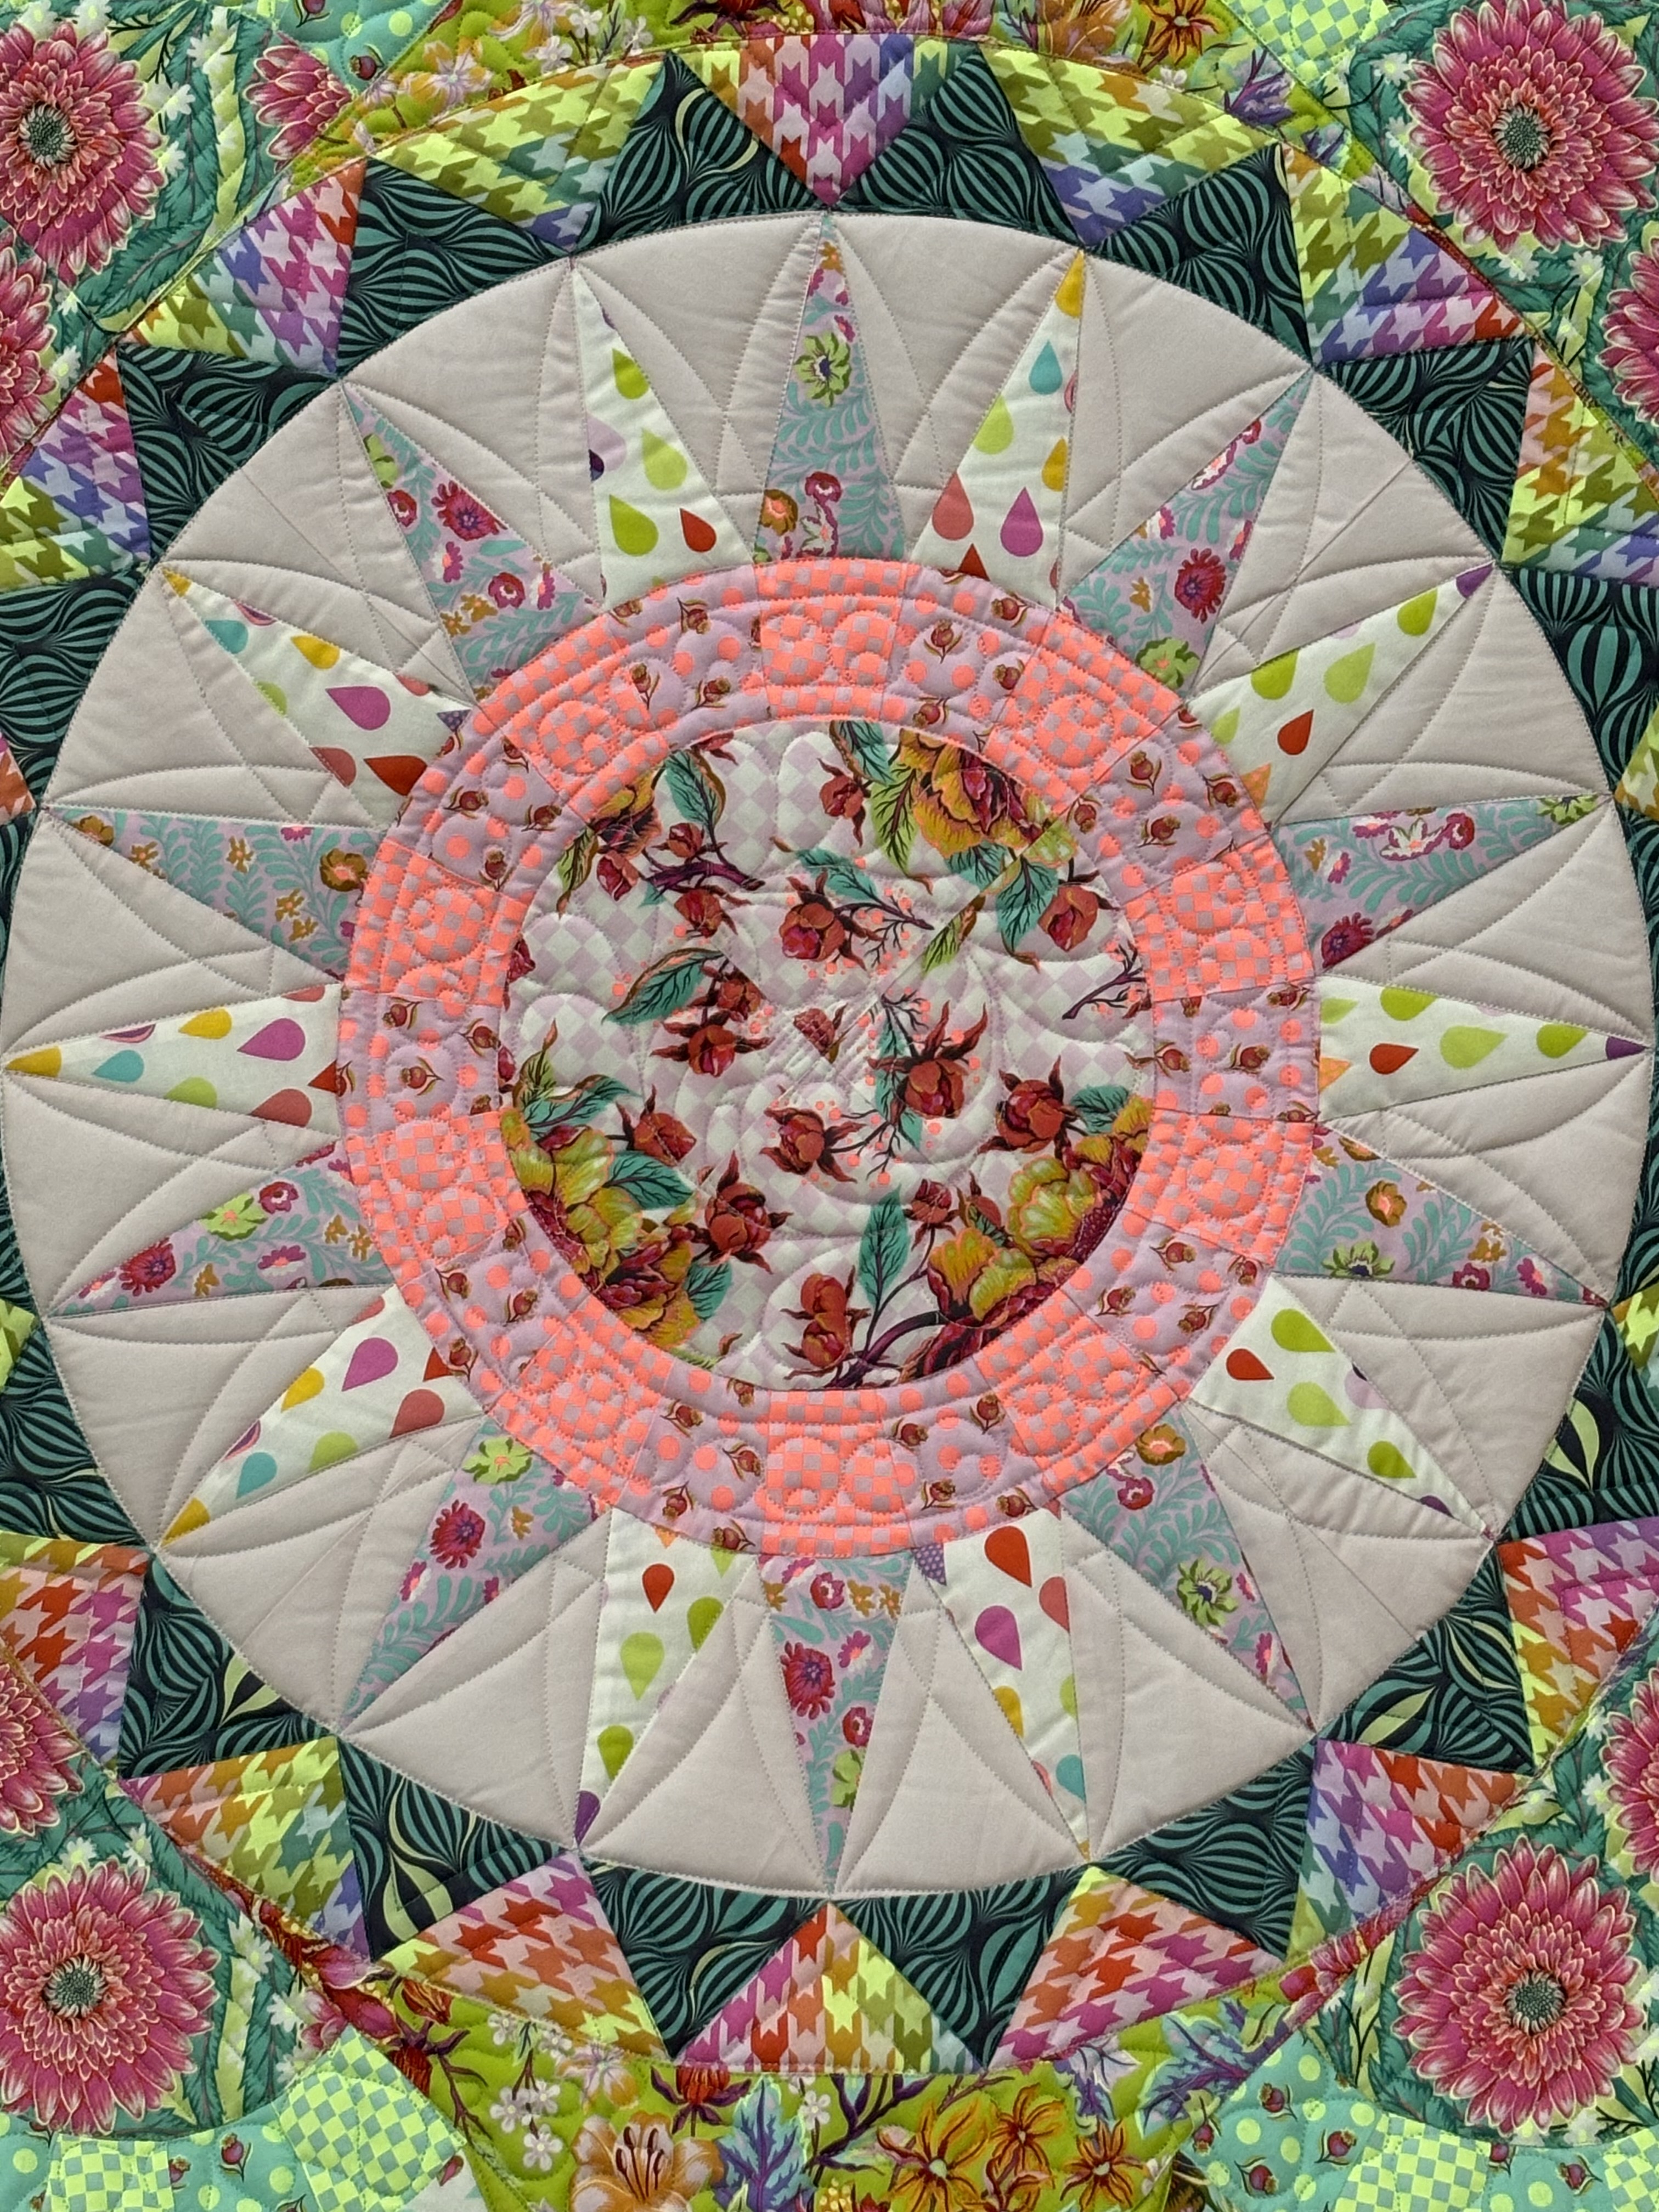
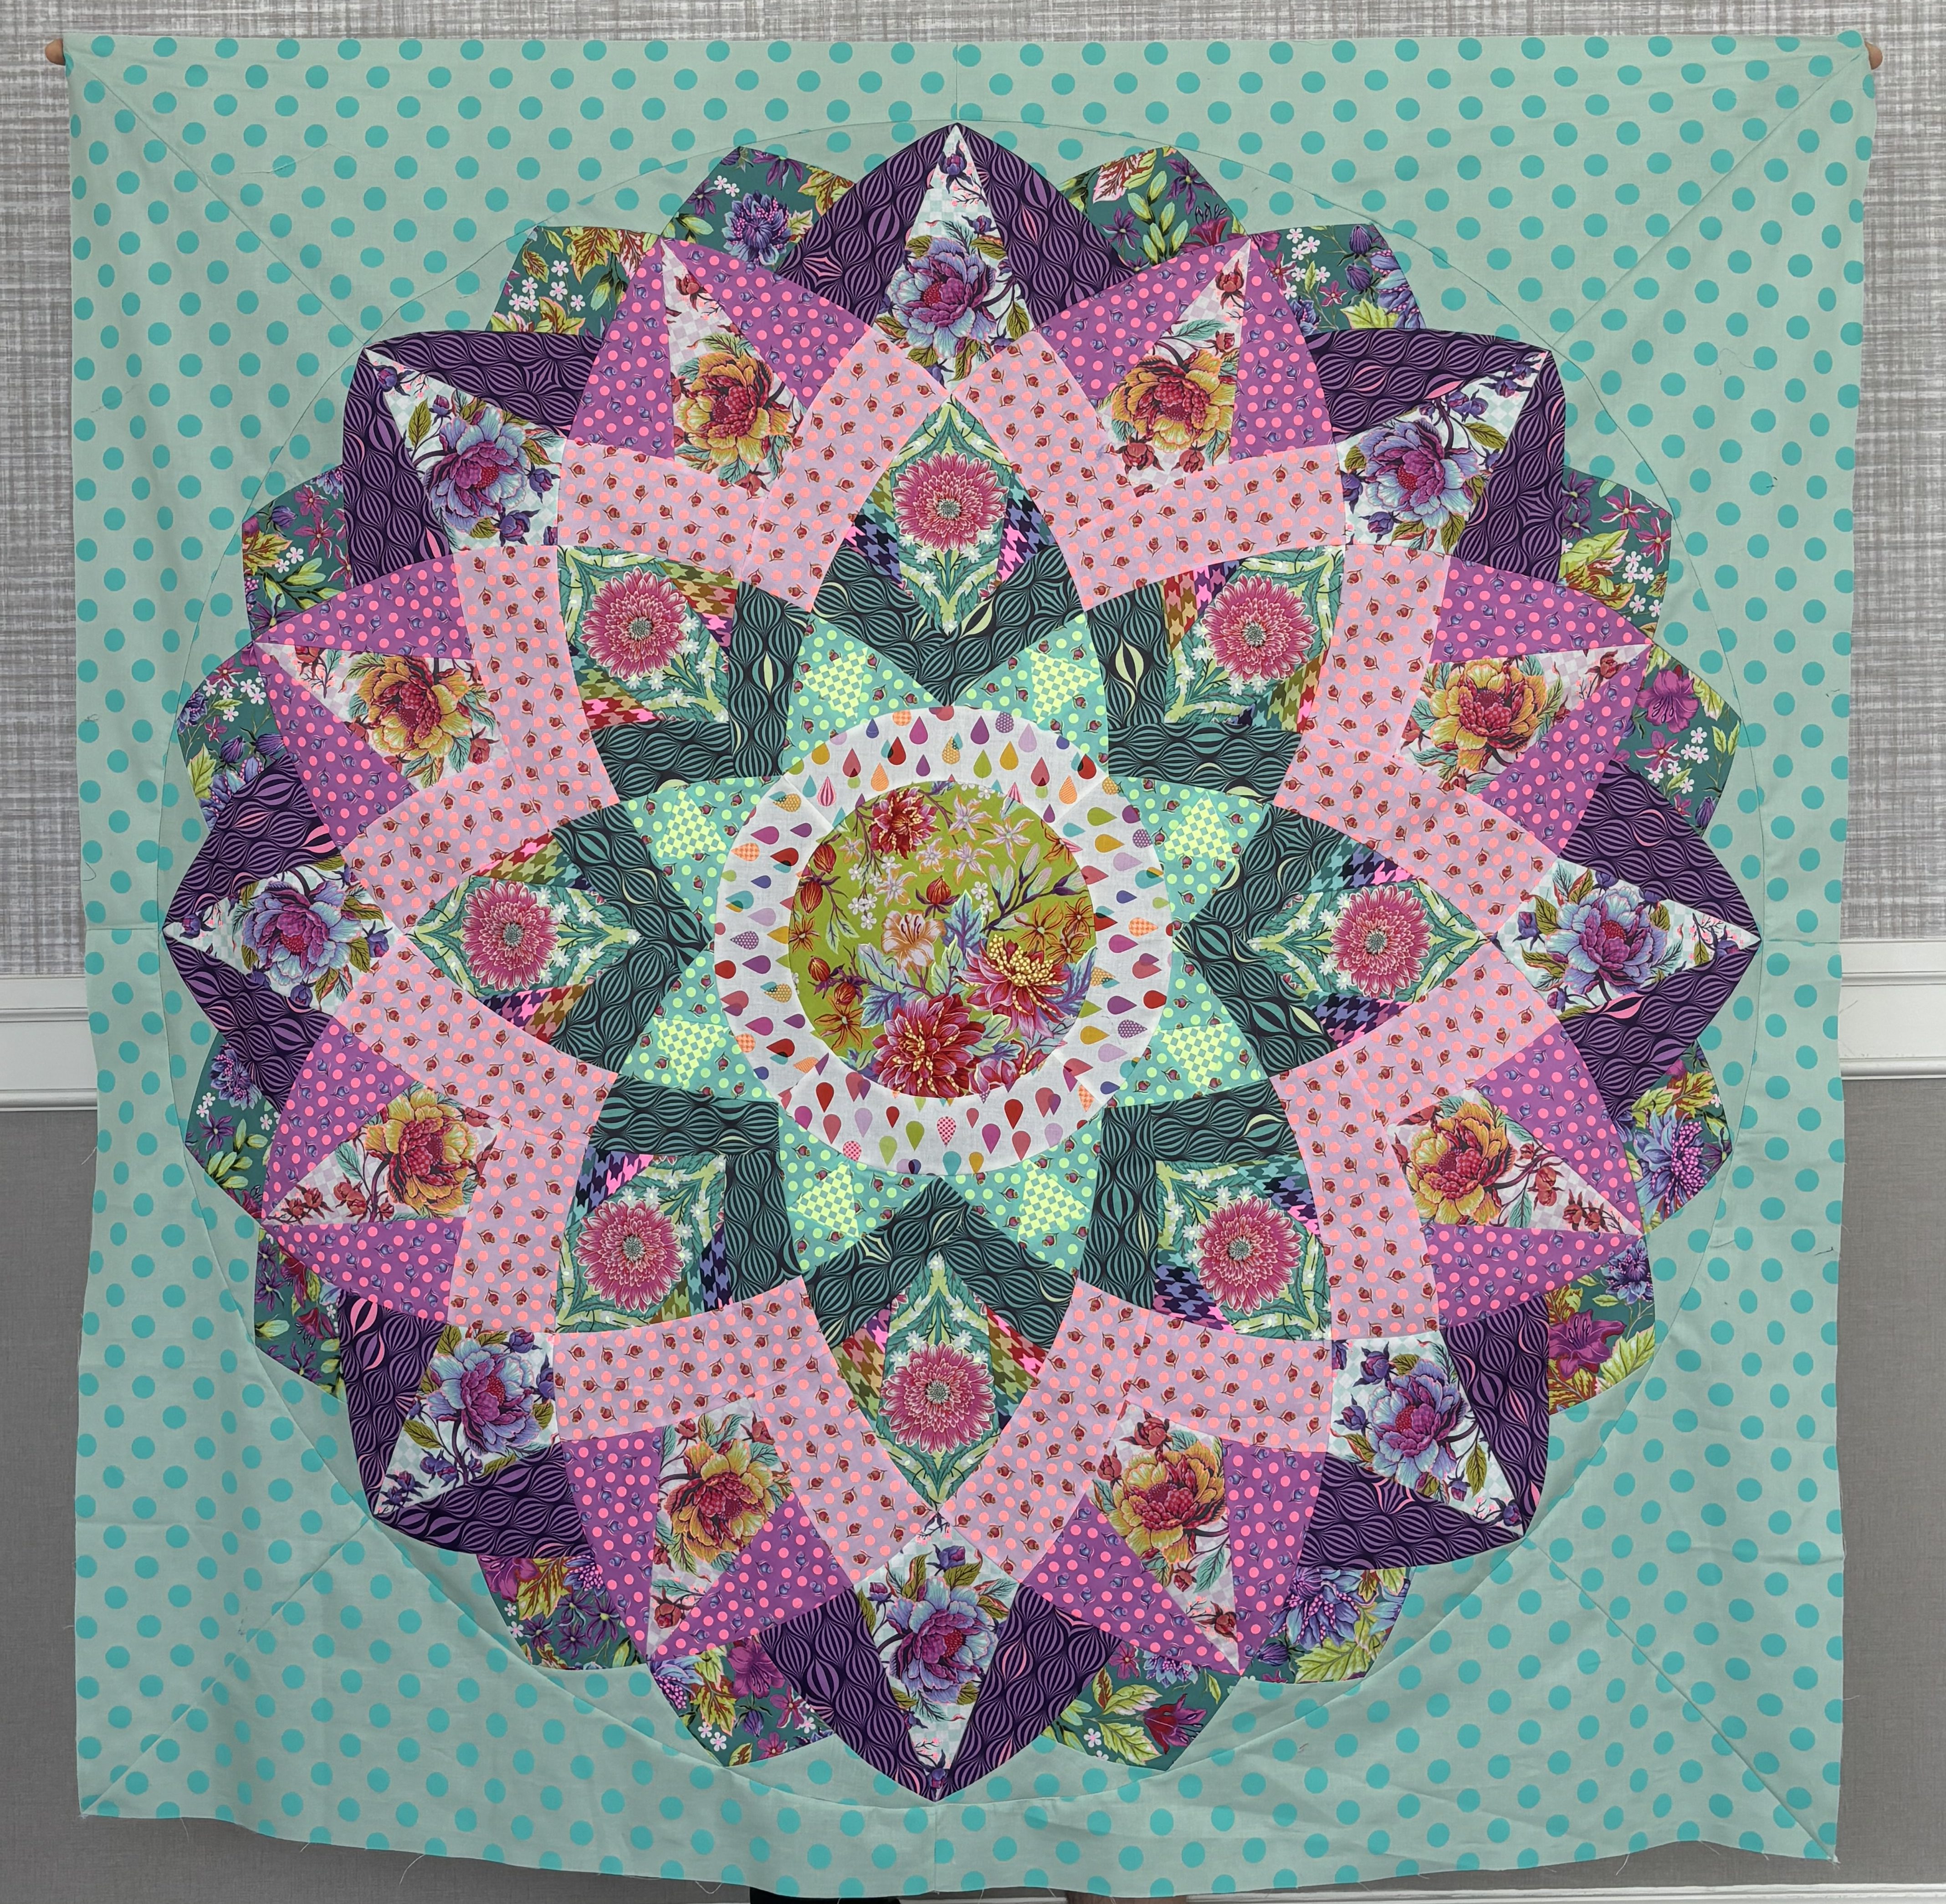
Today I am happy to introduce my latest quilt patter, In Bloom, to you all. Meet in Bloom, a celebration of spring and summer flowers.
In Bloom features the Untamed collection by Tula Pink for FreeSpirit Fabrics. The pattern is available in the May 2025 issue of AQ Magazine. I spent countless hours constructing and quilting this beauty, and I couldn’t be happier with the results. In Bloom is foundation paper piecing and curved templates, with a pieced border.
Each round of blocks was quilted with its own unique design. The quilting took about a week to plan and stitch out. I was stuck for a little bit, but with some help from Sharon Blackmore of Love Shack Quilts I got right back on track. Sharon offers one on one workshops and I highly recommend it! She is kind and patient and so talented.
The quilting is mostly ruler work, with some freehand ribbon candy swirls thrown in for good measure.
Enjoy the rest of the photos, and I hope you get a chance to pick up a copy of the magazine!
I’ve been having a lot of fun recently making different versions of my Zinnia Quilt. I’ve taught this particular quilt twice this year, thrice last year, and decided that the sample needed an upgrade.
What better to make a floral inspired quilt than a flora inspired collection? Tula Pink’s Untamed fabric collection, from FreeSpirit Fabrics, was the perfect palette to refresh Zinnia’s look.
I made two versions, one in each colorway.
I called this one the Waterlily. It uses the aqua neon dot for the background and features the cooler prints in the collection. Waterlily is currently living its best life in Florida.
Wild Rose uses my favorite prints from the warm colorway. I really wanted to showcase the white raindrop and warm herringbone to create an interesting secondary pattern with it. Wild Rose lives with me and will be quilted at some point, I promise! I fussy cut all of the floral prints using me new Cutterpillar. That thing is amazing and cuts my fussy time in 1/4!
I also finished my original class sample! I started it in 2020 when I first started teaching the pattern, and finally finished piecing it in 2025. I’d been saving that background fabric specifically for this quilt the entire time. The goal for this one was to create an inverse of the original, with the green in the cetner and the pink/purples at the outer edge.
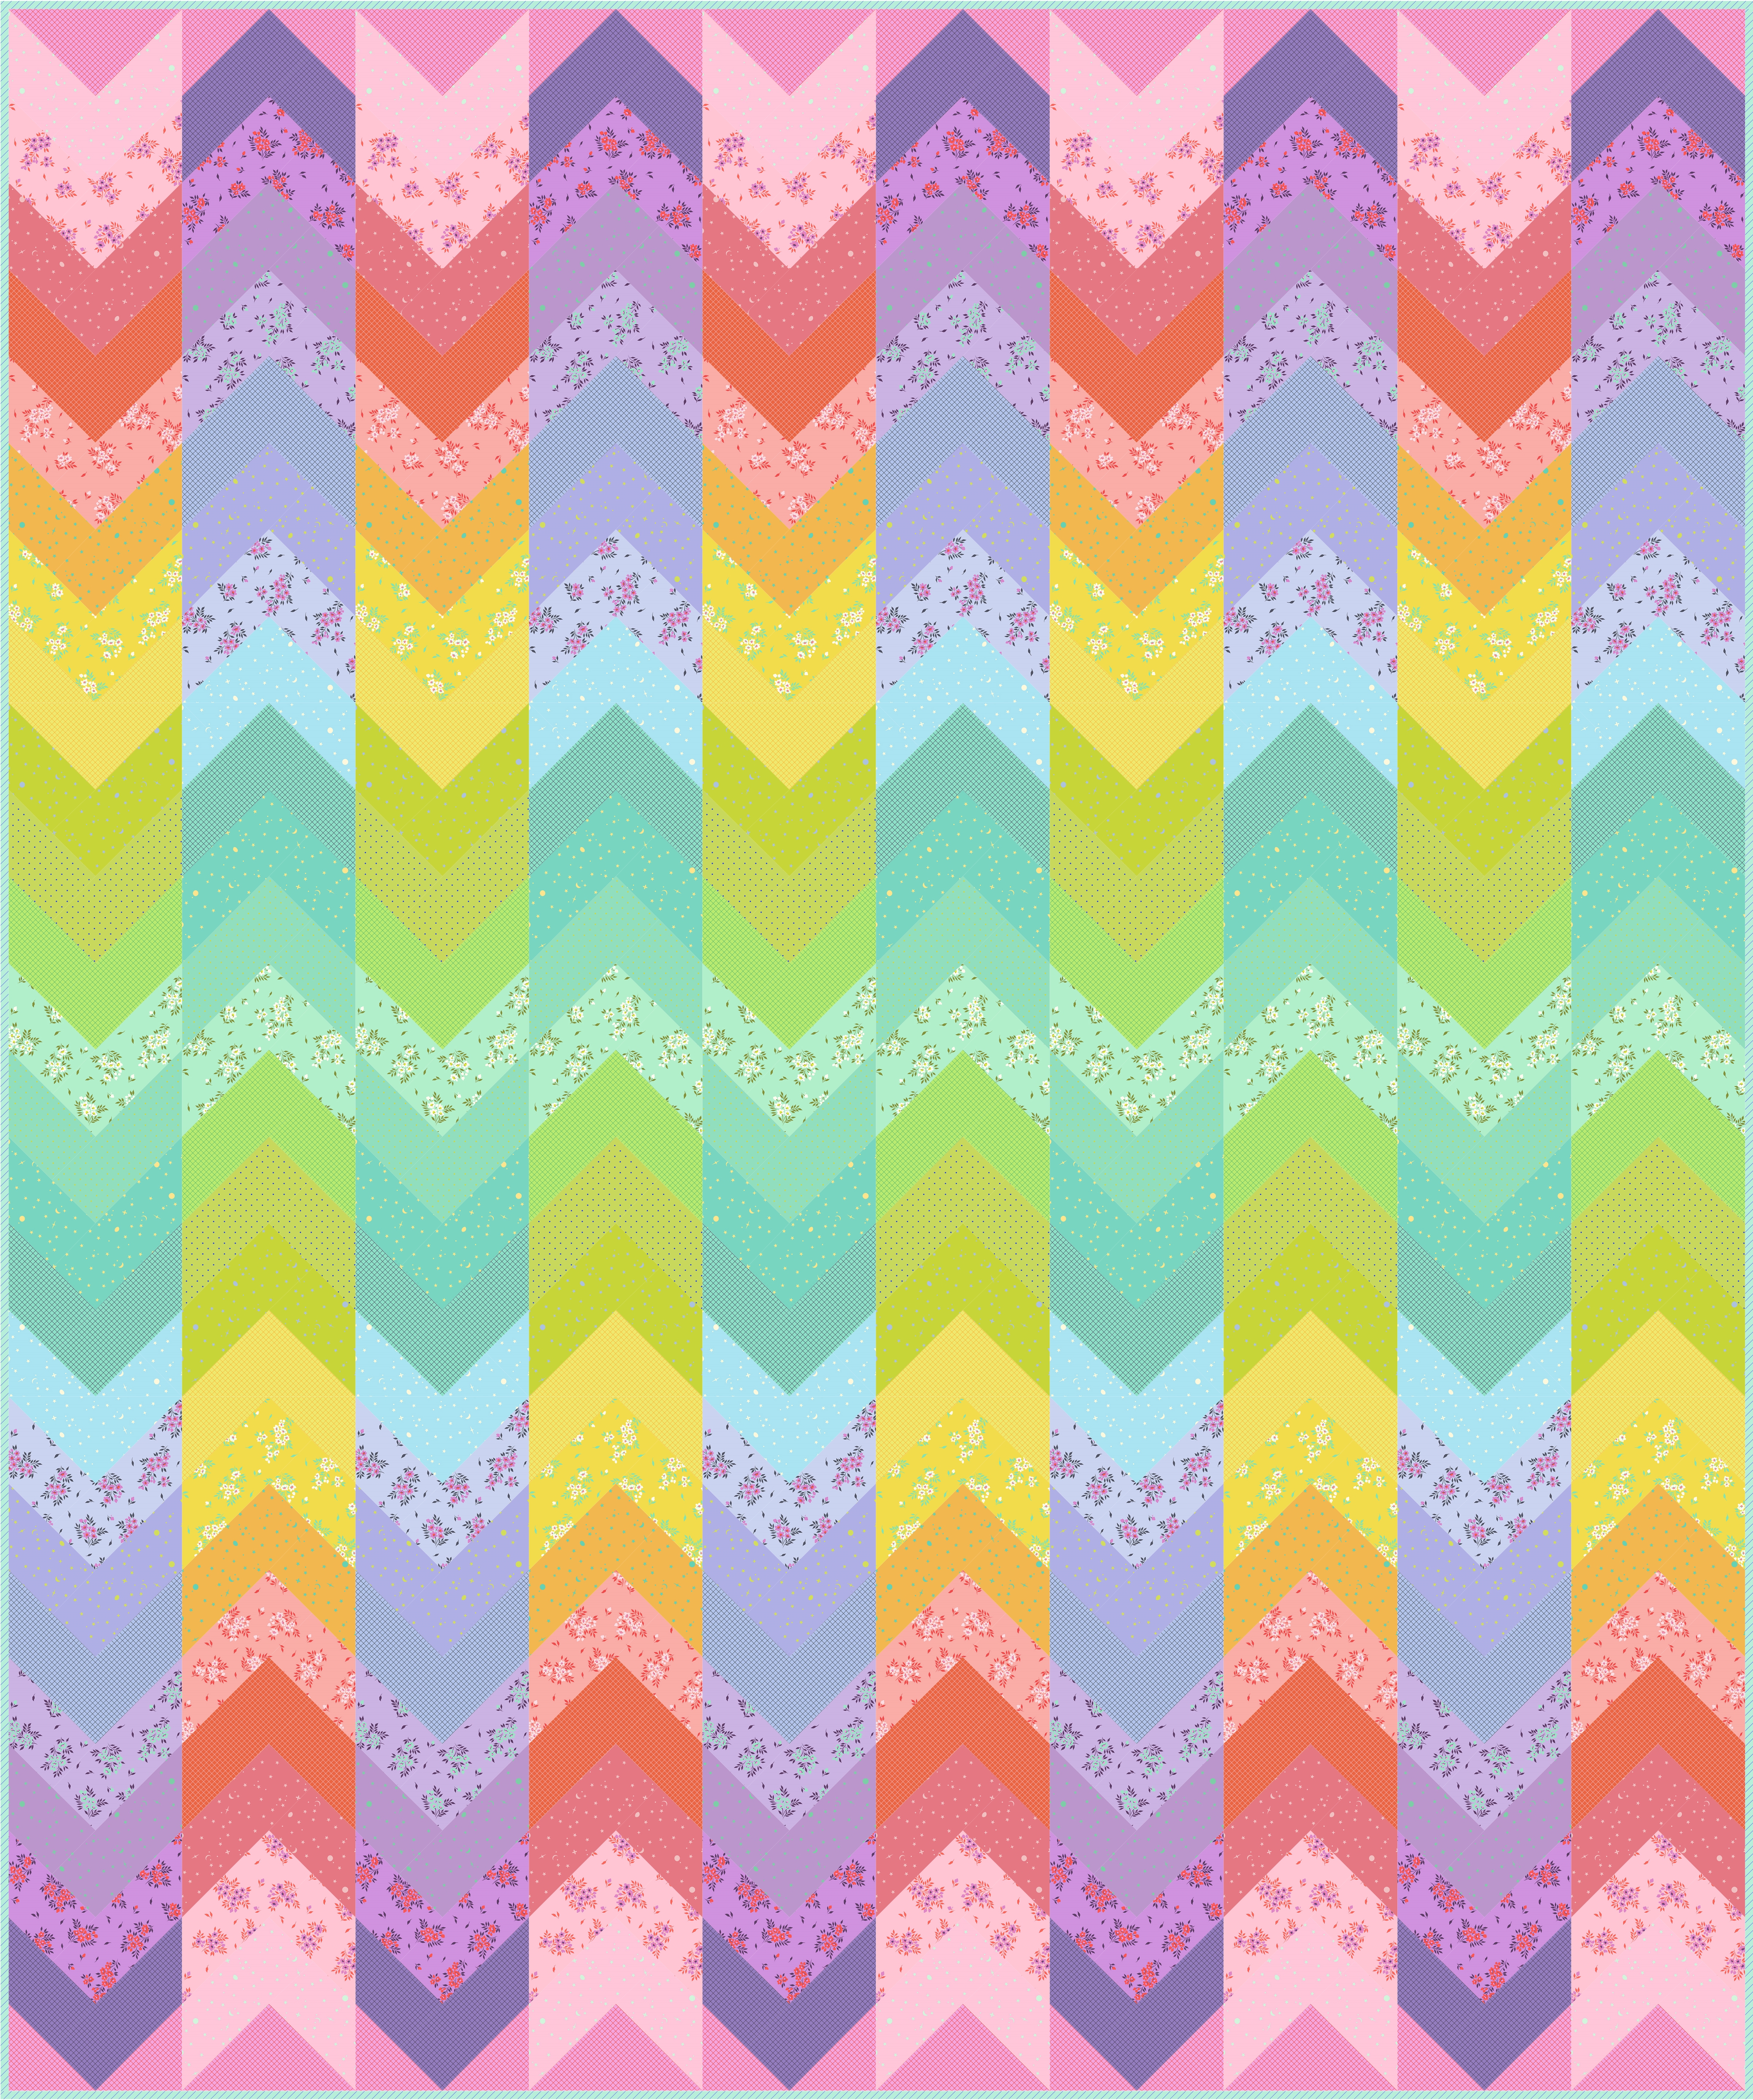
Classic Zinnia featured the V&Co Ombre Confetti collection. This is a staple collection from Moda Fabrics. However, the color range has changed since Zinnia debut in 2019, and some of the colors aren’t available anymore, but there are some new one with new gold prints that make great subsitutes.
Zinnia is super versatile, great for large and small prints, and I love making them!
To Celebrate, I have gone through and added about 20 quilt patterns to the Tula Pink Free Patterns Section and the FreeSpirit Free patterns section!
I’ve been busy sewing up a storm these past few months. Some things I can show off, some I can’t yet.
Jurassic party featuring Roar! by Tula Pink for Freespirit Fabrics
My Roar quilt has returned from its world tour! She’s been hanging at international quilt markets and making the rounds to quilt shops across North America. Roar is still my favorite fabric line!
Roar! Annette HandbagRoar! Annette Commuter Tote
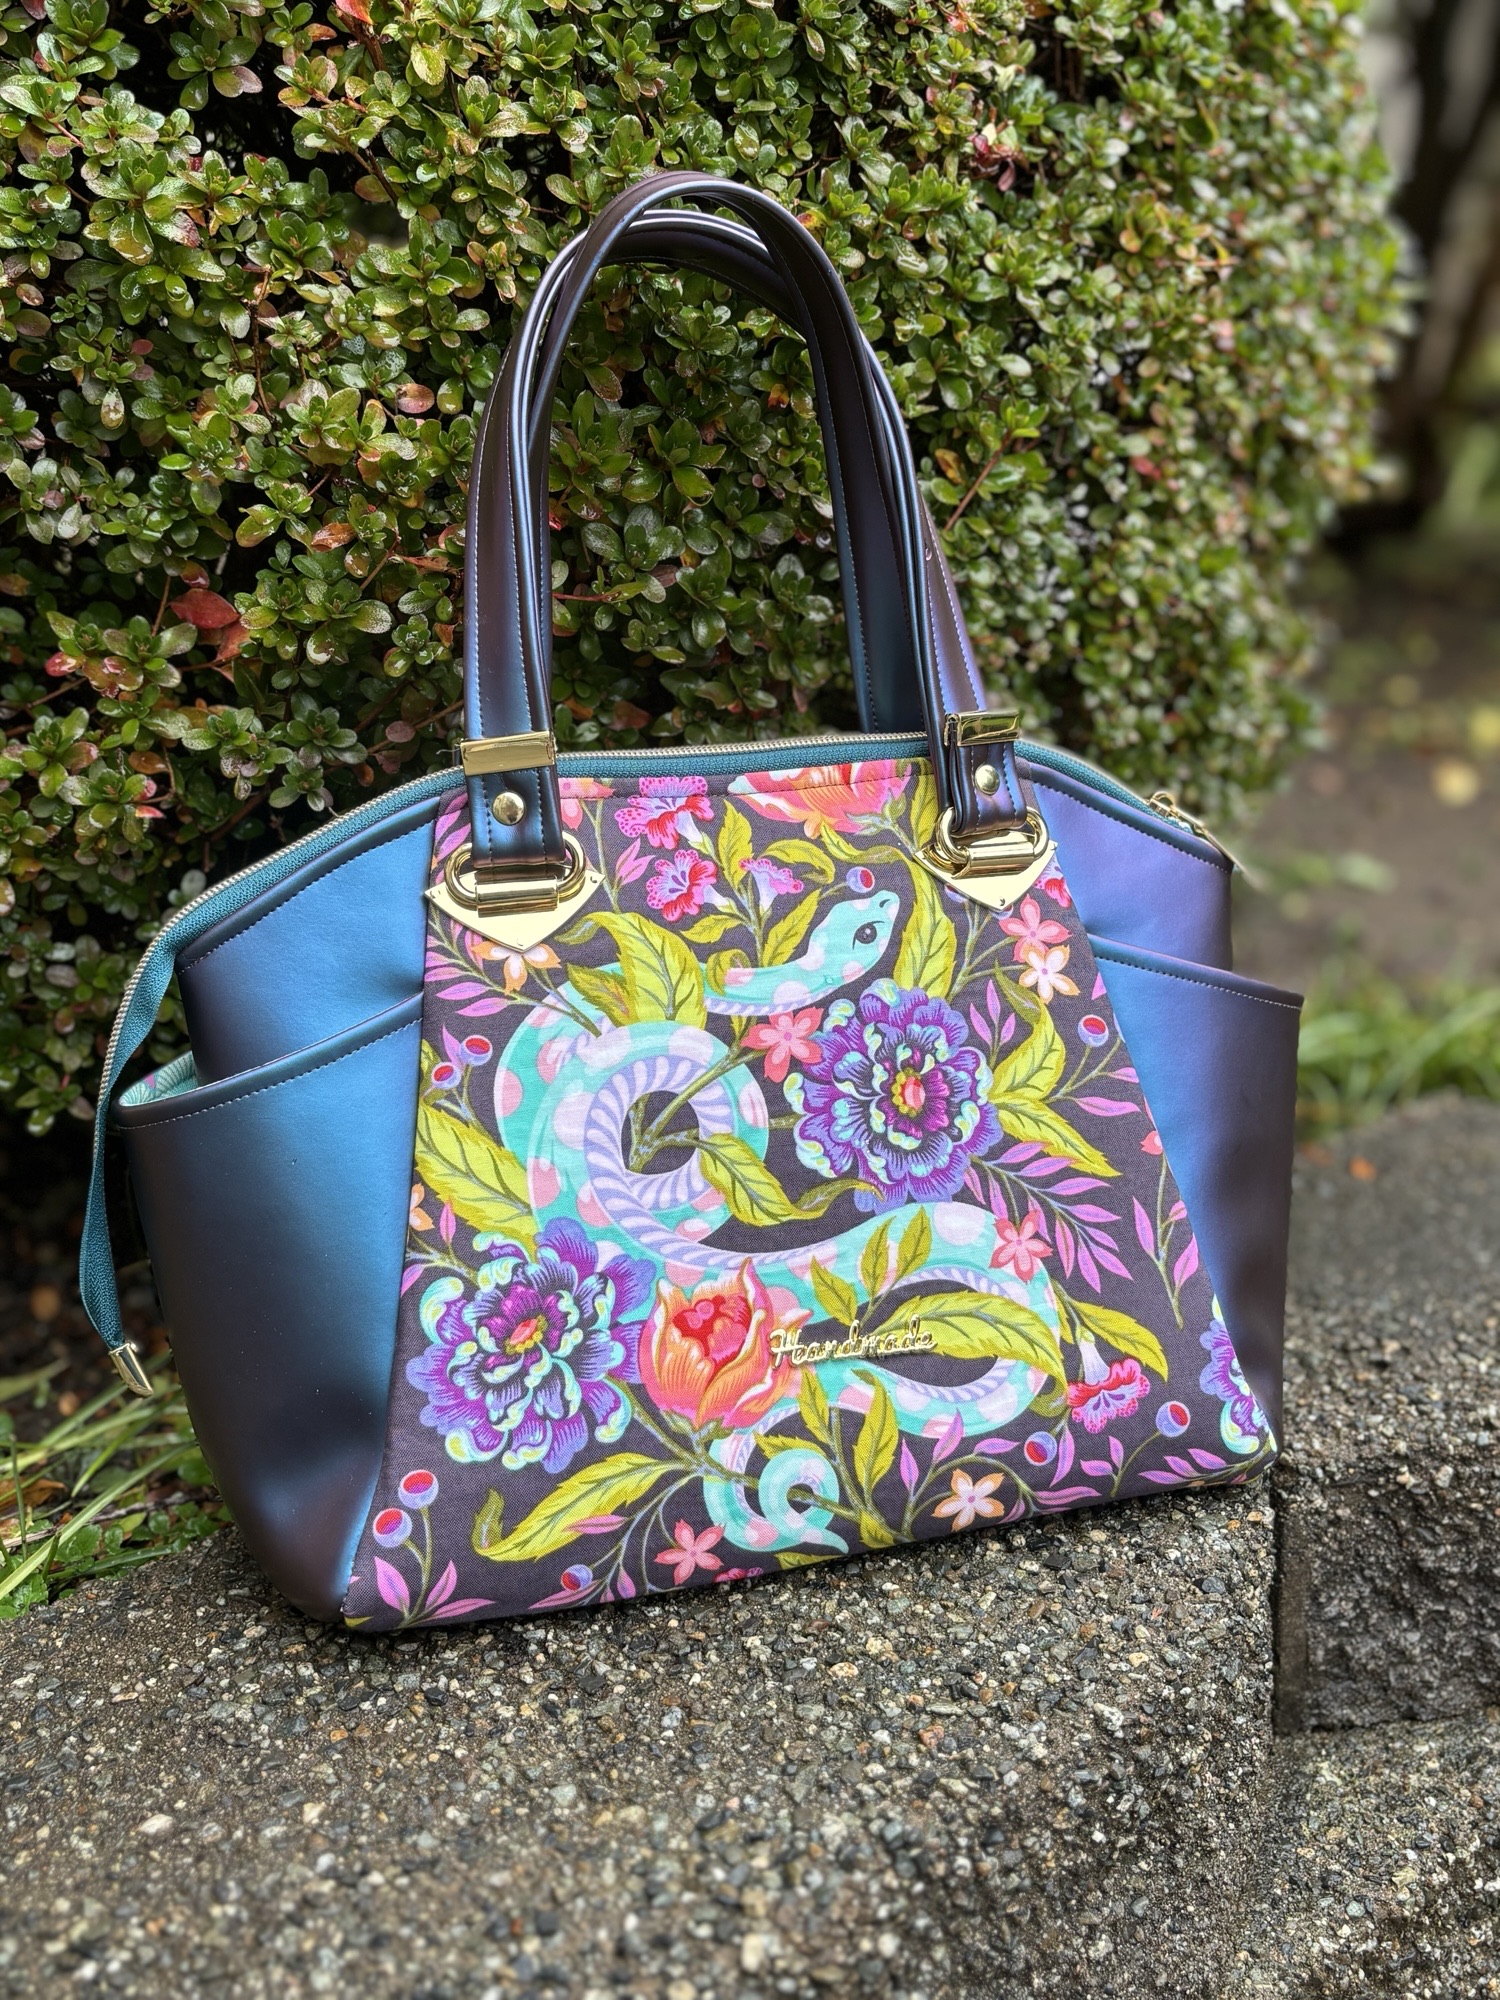
As you may have noticed, I have taken the plunge into bag making! Stacie Wilson of Troll Brothers Quilt Shop sent me a box of gorgeous colorshift vinyl to play with, and I have been making all the things! My Annette Handbag and Commuter Tote feature the vinyl handles and side panels.
Annette Handbag featuring Moon Garden by Tula Pink for FreeSpirit Fabrics
My Hissy Fit handbag is my daily go-to handbag. This is one of my favorite prints from Moon Garden. I am a reptile fan, and finally having Tula Pink make a snake print made me giddy with joy. I take this bag everywhere!
The pattern and hardware for my Annette came from Emmaline Bags. In Fact, every bag I have ever made has Emmaline’s Hardware. Its top notch hardware from right here in Canada!
In my box of vinyl was this deep yellow that I wasn’t quite sure what to do with. A little brainstorming with the kids, and my Pikachu backpack was born! I designed the face and ears myself, and used the Lindsport Mini Backpack as the body of the bag.
The Sweetpea Saddle Bag is a free pattern from BlueCalla. I love their bags as well, and have made a few. I was testing out the denim lookaline for Troll Brothers. Its got a water resistant backing and a denim look without actually being denim. The main flap was a generous donation of original Tula Pink Prince Charming frogs from a friend that I pieced together into a whole frog. It’s stunning with the bright gold hardware, and the perfect size when I just need the basics.
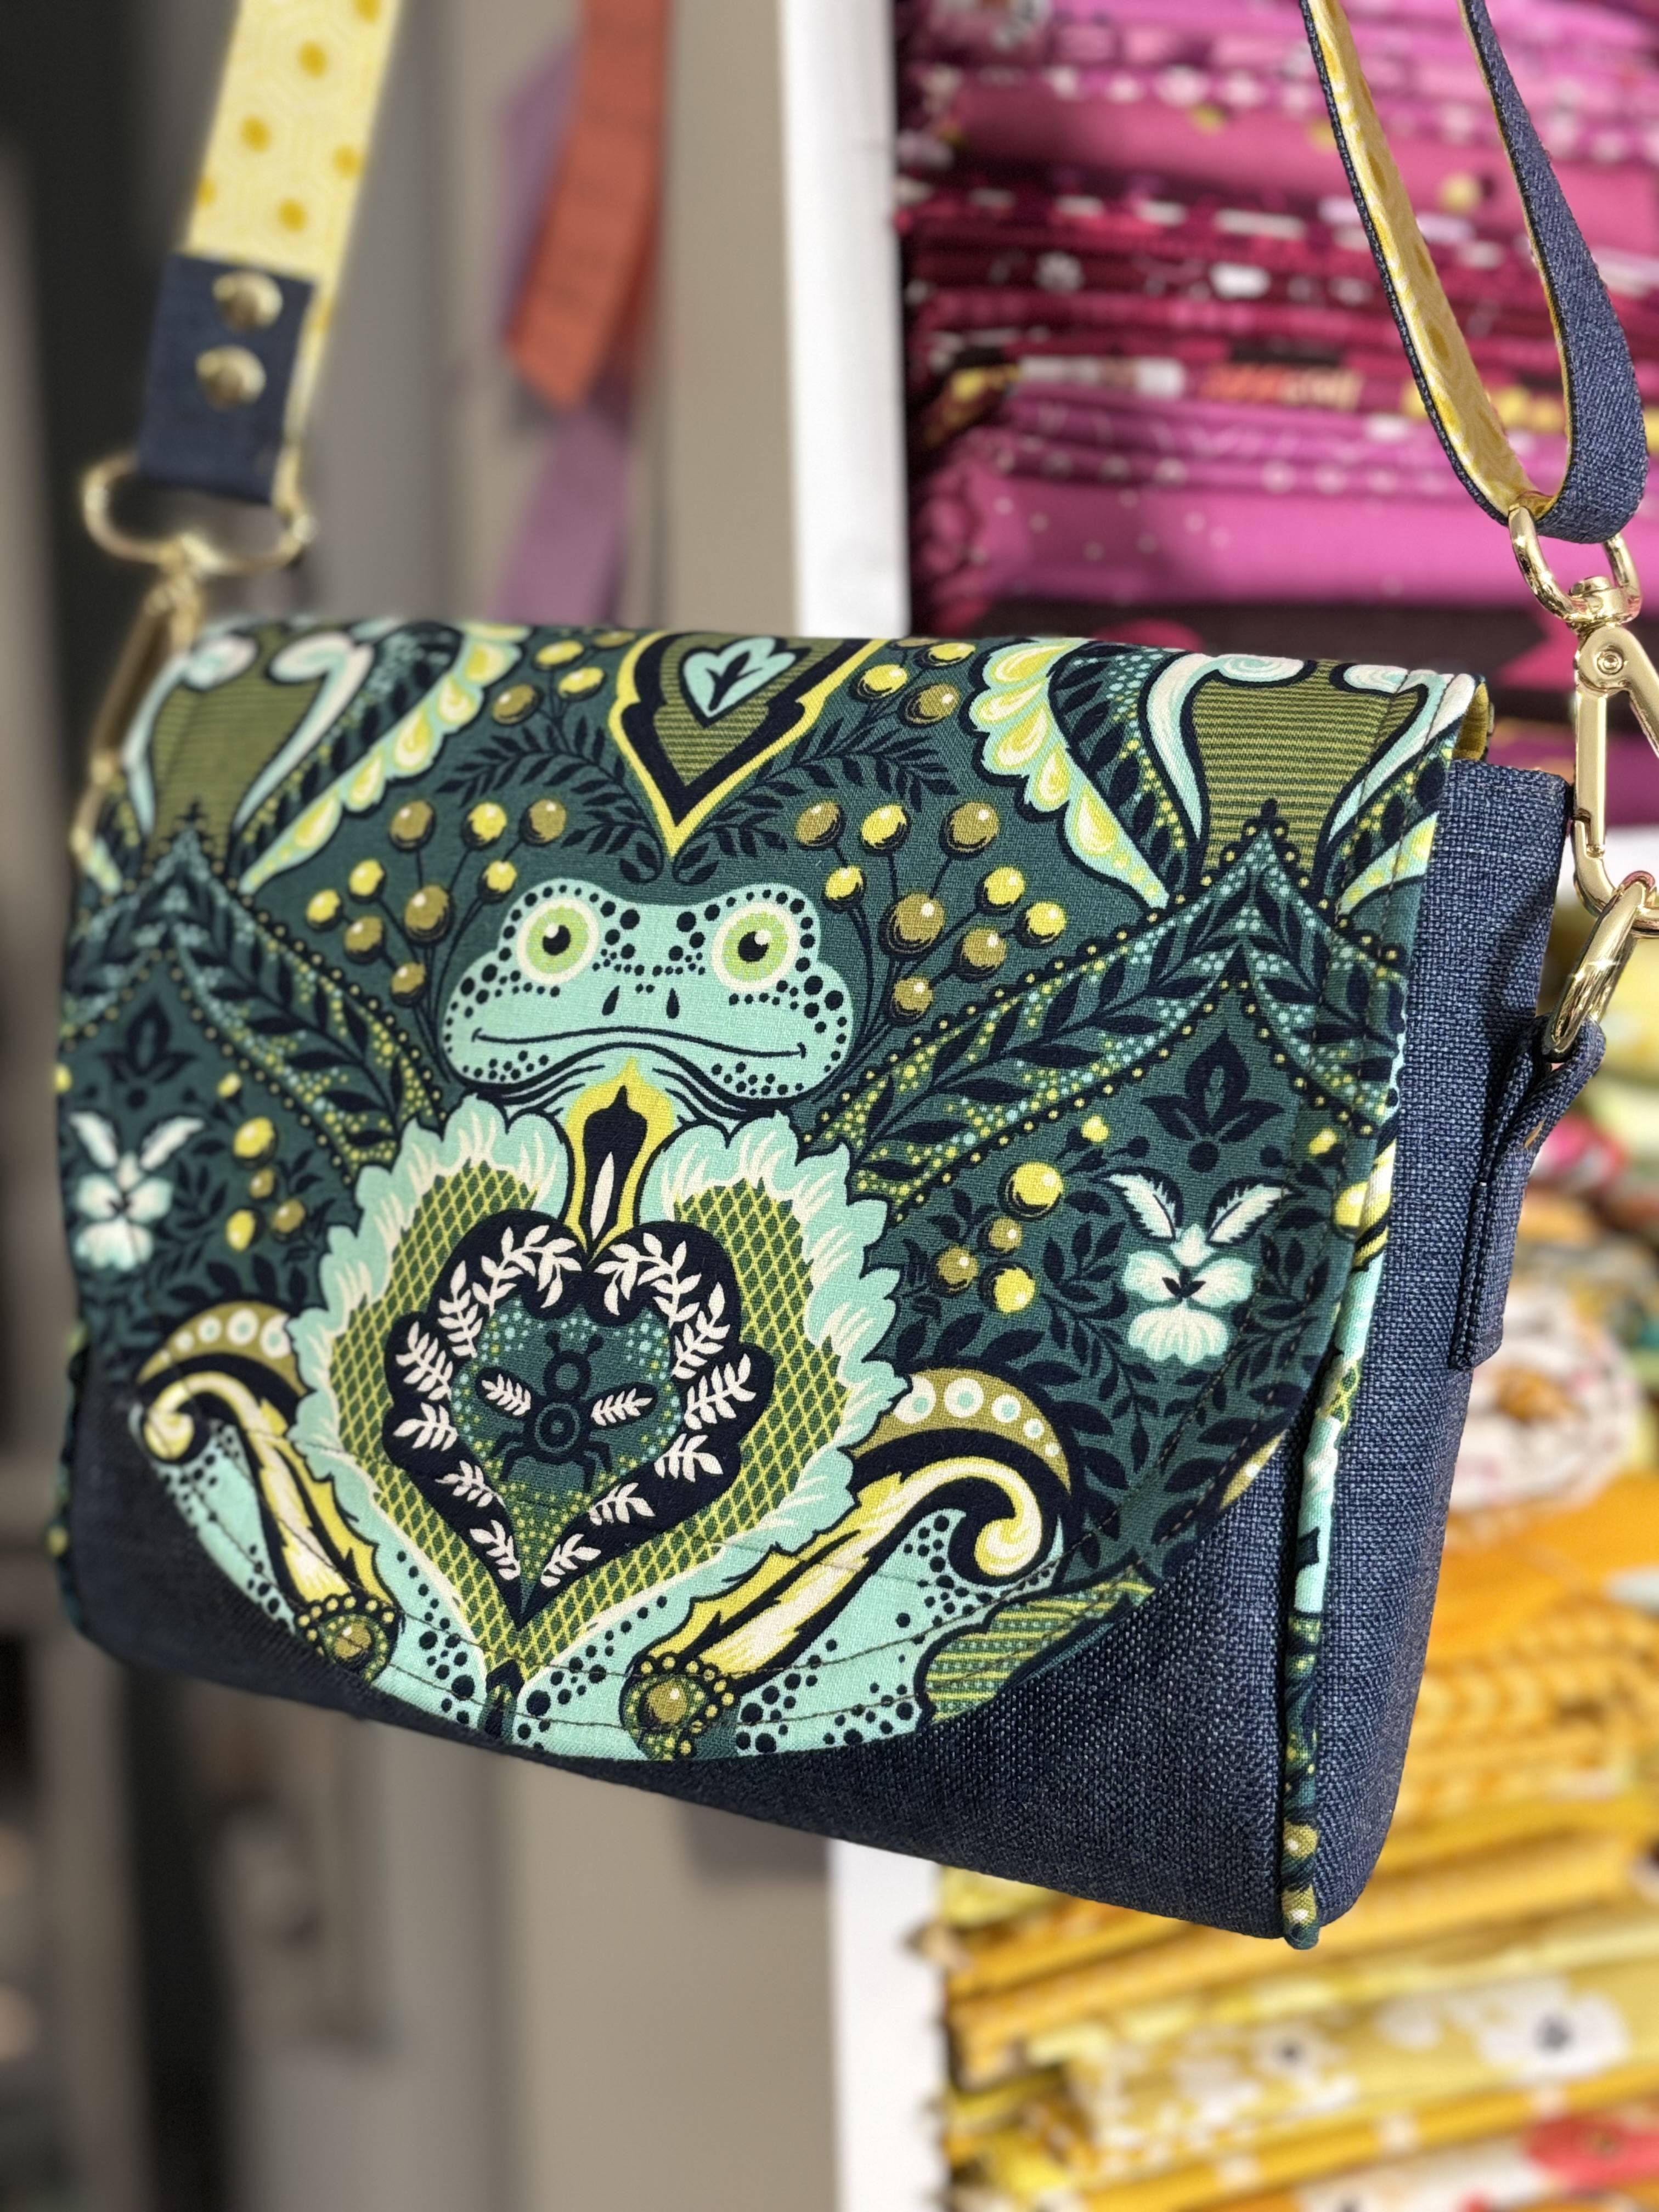
Lastly, I have this gorgeous duo! I was thrilled to be invited as a special guest into teh FreeSpirit Circle of Makers in November. I got to play with Club Hauer’s newest line, Costumes & Cobwebs. The whole line is gorgeous! I was sent this spooktacular cat and owl print, and the frightfully gorgeous Venus Eye Traps, as well as a handful of blender prints from the collection. The second I opened the box, I knew I absolutely needed to make a bag to show them off! I used the Aster Handbag from Blue Calla for the bag, and the Necessary Clutch Wallet from Emmaline Bags for the wallet. The two pair together brilliantly. I also pulled out some Italian leather that’s been waiting for just the right project.
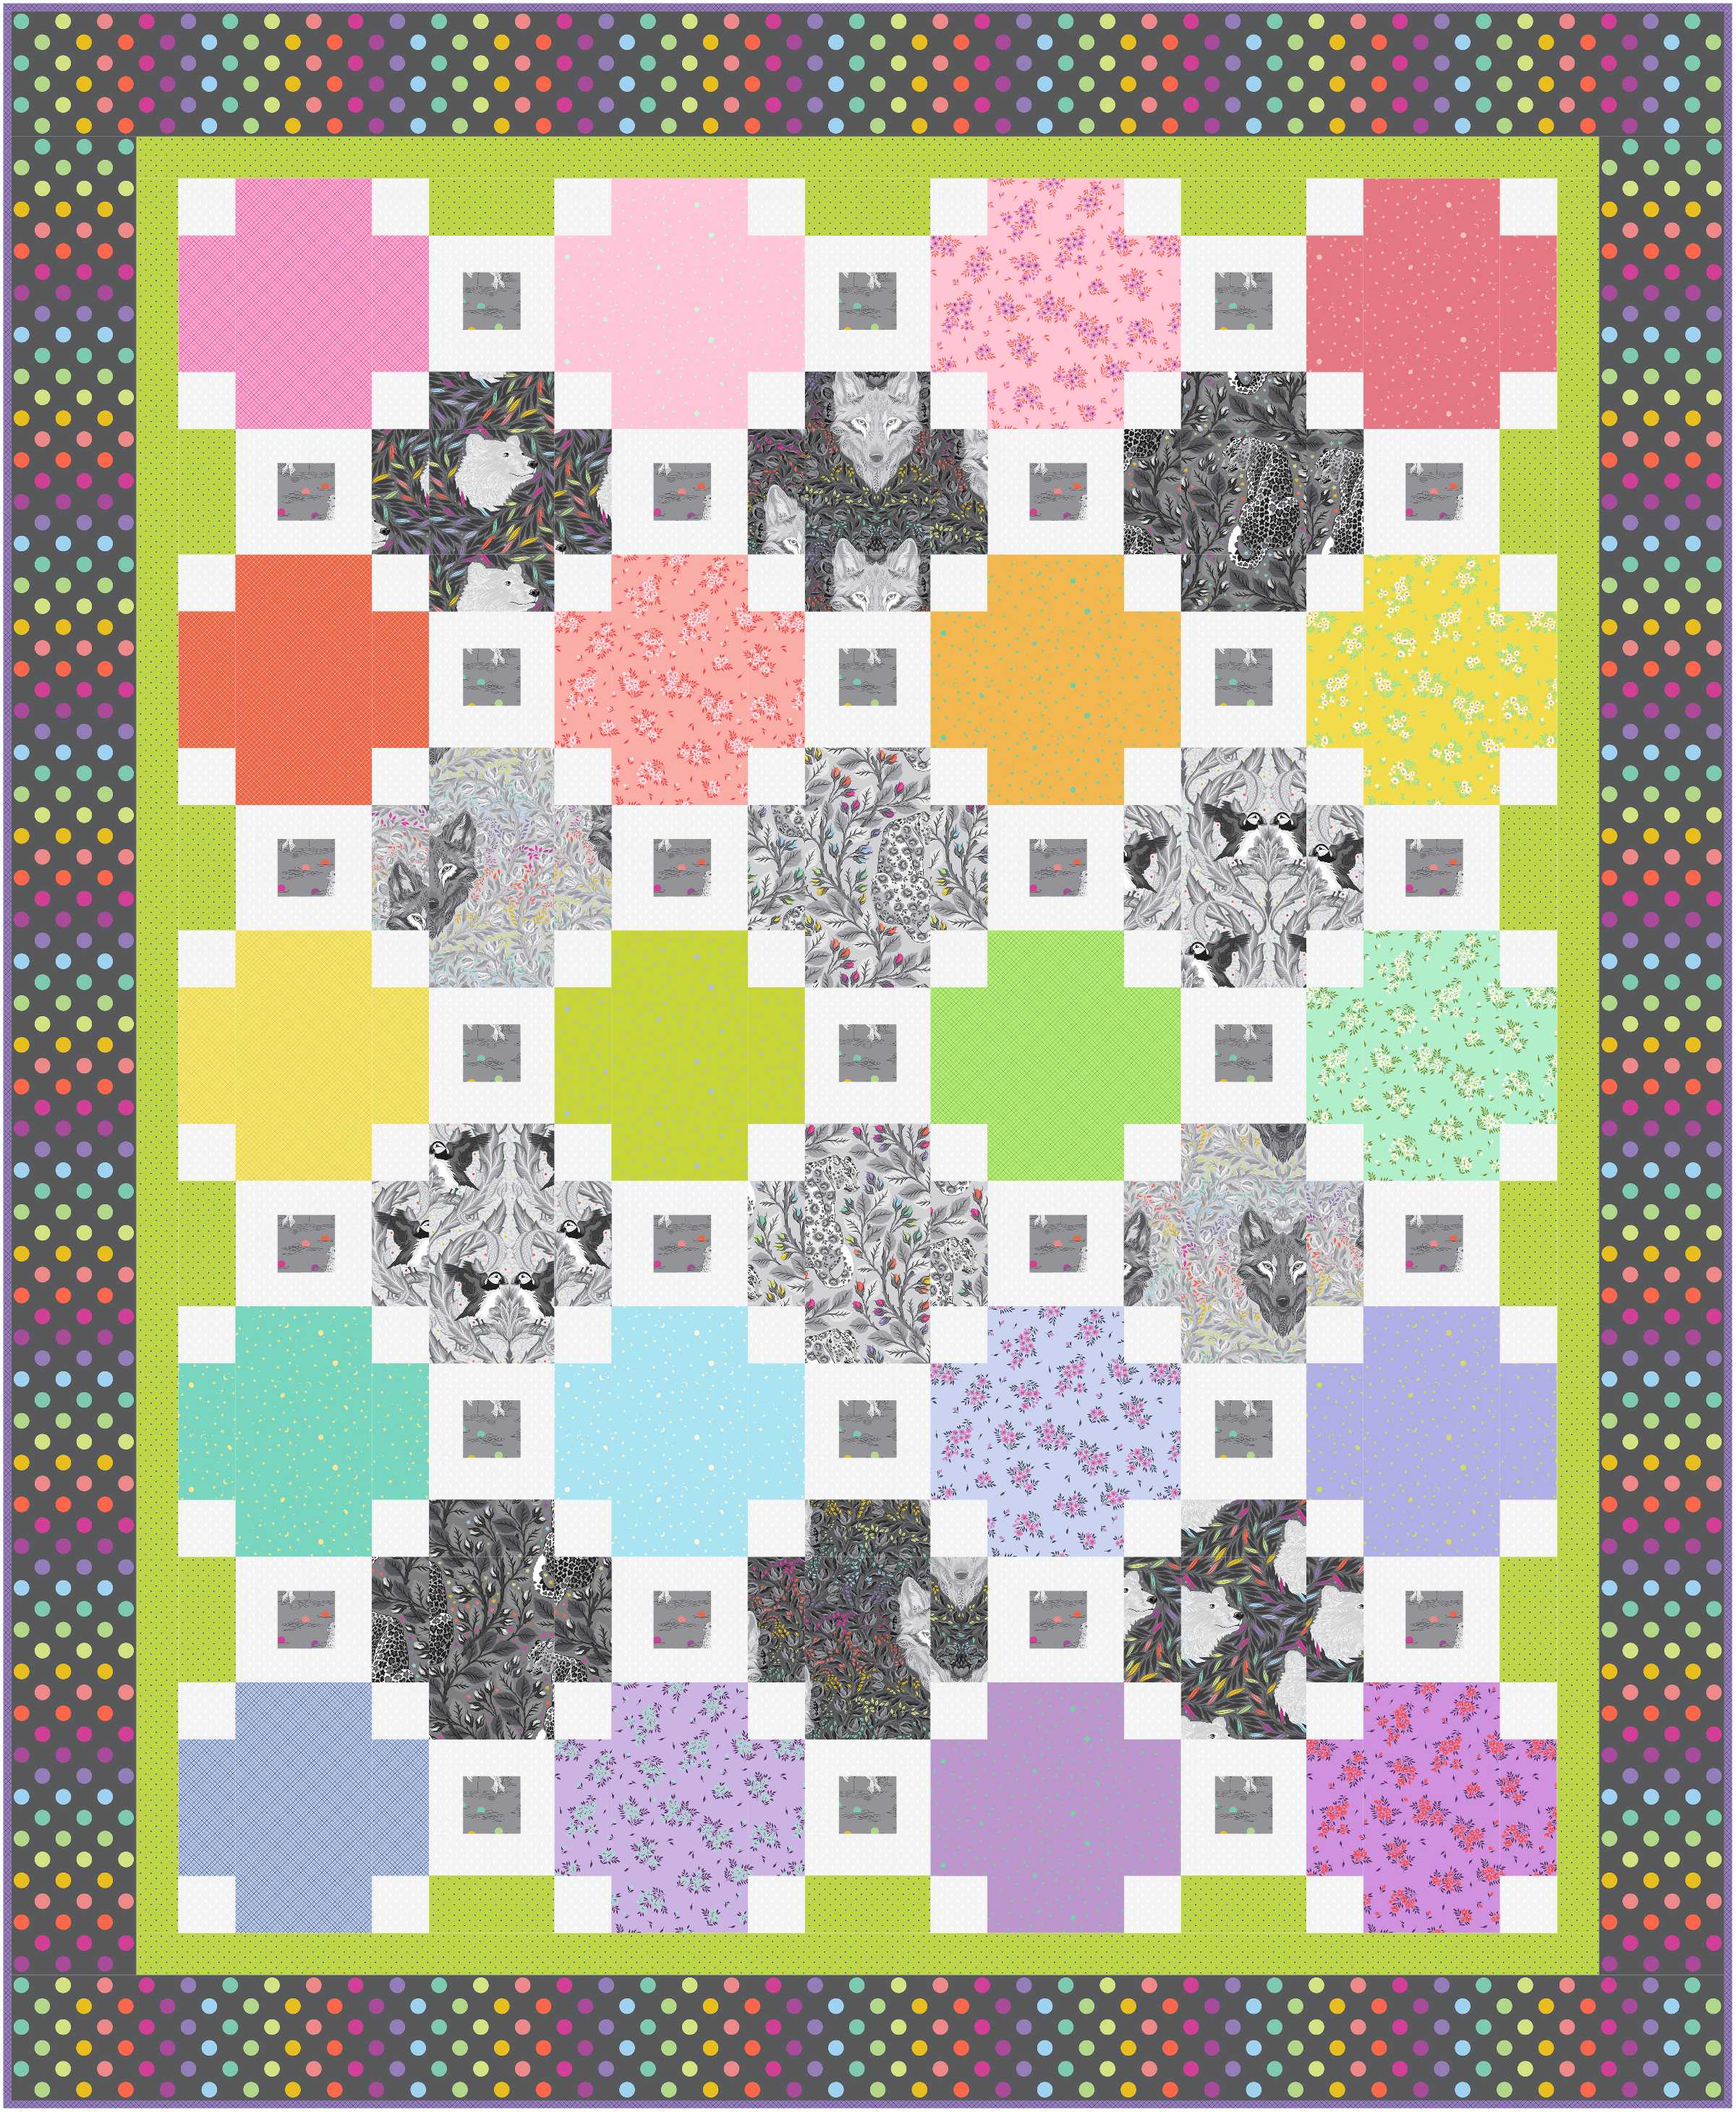
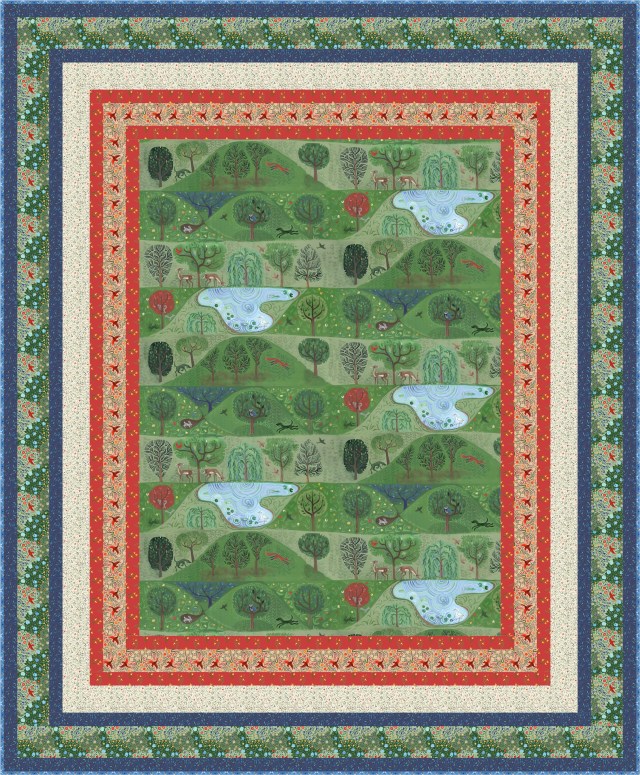
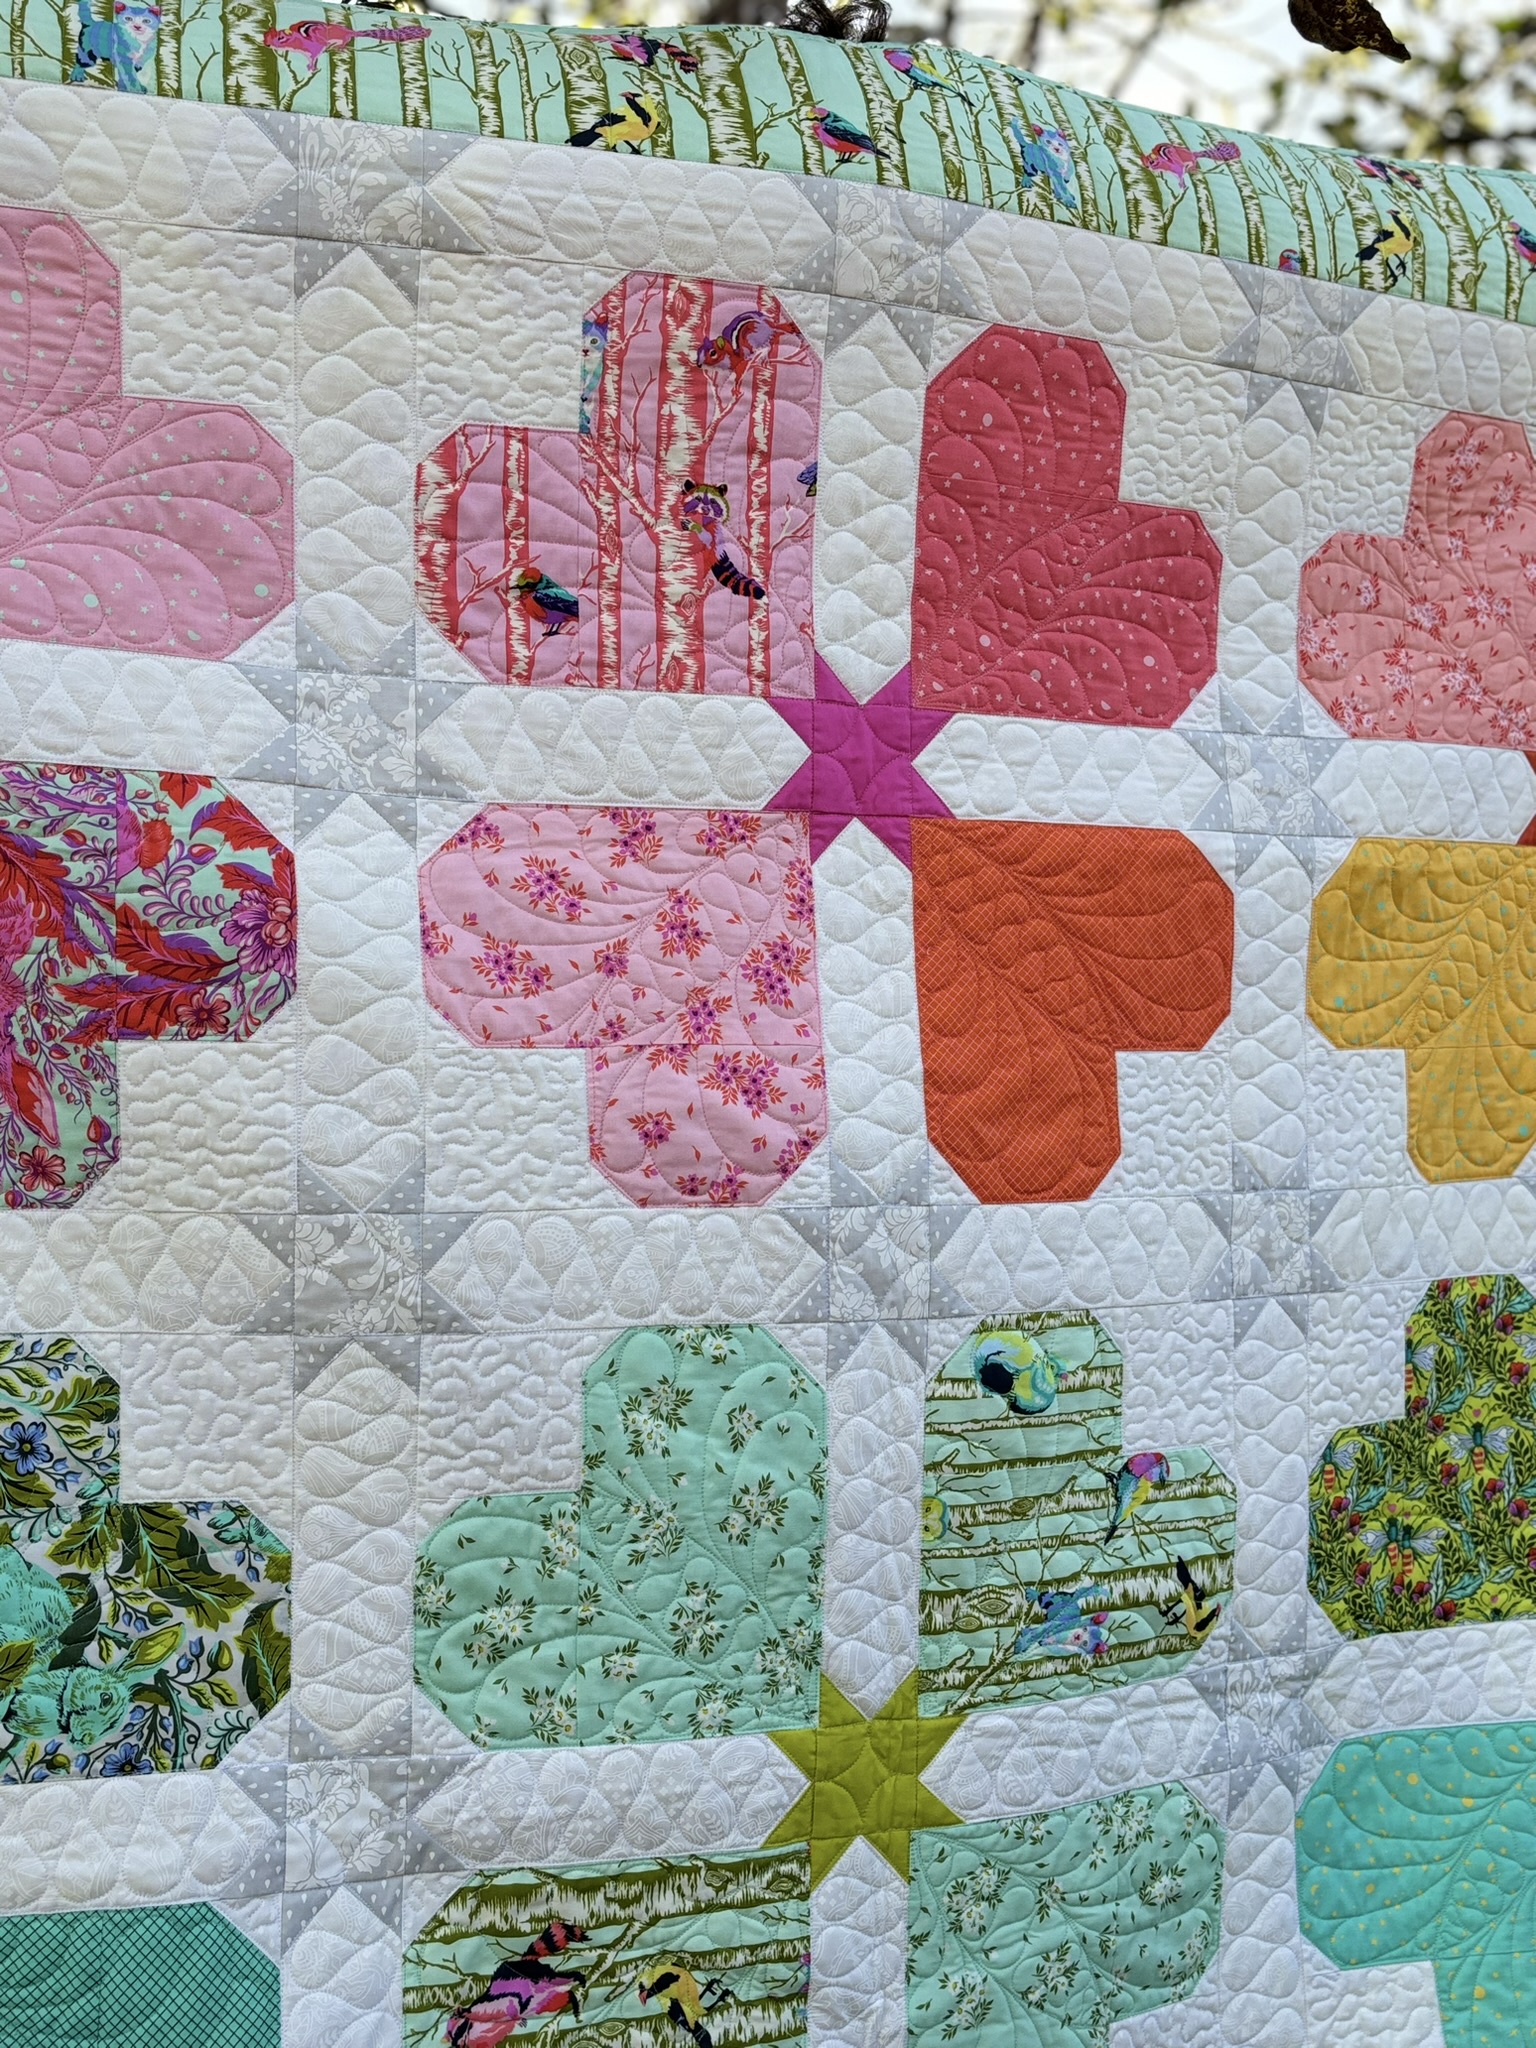
Today is the day! I and thrilled to announce that my heart quilt, Wild Heart, is finally ready!
Wild Heart is a reimagining of my original design, Home is Where the Heart Is, which was published in AQ Magazine all the way back in January 2019. Since it’s initial debut, I have taught this quilt class a number of times, and each time I made notes on how to improve the instructions and construction. I have also made several versions of this quilt digitally and in person. Still, it wasn’t until Tula Pink unveiled her Untamed fabric line that I was truly inspired to finish this pattern, and make it available for everyone.
Untamed spoke to me- a riot of colorful blooms and patterns coming together to create something wonderful. Immediately realized that it would be perfect for my heart quilt. It also inspired the name change. More than ever lately I have been feeling free to live my most authentic life, a little bit wild, a little bit untamed, living in full color as much as possible. I have been travelling more; for quilting and just for fun. I feel more confident in my own skin and taking up space. Some hearts are meant to be free, and that is what this new quilt embodies – the adventure and freedom to live how you want.
Wild Heart is now live in my new Etsy shop alongside the ever-popular Starlines and Zinnia. The pattern includes all the templates and instructions needed to make your own version of Wild Heart. Untamed fabric is shipping local quilt shops this month. I cannot wait to see what fabrics you chose to make you own Wild Heart!
It’s that time of year again. The kids are on their way (or already) back to school, the nights are cooler, the leave are starting to change, and pumpkin spice is back on the menu. Its around this time of year my BFF and I start to plan our annual Halloween quilt, and finish up last years.
This year I worked with few different FreeSpirit designers and their seasonal fabric collections. From frightful to delightful, these Halloween quilts have something for every spooky season connoisseur.
I have two Halloween collections form Club Hauer. Club Hauer always has amazingly detailed collections, they are the perfect balance of spooky and fun. The panels make for quick quilts, and the prints support them or are completely useable on their own.
First up is the Storybook Halloween collection. The collection features two panels – a full size single motif and another of multiple fussy cuttable motifs. The hexagon prints makes for a great border, with so many small details in each piece. its also my personal fave choice for backing. The bats and moon border strips makes for great sashing, and the support prints feature cats, bats, and ghosts – the trifecta of Halloween creatures!
Spellbound Spellbound features the small panel motifs and some of the larger support prints. Tricks and Treats
Tricks and Treats is a wall size quilt utilizing the large panel with a fun bonus, a table runner that can be made on its own, or using the leftover triangle scraps from the wall quilt!
The second Club Hauer collection is Mystic Moonlight. This collection is a little darker, more otherworldly than Storybook. The prints are large and perfect for fussy cutting, featuring some classic creatures of the night. Owls, bats, ravens and black cats take center stage with the support of some very handsome jack-o-lanterns and skulls.
Stirring Up Trouble was my first quilt for this collection. I had visions of cauldrons being stirred and spells being cast while the familiars wait and watch.
Halloween is the time of year when it can be easier to believe in magic. Personally when I picture magic, I thinks sparks and stars, and wanted to incorporate that into the next quilt. Believe in magic features all of the prints, fussy cut into their own magic stars. Even the striped corners are fussy cut to create the secondary patter. Because when it comes to magic, sometimes you don’t know what effects you may end up with (WooooOOOOOOooooo!)
The third quilt is less spooky and more fun. Who casts spells? Witches come to mind. As do wizards. In my mind, what do these particular spellcasters have in common? They wear some pretty distinctive socks. Since I have features witches socks in the past, it was time for the wizards to have their day. If witches wear stripes, then wizards must wear argyle, obviously! LOL! You know me, I’ll never pass up the opportunity for a good play on words 😉 and since wizards seems to make things more complicated than they need to be, this quilt features oodles of FUSSY CUTTING! Bwa-ha-ha!! Scargyle
The next Freespirit Collection is none other than Ghostly Greetings from designer Cori Dantini. This family-friendly Halloween collection features a multi-print panel that screamed (at least to me) a pattern set! The all in one pattern bundle gives you a wall quilt, a table topper or banner, and two pillows that takes care of your quilted decorating needs for the season.
Finally we have Haunted by designer Brenda Walton. This vintage vibe collection throws back to the magic of Halloween as a child. The brightly colored prints were so much fun to work with, I wanted to make a candy inspired quilt. As kids, our number one goal was as much candy as possible in a single night! The Gumdrops quilt (names after a classic candy, of course!) is big enough to snuggle under after trick or treating has ended, watching scary(ish) movies and eating leftover candy.
I hope these quilts inspire you to whip up something spooky and fun in time for Halloween, and perhaps start your own tradition with your quilty friends!
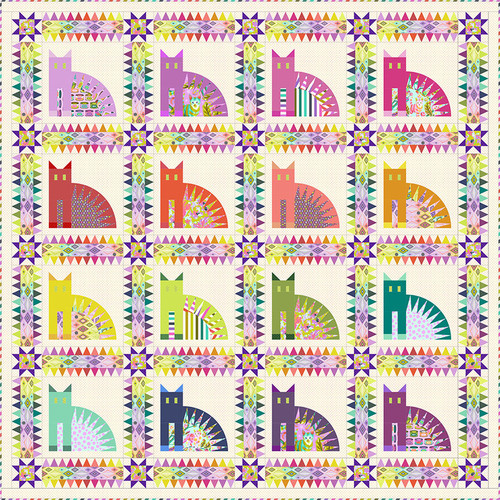
Now that Tabby Road is in LQS everywhere, its time to talk patterns!
Tabby Road is Tula Pink’s 3rd Deja Vu line – a reimagining of a classic collection in updated colors, scales, and in this case, textures! That’s right, the third Deja Vu collection includes three minky prints. These prints are supersize and supersoft, making them perfect for quilt backings, stuffed animals, and even warm linings for clothes!
Curiosity
We all know the old adage about curiosity and what it does to cats. Curiosity can also refer to a large group of cats ( have seen it both as clowder and curiosity) and what I have here is definitely a large group of cats. I took inspiration from some classic quilts and then turned them up a notch or five. The sawtooth sashing and the star cornerstones are all reminiscent of traditional quilts. I wanted to feature the rainbow prism print, and the sashing seemed the best place to do it. Add in a little rainbow gradient and a Curiosity of rainbow cats and we have a fun bright quilt! There’s even a little easter egg in this one- each of the star centers has a tiny fussy cut mouse in the middle!
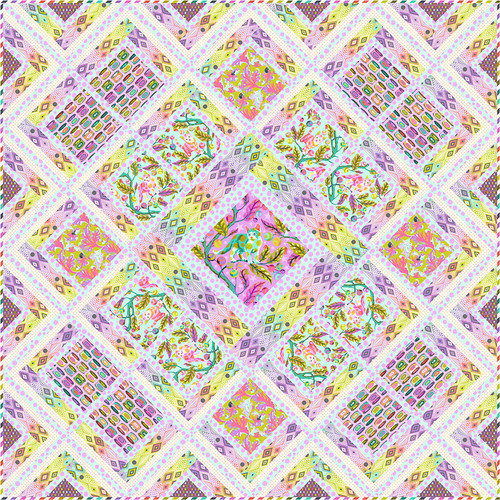
Cotton Candy
This quilt looked good enough to eat, so I named it cotton candy. it features a lot of the fur balls print, which remind me of puff of the aforementioned sweet treat. I like to image the cans of cat food are actually filled with cotton candy, and the fur balls are the cotton candy popping out when you open the cans!
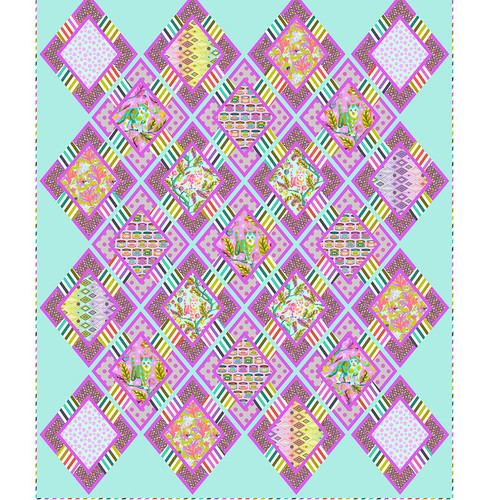
Cat’s Cradle
Tabby road Deja Vu has this fantastic multicolor stripe that makes and obvious binding, however, I liked it so much I really wanted to design a quilt where it had a chance to shine. Cat’s Cradle was the final result after what seemed like days of playing with that stripe. i really wanted to use it to its full potential without overwhelming the maker with STRIPE!!!! Throw in some classic Stacey in Stitches fussy cutting, some neon dots, and a fun background color, and there you have it!
I hope y’all are able to get your paws on this collection while you can. Are you planning on making any of these quilts? let me know in the comments, and of course send me pictures of what you make!