Where Does the Time Go?

Holy Cow.

Is it almost September already? Yup, apparently it is according to my phone, computer, and AQS wall Calender.

August always seems to fly by for me. There were the 10 days on vacation, 5 days waiting for a new video card after the crash of my computer, starting a new quilt for the 2013 CQA Quilt Show (in Penticton this year, only a 5 hour drive! Woo-hoo!), <—- Apparently Woo-hoo is not in the spell check dictionary but woo-bop is. Go figure. I also started the blocks for the 3×6 block swap I am participating in, and the name tag for the RATZ Swap. For those who want to know, RATZ stands for Rapid Tiny Zakka. Zakka means many tiny things in Japanese, so that’s what we make. The last month was needle-books, month before that was key chain tags. I am sorry I missed the needle-books because they look so cute. I am looking forward to the future swaps though. I actually finished my name tag on time and sent it to my partner in New York state. I hope she likes it.


I also received my packets from the Hoffman Challenge. This year marked the 25th anniversary of the challenge, so to celebrate for every 25 entries they would pull a name out of a hat and send off a packet of Hoffman Batiks and Sulky Threads. I got home from vacation to find this package at my door! I love the colors, especially the peacock thread! Batiks are my favorite fabrics, so I was giddy when I got the email saying I had won a prize draw!

I also found a second packet from Hoffman with my letter of acceptance into the trunk show and the goodies they send along: a beautiful cloche pin,  Sulky thread, and a fat quarter of a Hoffman screen print.

I am always excited when my quilts are chosen to be in a show. Even though I don’t win ribbons it is an honor to have my work displayed with some of the best from around the world. I was very excited in 2010 because my quilt Starfire was in the same traveling trunk as Fly Away by Jaqueline de Jonge, who you all know if one of my favorite inspiring quilters! Solaris, an original design, was also chosen to travel in 2011. It should be arriving home in October.

I have been participating since 2010, and I look forward to the new fabric each year. When 2012 was revealed, I was aghast. Its not that the fabric was terrible, its just not my thing. Right up Grandma’s alley, but definitely a few blocks and a kitty corner from mine. But that’s why they call it a challenge, right? Last year, when I had lots of time to sit and draft, I replicated the pieced inner panel from the Claudia Clark Myers/Marilyn Badger collaboration Greensleeves. (I did not include the applique.) Then I emailed Claudia Clark Myers and received permission to sew it up and enter it into the challenge.

I ended up going a different direction last year, but I found for 2012 it was the perfect pattern to showcase and at the same time hide this fabric. Again let me emphasize that while the fabric is nice, it is just REALLY not to my taste. The effect was charming, and I named the quilt My Secret Garden.

The fabric for 2013 is stunning, and I am so happy that it is in my palette. It has quite a large repeat as well as a huge amount of visual content in the repeat. I have an Idea forming for what I want to do. Now the waiting game begins until I can pre-order my fabric from one more of the online retailers. This one will sell out fast!

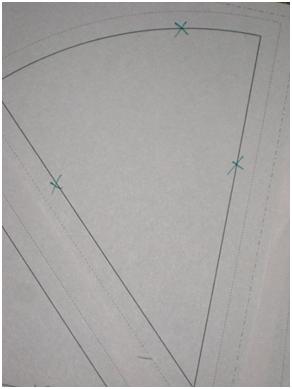
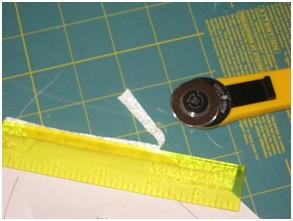
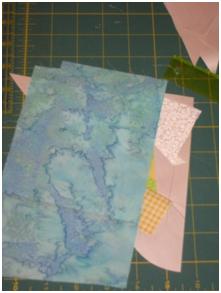
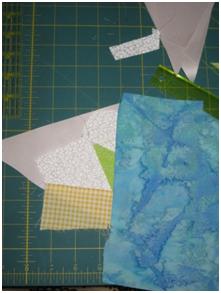
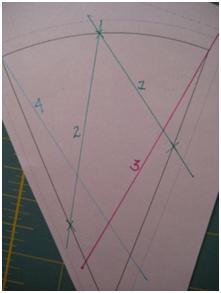
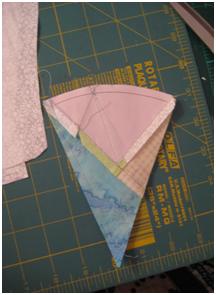
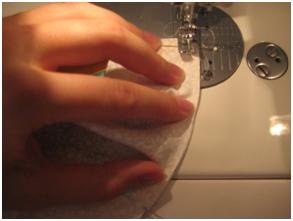
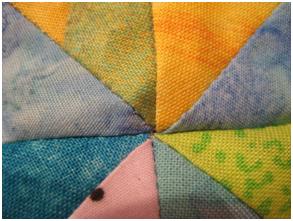
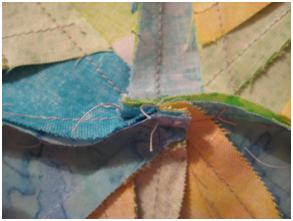
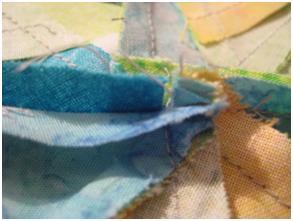
While I was away I started working on my entry for the Canadian Quilters Association Juried Quilt Show. I am making the Jaqueline de Jonge pattern Listen With Your Eyes. Here is a sneak peek at what I have completed so far! My color wheel has more than 100 different fabrics, not a single fabric repeats! I pulled all but 9 from my stash, somehow I was a tad low on yellow/lime and aqua. This is the original quilt, and I got the pattern here.


I also received my Glacier Star quilt back from Julie House of Sculptured Threads Quilting in Arizona. She did an amazing job and I highly recommend her. You can check our her work on Facebook. I am going to enter this quilt into the Georgia Quilt Show. I need to think of a name, any suggestions?


Thanks for being so patient with me! The gallery should be up and running in a week or so. As always, Happy Quilting!

This little fellow was out on my parents deck. The Mountain Bluebirds were out full force one evening, and he had a small run in with the window. I picked him up so he could get over the deck, and he is now happily living in the back  forest.

Wonky Compass Tutorial

Alrighty, for all my Modern Quilt Guild friends (and anyone else who enjoys modern/wonky quilting), here it is! The Wonky Compass Tutorial with 2 methods of construction! I did half of my blocks freestyle and half pre-marked. For those of you who are unsure about freestyle paper piecing the pre-marking method is best.

You need scrap fabric (3 colors per wedge), a marker and straight edge ruler , 8 wedge templates to create the circle, and a template for the border to make the block square. If you need one, you can use my  Quarter Compass Wedge and Template. The template finishes 12″square.

FREESTYLE METHOD

Mark out 3 points on your wedges, one on the upper curve, and one on either side

Lay your first main fabric (yellow) RIGHT SIDE UP on the blank side of the paper. Lay your first scrap of background fabric (white) right sides together (RST from here on out) with the main fabric. Sew a straight line from the center mark to the right side mark.


If your line doesn’t cross the mark, that’s ok!


Check to make sure the fabric covers the section from your sewn line to the seam allowance. Fold the paper back on the line you just stitched. Trim the seam allowance to ¼”. Put the paper back in place and press your fabric open. Repeat for the left side mark, making sure that your seams meet somewhere at or slightly below the seam line at the center mark. This way your points will be nice and pointy later!


Check the wedge with your l0cal wedge inspector, and then continue!


With RST, lay a piece of main fabric (green) from your top right corner to somewhere along the opposite side. The bulk of the fabric should be at the curved top of the wedge. Sew a straight line through the right corner to anywhere you like below your mark on the opposite side. Again, make sure the fabric covers the seam allowance at the top corner. Trim your seam allowances and press. Tear the paper along any intersecting stitch lines to make trimming easier. At this point it does not matter if you have gaping spots or your fabrics weren’t long enough to reach the marks or opposite side, as the last step will cover any of that up!


Take your last piece of scrap fabric (blue) and lay it RST from your top left corner to somewhere along the right side, making sure you can see the background fabric and 2 previous main fabrics extending past the edge of this piece. I like to hold my block up to the light so I can see where the straightest edge of the last fabric needs to be in order to cover all the blank spots.


Sew your line, and check to make sure the remainder of the wedge is covered and there are no missed open spots in the middle of your block.


Trim around the outside of your block, leaving a ¼” seam allowance around your block lines. If you are using the template provided the seam allowances are included on the block, just trim around! You get a wedge that looks like this:


Repeat this process for the remaining 7 wedges. Do not remove paper.

PRE-MARKED METHOD

Mark and draw your stitching lines on your wedge as shown in the example below. Lines 1 and 2 must intersect somewhere along the top curve. Lines 3 must enter through the top right corner, cross line one, and end on the opposite side ( above or below line 2, whatever you want) Line 4 must enter through the top left corner and cross both Line 2 and Line 3. If you want, for blocks with a little more consistency and a more compass-like look, have lines 3 /4 meet the opposite sides below the marks for lines 1/2.


Place your first main fabric and background RST along the straightest edge. Hold it up to the light to align with Line 1 as shown below. Sew along your line, trim and press. Repeat for the remaining lines to get your wedge. The fabric placement is the same for this method as the one above. Lines 1/2 the background is sewn to the main fabric, line 3 is your 2nd color, line 4 is your 3rd color. Repeat for remaining 7 wedges. Do not remove paper.


FINISHING-BOTH METHODS

To finish your Wonky Compass block, trace the curved template onto your background fabric. Cut around the curve, on the line if using the above template, or making sure you have proper seam allowance if you aren’t. I like to leave the outer edges jagged, as shown below. This comes in handy for squaring up your finished block.


Fold your curve in half, find the center and pin. Set aside. Repeat for all curved templates.

Make 2 piles, 4 wedges in each pile. Pin one wedge from each pile RST at the top and bottom. Tear the paper from the pinned section that will be FACEDOWN on your machine. This lessens the bulk in your seam and you still have a stitching guide. Sew on the line. Tear paper from lines 3 and 4 on both wedges, leaving the paper on the center diamond shape and the background fabric. This makes 4 quarter wedges.


I use the three pin method as follows to sew my curved seams. You can use whatever method you are comfortable with.

Pin your curve template to your ¼ wedge at the sides and center. With the curve template facing you, sew your curved seam by easing the fabric into place with your finger or a tool. Press your seam away from the curve. Repeat for remaining ¼ wedges.


To trim, take your 6 ½” square ruler and line the 45 degree angle line with the center seam on your ¼ wedge. Trim the block as shown.


Pin 2 quarter compass blocks together, matching at the curved seam and the points. Sew a ¼” seam. Press open. It is critical that your press all your seams in the same direction in order for your block to lay flat! Repeat for remaining blocks. This makes two ½ blocks, which we sew together to make the compass block. Pin your ½ compass blocks together at the center and the curved seams. Sew your ¼” seam. Open the block and check that the seams all match in the center. Adjust if necessary, but do not press yet. A trick to get perfect seams the first time is to pin through the center of each block. With the pin in a vertical position holding your center point together, place 2 more pins, one to either side. Remove the vertical pin and sew. Voila! Practically Perfect Every Time!


We want our block to lay flat, so that means the seams need to all be pressed in the same direction.

In the picture below you can see that my seams rotate in a counter-clockwise direction. This is the direction I will press, but first I need to open the stitching in the center of my block.


Finger Press your seam open. Find the seams shown below by the pins. They are the seams that made your ¼ blocks into half blocks.


With your seam ripper, very carefully pull out a few stitches, making sure not to rip out the seam connecting your ½ compass blocks. It should look something like this.


Now you can finger press the seams so they lay in the same direction, in this case counter-clockwise. It should look like 4 tiny 1/2square blocks in the center of your seam, like shown. Press your seams flat. Turn you block right side up, and press, using steam to set your block.


Trim your block to 12 ½” square by aligning your ruler with the seams as shown. All that extra fabric you has around the outside is now trimmed away, and you have a perfectly square block!


I hope you enjoyed this tutorial! If anything seems unclear, or you need any help at all, please post below and I will help you as best as I can!

Happy Sewing!