Blogathon Canada is Coming!

I am pleased to announce that Blogathon Canada 2013 is coming! Next weeks kicks off a celebration of Canadian Bloggers, hosted by Sew Sisters Quilt Shop. Whats even better is that my friend and president of the Vancouver Modern Quilt Guild, Holly, will be the a host blogger for BC! Woot Woot!

SewSistersQuiltShop

On November 18th, head on over to Holly’s Red Bike  for all the Blogathon Awesomeness! There are links to all the local BC bloggers (yours truly included), there will be giveaways and prizes, and if you haven’t seen Holly’s Rainbow Girl Quilt, you are missing out!!

I will be sharing a new quilt and a surprise pattern for a past project. Can you guess what it is?? Hint: tick…..

I look forward to seeing you all here on November 18th!

Happy Stitching!


Stacey

Phew, what a week! Lots to share!

Hello everyone! It has been a very busy week here, so I haven’t had time to do much blogging. I say week but in reality the last 15 days have been go go go!Between play-dates and appointments and pick ups and drop off I have had time to finish up all my 3×6 bee blocks and get them in the mail, catch up on my Modern Mystery Quilt, keep up with the Cathedral Window QAL, and make/hunt down some props for my little man’s 6 month photo session today. Throw in some grocery shopping and a sudden change in the weather read: from Indian Summer to torrential rain overnight  and voila! Lots of excuses not to vacuum….. =)

I realize that this is the west coast, and normally by the start of October the rain has moved in, but it was so beautiful for so long. Thanksgiving weekend was so warm people were still out in shorts. We were going to go to the Pumpkin Patch and have ourselves a grand old time yesterday, but record rainfall coupled with a rainfall warning quashed that faster than you can say “eh?” I did get to try Harry’s snowsuit. I don’t think it fits quite right yet……but it sure is warm!

Do I look impressed?

Can you tell I don’t like the rain? I’m from Northern Alberta. It may be -40, but at least the sun is shining and your not soaked! Anywho….onwards!

It seems lately that everything I make heads out the door. I feel like I have been sewing like a madwoman but have nothing to show at the guild meeting tonight.

Here, this is my stack of finished blocks that need more to complete whatever I was going to do with them, 1/2 of the checkerboard for a show quilt,  and all the pieces to a mystery quilt that I can’t for the life of me figure out how the end result will look….*chirp chirp*

However, I do have a cute little project that I whipped up last night as a photo prop that I can take with me. If Harry is going to be a dragon for Halloween, he needs a Princess to kidnap (and probably try to eat).

She looks so happy, just wait until the dragon starts gumming her head =)

The dress fabric is my favorite colorway from Treasures of the East by Hoffman. The teal/aqua colorway was the challenge fabric in 2010. I also picked some up in the fuchsia and sunset colorways. I can’t seem to find them anymore, so If anyone comes across either colorway, please let me know! Poppins Quilt Parlour in Penticton, BC still has the challenge fabric for anyone looking to nab some. They do phone orders!

I drew her face on with Sharpie markers. I think she looks suitably princessy!

You can find the pattern here as well as the tutorial. I just winged it with mine.

I was also doing some pinning while watching TV the other night. This is why you don’t leave your pin box where the cat can get to it!

Luckily I found them all (magnets are wonderful wonderful wonderful!) and I have yet to be stuck with a pin! It did inspire a pincushion design however, but more on that to come!

Tomorrow I will be posting my Scrappy Star block pattern, no tutorial yet though, so please be patient with me! I start a temporary job as a nanny for my friend who just welcomes their little boy yesterday morning. I have all the fabrics for her new baby quilt, I just need to get to it!
Happy Quilting!

A Moment of Discovery

Do you ever have those moments where you go, know why didn’t I think of that? That’s what happened to me the other day while reading Felicity’s blog. She posted about her Craft Buds month entry, and mentioned that she got her book from the local library.

“SAY WHAT? The library has modern quilting books? Well, I don’t know why I didn’t think of that before!” I said to myself.

Needless to say I promptly went online and searched around the Surrey Public Libraries website, and boy, do they ever have quilting books. Not just modern quilting, but any kind of crafting book. And new ones, modern ones! Tula Pink, Elizabeth Hartman, Weeks Ringle and Bill Kerr, and not one but three Kaffe Fassett? My library card now holds a coveted spot in my purse, and I almost have the numbers memorized to log in online and reserve books, but because I am a new cardholder my limit is 10 books at a time. I laughed when she said that, 10 is more than enough to keep me occupied for 2 weeks. I maxed out my limit the first night (better on a library card than a credit card) and have 8 books on order. I have to bring the lot of them back this weeks and exchange them for the next batch (Quilts from the House of Tula Pink is in this batch, yippee!)

While digging through my little trove of quilty goodness, getting inspired and copying templates, I discovered something about myself.  A couple of the modern quilting books were centered around minimalist quilting, or had projects that fall into that category. As much as I can appreciate the design and time that goes into them, I found myself thinking more and more that these were not things I would make for myself. Only one color and a plain white background…? I am not a minimalist!

I love to put as many colors as possible in my quilts.

Rich, vibrant prints and blenders with a tone-on-tone black background? Yes please!

Batiks? Let me at ’em!

Don’t get me wrong, I really like many of the modern quilts I see, and there are many that I would like to/will eventually make. I love anything Tula Pink, I think Pat Bravo makes some amazing fabric lines, and the use of solids is stellar, and I love the projects that come up in the blogs I follow that put a modern spin on the traditional quilts. Don’t even get me started on the amazing quilts of Kaffe Fassett! I just can’t make a quilt with only 3 fabrics in it when there are so many out there just calling my name. Use Me!!

Flights of Fancy, using Nest by Tula Pink for Moda

I am looking forward to this week’s mail, my order of Rock n Romance by Pat Bravo for Art Gallery Fabrics will be arriving! Hurray! I ordered a fat quarter bundle from The Intrepid Thread. It has all the prints with an equal number of matching blenders. I am going to use these to make the Starburst Quilt.

Happy Quilting!

Bottled Rainbows Quilt by Maureen Cracknell Handmade

Today I would like to share a quilt from Maureen Cracknell Handmade. Maureen’s blog is one of my favorites. She always has something creative, fun and inspiring to share with us. That she does it with 3 children makes it even more amazing!

Maureen Cracknell Handmade, Bottled Rainbows

Image courtesy of Maureen Cracknell Handmade

The Bottled Rainbows tutorial is one that many modern quilters know. It inspired one of our VMQG Challenges last year, and the resulting quilts are always beautiful and colorful. Maureen took Bottled Rainbows to the next level by using shapes and motifs instead of just squares and rectangles. You can read more about Maureen and her Bottled Rainbows Quilt here : Maureen Cracknell Handmade: My Bottled Rainbows Quilt : :. I love her construction techniques. You can also find the original Bottles Rainbows Post and Tutorial here.

Thank you Maureen for allowing me to share your work!


VMQG Pincushion Swap

My guild, the Vancouver Modern Quilt Guild, is participating in a nationwide pincushion swap! I am excited! I love swaps, its is so much fun to send your work out and get something back in the mail. Its like Christmas! You can find more information on the swap at the Vancouver Modern Quilt Guild Blog. You can also find information about the guild and how to join. We love to see new faces and quilts! Everyone is welcome, there is such a wide inspiring range of talents!

Holly, of (Holly’s Red Bike), Felicity posted a couple pincushion tutorials on the VMQG blog ( thank you Holly for the correction) and I was immediately drawn to the Cathedral Window Pincushion over at My Go-Go Life. I have always wanted to try a Cathedral Window quilt, but have never gotten around to it. This pincushion was the perfect way to the try the technique, and now I am hooked. I am going to tweak it a bit and try a couple of things out. I really enjoy all the tutorials Kim has on her blog, and I hope you all head on over and check it out!

For my pincushion I used a Kona Solid in Linen for my square, and used Moda Bliss for my pops of color. The grey polka dot in the center was a random fat quarter I picked out of my stash. It might be a Riley Blake fabric….

I had so much fun making the front and realized I has some good scrappy pieces left over so I decided to have fun with the back too! I also made a covered button with the leftover scraps from that, and voila! A Cathedral Window Pincushion. I am going to make some more for and exciting event coming up with the guild, but more on that later!

Enjoy the tutorial and as always,

Happy Quilting!

Modern Mystery Quilt Challenge

The American Quilters Society is hosting a modern Mystery Quilt. The quilt was designed by Weeks Ringle and Bill Kerr, authors of Quilts Made Modern. The best part? Its free! It is a 6 part/week Mystery Quilt, and part 1 is up now. Part 2 will be up next week.

Because this is a free quilt-a-long, I would love for everyone to participate and send me pictures of your progress week to week! I will post pictures as we go, and then after the last installment we will have a final reveal of everyone’s finished quilt tops! You will get to vote for your favorite, and the top with the most votes will win a fat quarter pack! That’s right! I will put together a packet of 5 fresh modern fat quarters for one of my lucky readers to win! So please, share this with all your friends and lets have some fun! The deadline for submissions will be November 14th, 2012. Voting will run from November 15th to November 25th, and the Winner(s) will be announced November 26th. Voting Closed. 

To Participate:

1. Comment below so I know how many people interested. For every 10 entrants I will add a Fat Quarter Packet.  If there are more than 10 entries we will have a first, second and third place!

2. Encourage your friends to follow the blog and vote for your quilt! The more followers, the more votes!

3. Send a photo of your finished quilt top ( it does not have to be quilted) by November 14th, 2012

Here is the link! I can’t wait to see what everyone comes up with!

This challenge will be open to international participants as well! Quilting is its own language, one that is spoken with color and thread and heard with the eyes, and understood by all!

As Always,

Happy Quilting!


Wonky Compass Tutorial

Alrighty, for all my Modern Quilt Guild friends (and anyone else who enjoys modern/wonky quilting), here it is! The Wonky Compass Tutorial with 2 methods of construction! I did half of my blocks freestyle and half pre-marked. For those of you who are unsure about freestyle paper piecing the pre-marking method is best.

You need scrap fabric (3 colors per wedge), a marker and straight edge ruler , 8 wedge templates to create the circle, and a template for the border to make the block square. If you need one, you can use my  Quarter Compass Wedge and Template. The template finishes 12″square.

FREESTYLE METHOD

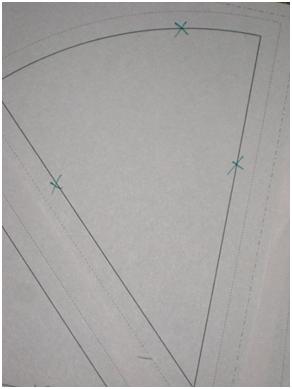
Mark out 3 points on your wedges, one on the upper curve, and one on either side

Lay your first main fabric (yellow) RIGHT SIDE UP on the blank side of the paper. Lay your first scrap of background fabric (white) right sides together (RST from here on out) with the main fabric. Sew a straight line from the center mark to the right side mark.


If your line doesn’t cross the mark, that’s ok!


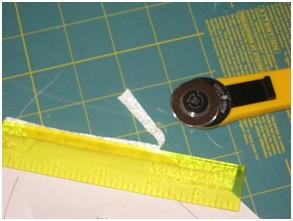
Check to make sure the fabric covers the section from your sewn line to the seam allowance. Fold the paper back on the line you just stitched. Trim the seam allowance to ¼”. Put the paper back in place and press your fabric open. Repeat for the left side mark, making sure that your seams meet somewhere at or slightly below the seam line at the center mark. This way your points will be nice and pointy later!


Check the wedge with your l0cal wedge inspector, and then continue!


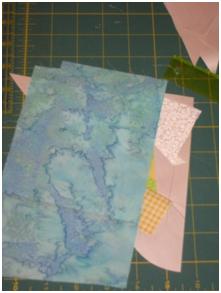
With RST, lay a piece of main fabric (green) from your top right corner to somewhere along the opposite side. The bulk of the fabric should be at the curved top of the wedge. Sew a straight line through the right corner to anywhere you like below your mark on the opposite side. Again, make sure the fabric covers the seam allowance at the top corner. Trim your seam allowances and press. Tear the paper along any intersecting stitch lines to make trimming easier. At this point it does not matter if you have gaping spots or your fabrics weren’t long enough to reach the marks or opposite side, as the last step will cover any of that up!


Take your last piece of scrap fabric (blue) and lay it RST from your top left corner to somewhere along the right side, making sure you can see the background fabric and 2 previous main fabrics extending past the edge of this piece. I like to hold my block up to the light so I can see where the straightest edge of the last fabric needs to be in order to cover all the blank spots.


Sew your line, and check to make sure the remainder of the wedge is covered and there are no missed open spots in the middle of your block.


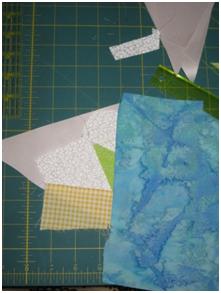
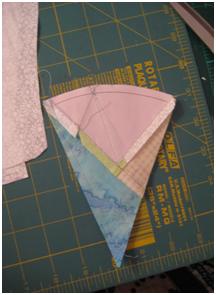
Trim around the outside of your block, leaving a ¼” seam allowance around your block lines. If you are using the template provided the seam allowances are included on the block, just trim around! You get a wedge that looks like this:


Repeat this process for the remaining 7 wedges. Do not remove paper.

PRE-MARKED METHOD

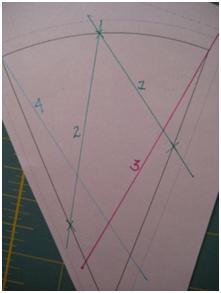
Mark and draw your stitching lines on your wedge as shown in the example below. Lines 1 and 2 must intersect somewhere along the top curve. Lines 3 must enter through the top right corner, cross line one, and end on the opposite side ( above or below line 2, whatever you want) Line 4 must enter through the top left corner and cross both Line 2 and Line 3. If you want, for blocks with a little more consistency and a more compass-like look, have lines 3 /4 meet the opposite sides below the marks for lines 1/2.


Place your first main fabric and background RST along the straightest edge. Hold it up to the light to align with Line 1 as shown below. Sew along your line, trim and press. Repeat for the remaining lines to get your wedge. The fabric placement is the same for this method as the one above. Lines 1/2 the background is sewn to the main fabric, line 3 is your 2nd color, line 4 is your 3rd color. Repeat for remaining 7 wedges. Do not remove paper.


FINISHING-BOTH METHODS

To finish your Wonky Compass block, trace the curved template onto your background fabric. Cut around the curve, on the line if using the above template, or making sure you have proper seam allowance if you aren’t. I like to leave the outer edges jagged, as shown below. This comes in handy for squaring up your finished block.


Fold your curve in half, find the center and pin. Set aside. Repeat for all curved templates.

Make 2 piles, 4 wedges in each pile. Pin one wedge from each pile RST at the top and bottom. Tear the paper from the pinned section that will be FACEDOWN on your machine. This lessens the bulk in your seam and you still have a stitching guide. Sew on the line. Tear paper from lines 3 and 4 on both wedges, leaving the paper on the center diamond shape and the background fabric. This makes 4 quarter wedges.


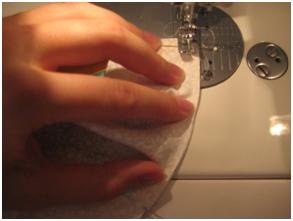
I use the three pin method as follows to sew my curved seams. You can use whatever method you are comfortable with.

Pin your curve template to your ¼ wedge at the sides and center. With the curve template facing you, sew your curved seam by easing the fabric into place with your finger or a tool. Press your seam away from the curve. Repeat for remaining ¼ wedges.


To trim, take your 6 ½” square ruler and line the 45 degree angle line with the center seam on your ¼ wedge. Trim the block as shown.


Pin 2 quarter compass blocks together, matching at the curved seam and the points. Sew a ¼” seam. Press open. It is critical that your press all your seams in the same direction in order for your block to lay flat! Repeat for remaining blocks. This makes two ½ blocks, which we sew together to make the compass block. Pin your ½ compass blocks together at the center and the curved seams. Sew your ¼” seam. Open the block and check that the seams all match in the center. Adjust if necessary, but do not press yet. A trick to get perfect seams the first time is to pin through the center of each block. With the pin in a vertical position holding your center point together, place 2 more pins, one to either side. Remove the vertical pin and sew. Voila! Practically Perfect Every Time!


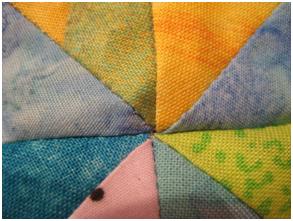
We want our block to lay flat, so that means the seams need to all be pressed in the same direction.

In the picture below you can see that my seams rotate in a counter-clockwise direction. This is the direction I will press, but first I need to open the stitching in the center of my block.


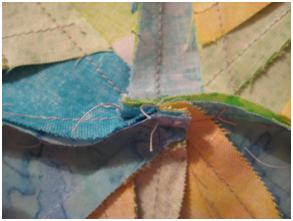
Finger Press your seam open. Find the seams shown below by the pins. They are the seams that made your ¼ blocks into half blocks.


With your seam ripper, very carefully pull out a few stitches, making sure not to rip out the seam connecting your ½ compass blocks. It should look something like this.


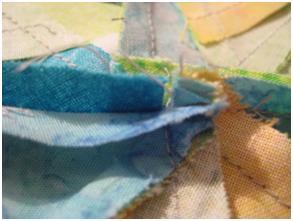
Now you can finger press the seams so they lay in the same direction, in this case counter-clockwise. It should look like 4 tiny 1/2square blocks in the center of your seam, like shown. Press your seams flat. Turn you block right side up, and press, using steam to set your block.


Trim your block to 12 ½” square by aligning your ruler with the seams as shown. All that extra fabric you has around the outside is now trimmed away, and you have a perfectly square block!


I hope you enjoyed this tutorial! If anything seems unclear, or you need any help at all, please post below and I will help you as best as I can!

Happy Sewing!


Welcome to my Quilty World!

Welcome to Stacey in Stitches!

I have finally started The Blog. Blogging is a new experience. I had never read a blog until a few months ago, even though my fellow guild members all talk about all the wonderful things they find and friendships they have made. I kept thinking that bloggers were mostly angst-ridden teenagers who never grew up and use blogging as a medium to vent. I am sure many still do, BUT, to my delight and surprise (and embarrassment that it took me FOREVER to actually discover this), it is a wonderful way to meet people with new and inspiring ideas, and to learn new things about the things you already love! Like QUILTING!

I love to quilt. I have been quilting for 10 years now, and there is no foreseeable point in the far future when I might ever stop. Maybe if I lose both hands, but as long as they have helper monkeys to run the fabric through for me I will be fine! I can’t even run out of room for my fabric stash, because let’s face it, that is what Rubbermaid containers and crawl spaces were made for! Thank goodness for understanding husbands and partners, though I think they all secretly think if they complain too loudly that we will hem all their pants 3 inches too short!

So about me…..I am a founding member of the Vancouver Modern Quilt Guild, an although my quilts are not what many would call modern, they certainly aren’t “traditional” either. I design and sell quilts and quilt patterns.  I am also a new Mom to my cute-as-a-button needs-more-quilts son who was born in March of this year, so if I devote a blog post or two please bear with me. He is my first after all.

As I get started into the world of Modern Quilting, blogging, and all that fun crafty stuff, I hope you enjoy the journey with me!