Pattern Roundup, Day 4

It inevitably ends up that, as I am submitting designs for new collections, that not all will make it into a free pattern. If it is a design that I really like, I will occasionally save it for future collections. Other times, I love it so much in its current form, that I SIMPLY CANNOT WAIT. That’s right, I said that in all caps. By now y’all know I am VERY passionate about my quilting.

For those must-make projects, I like to submit them as patterns for AQ Magazine. I have been working with the AQ team for many years now, and the experience has been so positive and fulfilling that I will continue to work with and support the company. My quilts have been published in over a dozen issues, online as web exclusives, used as member exclusive rewards, and turned into kits. The team at AQ are friendly, thoughtful, and just overall fun and wonderful to work with.

You can find these quilts in the paper back-issues or online if you are a member. I highly recommend and AQ membership. They keep all of the back issues online and can access them at any time, as well as receiving the newest issues as they release.

The January 2020 featured a quilt I made using the Tula Pink collection Monkey Wrench. It was a super fun and bright collection that featured monkeys, cockatiels, and frogs (FROGS!!!!) Monkey’s Lunch is super quick and easy to put together. The photographer to AQ Magazine went on a roadtrip for this shot, and I love it!

Monkey’s Lunch – January 2020 Photo courtesy of AQ Magazine

July 2020 featured my quilt Amethyst. This piece was made for the 2014 Hoffman Challenge and was quilted by Joan Nicholson of Maple Leaf Quilters. the quilt finishes 40″ x 40″, a perfect accent wall size. It was inspired by a piece of amethyst, which got me thinking about crystalline structures and how they come together, and this piece was the result.

Amethyst – July 2020 Photo courtesy of AQ Magazine

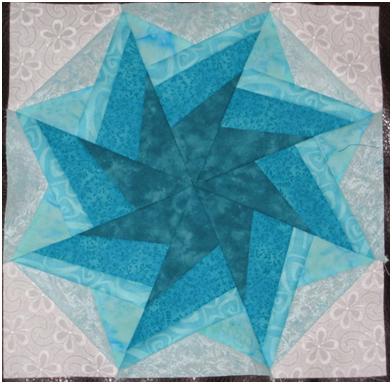
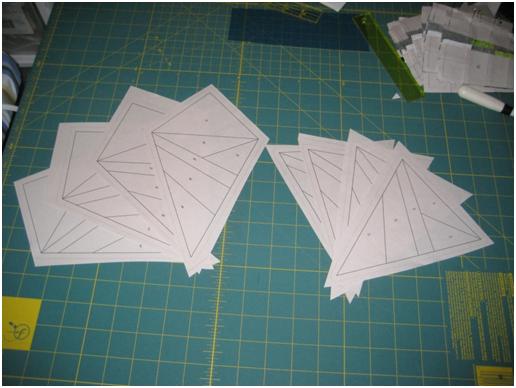
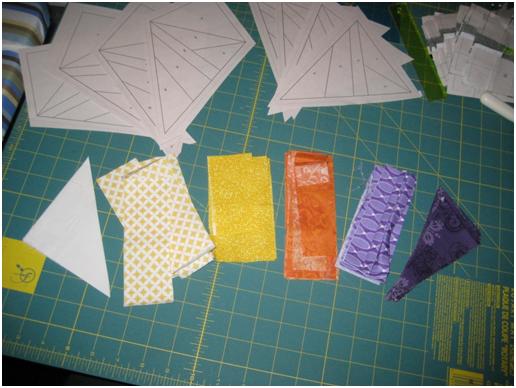
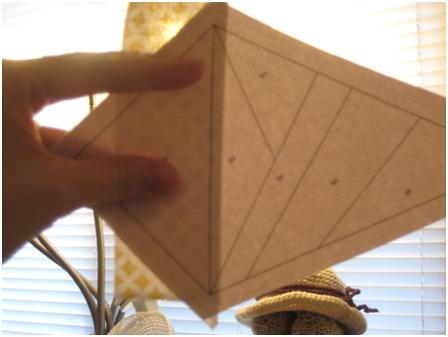
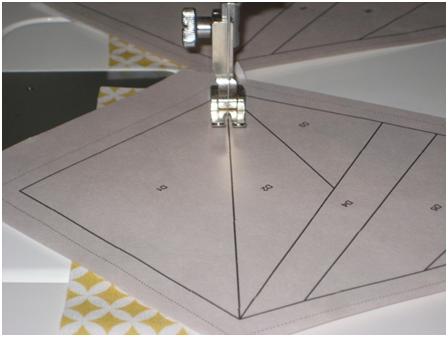
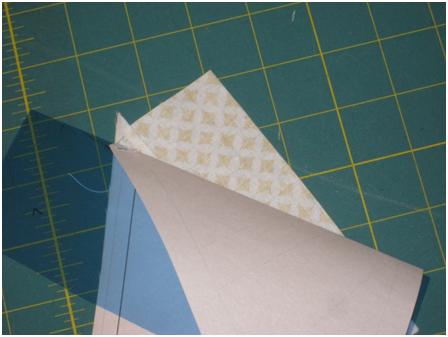
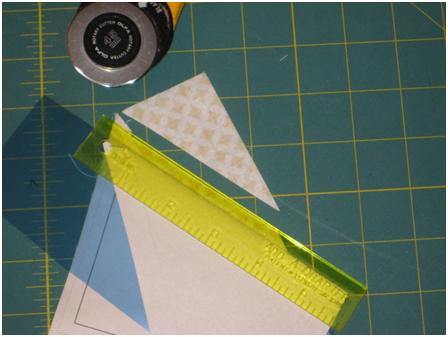
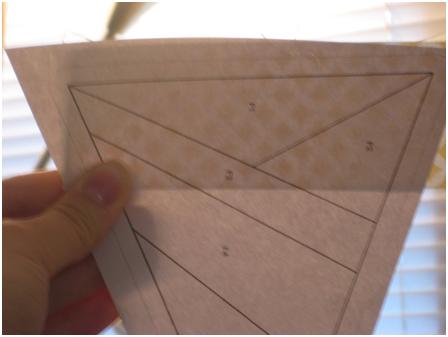
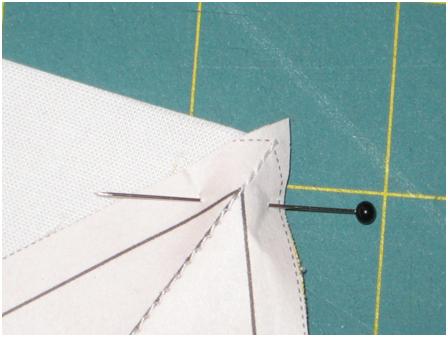
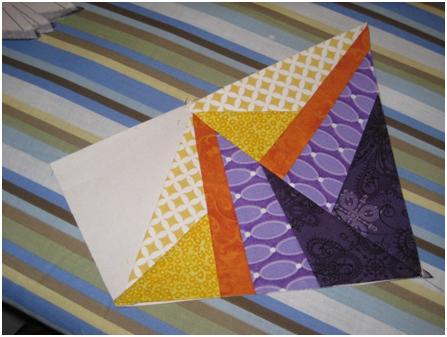
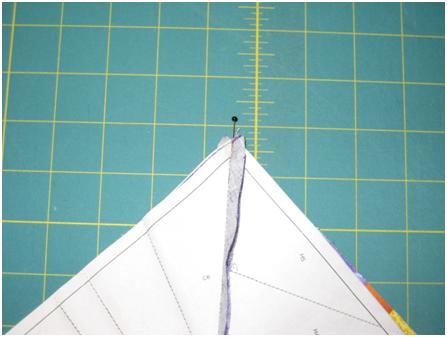
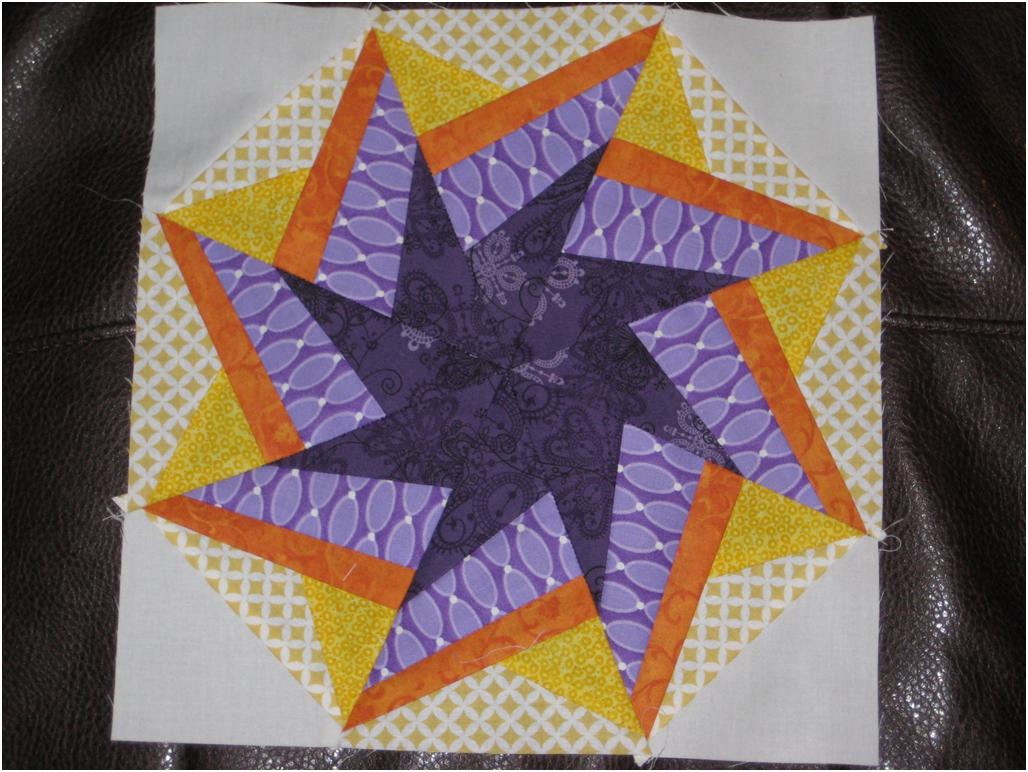
In the November 2020 issue, you will find one of my absolute favorite quilts of that year; Kaleidoscope. This design has been floating around in my maybe folder for a while now, and when Tula Pink released True colors, I knew I finally found the perfect fabric match for this design. Kaleidoscope is foundation paper pieced and template pieced. It is definitely an advanced project, and oh so stunning! I had it send off and custom quilted by Teresa Silva of Quilting Is My Bliss. She did an absolute stellar job and I couldn’t be happier with the results. Teresa’s quilting is well worth the cross-border shipping.

Kaliedoscope – November 2020 Photo courtesy of AQ Magazine

I kicked off 2021 with Family Hearts. When I came up with the design, I had been thinking a lot about family, and what it means. Now more than ever people are recognizing the importance of family. And Family means different things to different people. Some have the family they were born into, and for others family are the people you have chosen and have chosen you, family through love. I am so fortunate to have both in my life; my family through blood and my family through love. I don’t know where I would be without those people, and the support and love they provide me, and accept from me in return. I wanted to make a non-linear family tree to represent the connections I have with my people, and thought that hearts were the perfect way to do it. I chose a rainbow spectrum of colors, using a combination of Handwork and Sunprints by Alison Glass for the fabrics.

Family Hearts – January 2021 Photo courtesy of AQ Magazine

Starlines came next, and was the featured quilt for the cover of the March 2021 issue! This quilt was a real departure from my usual colorful quilts, and I am so happy with it. Starlines features Linework by Tula Pink, with just a spot of bright color to liven it up. I love the green floral from True Colors and will happily use it in everything I can. I designed this on a very cold and snowy day, and in my minds eye the quilt is a serene winter landscape, with the hope of spring just around the corner. I fussy cut the different motifs from the Linework fabrics, and groups the pops of color from the fabrics together, with the warm spectrum on the left and the cool spectrum on the right. I think my favorite print from the collection is the Lemur.

Starlines – March 2021 Cover Photo courtesy of AQ Magazine

The next quilt released only last month is another personal favorite, Delphinium. This is another design I have been playing with on and off for a while. I have a practice quilt, much smaller and in completely different colors, that I have been slowly working on, but the choices didn’t feel quite right. When I saw the Norma Rose collection by Natalie Barnes, I KNEW it was the perfect collection for Delphinium. Vibrant colors and subtle textures combined with the Ruby and Bee solids from Windham Fabrics, everything about this quilt fells bright and alive. The quilting was a labor of love, and completed by my good friend and expert quilter, Miriam March of Whispering Pines. We spent the better part of the day choosing the quilting and layout placement for each motif. This quilt will be the centerpiece quilt in the living room of my new home (yep, moving once again, and for the final time!)

Delphinium – May 2021 Photo courtesy of AQ Magazine

There are more quilts slated to release in later issues this year, and well into 2022! I cannot wait to show you what I have come up with!

Happy Stitching!

Guess Who’s Back!

Well, after a long Christmas break I am back ready to rock and roll (and sew)! The last months has been a super whirlwind of sewing, cooking, baking and family. It was the first Christmas with our little one in our new home with all the family here (and only one person sleeping on the couch/floor). Then 10 days on the mountain with my parents and grandparents with no cell coverage and spotty internet, where the cards abounded! Its been a long time since we had everyone together for the holidays, and I forgot how much fun it is playing cards until midnight, yelling and scrapping and basically having a grand old time I BUY!! I BUY!! NOOOOOOOOOO!!!!!!!

For those who play Pepper, these are two deadman's hands dealt honestly

For those who play Pepper, these are two deadman’s hands dealt honestly

Baby H got his first taste of deep snow. It was about 3 feet deep, but he is such a featherweight that he was able to sit on top of the pile. He was fine until mommy pushed him over *wink*

Not Happy!

Not Happy!

He also recieved a beautiful quilt from his Great Grandma for Christmas. Mommy loves it because its owls, and she used the Jenny Ski 10 Little Things owls for the border. H likes it because the wings are prairie points that he can flap and chew.

The Owl Quilt

The Owl Quilt


My big project over the last 3 months has been the Sawtooth Cat Quilt commission. I finished it and a set of pillow shams in time for Christmas ( December 23rd still counts). It was for my clients mother, who lost everything she had to a house fire. She has a very large cat collection, and Laurel Burch figured among them. The inspiration for the quilt was a panel I had in my stash of Laurel Burch’s Fanciful Felines.

December 092

The Pillow Sham

I had a major panic attack when I went to make the shams because I ran out of fabric to do the ruffle and the back. I was starting to hyperventilate when I remembered that Holly of Holly’s Red Bike, who is the President of the Vancouver Modern Quilt Guild, had given me 2 meters of Laurel Burch Fanciful Felines cat print in the same colorway! It saved my sanity and the commission. Thank You Holly!!


The Cat Quilt

The Cat Quilt

Of course no quilt is ever fully completed without home special “helpers”, usually in the form of a cat or small child. This go round was the latter for me.

Mommy I'm Helping!

Mommy I’m Helping!

For those of you who downloaded the mystery pattern,  I am still working on the tutorial, and it will be up soon!


Happy New Year!


Stacey


A Moment of Discovery

Do you ever have those moments where you go, know why didn’t I think of that? That’s what happened to me the other day while reading Felicity’s blog. She posted about her Craft Buds month entry, and mentioned that she got her book from the local library.

“SAY WHAT? The library has modern quilting books? Well, I don’t know why I didn’t think of that before!” I said to myself.

Needless to say I promptly went online and searched around the Surrey Public Libraries website, and boy, do they ever have quilting books. Not just modern quilting, but any kind of crafting book. And new ones, modern ones! Tula Pink, Elizabeth Hartman, Weeks Ringle and Bill Kerr, and not one but three Kaffe Fassett? My library card now holds a coveted spot in my purse, and I almost have the numbers memorized to log in online and reserve books, but because I am a new cardholder my limit is 10 books at a time. I laughed when she said that, 10 is more than enough to keep me occupied for 2 weeks. I maxed out my limit the first night (better on a library card than a credit card) and have 8 books on order. I have to bring the lot of them back this weeks and exchange them for the next batch (Quilts from the House of Tula Pink is in this batch, yippee!)

While digging through my little trove of quilty goodness, getting inspired and copying templates, I discovered something about myself.  A couple of the modern quilting books were centered around minimalist quilting, or had projects that fall into that category. As much as I can appreciate the design and time that goes into them, I found myself thinking more and more that these were not things I would make for myself. Only one color and a plain white background…? I am not a minimalist!

I love to put as many colors as possible in my quilts.

Rich, vibrant prints and blenders with a tone-on-tone black background? Yes please!

Batiks? Let me at ’em!

Don’t get me wrong, I really like many of the modern quilts I see, and there are many that I would like to/will eventually make. I love anything Tula Pink, I think Pat Bravo makes some amazing fabric lines, and the use of solids is stellar, and I love the projects that come up in the blogs I follow that put a modern spin on the traditional quilts. Don’t even get me started on the amazing quilts of Kaffe Fassett! I just can’t make a quilt with only 3 fabrics in it when there are so many out there just calling my name. Use Me!!

Flights of Fancy, using Nest by Tula Pink for Moda

I am looking forward to this week’s mail, my order of Rock n Romance by Pat Bravo for Art Gallery Fabrics will be arriving! Hurray! I ordered a fat quarter bundle from The Intrepid Thread. It has all the prints with an equal number of matching blenders. I am going to use these to make the Starburst Quilt.

Happy Quilting!

Bottled Rainbows Quilt by Maureen Cracknell Handmade

Today I would like to share a quilt from Maureen Cracknell Handmade. Maureen’s blog is one of my favorites. She always has something creative, fun and inspiring to share with us. That she does it with 3 children makes it even more amazing!

Maureen Cracknell Handmade, Bottled Rainbows

Image courtesy of Maureen Cracknell Handmade

The Bottled Rainbows tutorial is one that many modern quilters know. It inspired one of our VMQG Challenges last year, and the resulting quilts are always beautiful and colorful. Maureen took Bottled Rainbows to the next level by using shapes and motifs instead of just squares and rectangles. You can read more about Maureen and her Bottled Rainbows Quilt here : Maureen Cracknell Handmade: My Bottled Rainbows Quilt : :. I love her construction techniques. You can also find the original Bottles Rainbows Post and Tutorial here.

Thank you Maureen for allowing me to share your work!


Cathedral Window QAL

Yesterday marked day one of the Cathedral Window Quilt A Long Blog Hop! Sara of Sew Sweetness gave us our first tutorial, the Layered Cathedral Window,  and I love how her block turned out! I have decided to use a consistent color scheme throughout the QAL. I am going to be using Limes, Aquas, Teals and Yellows. There are 9 blocks in this QAL, so I hope I have enough fabric! Ha ha ha, like that’s really a problem for me…

Here is my finished block! I ended up ripping 2 portions apart and placing the fabrics in a different order, but I am so happy with the result. There is some definite movement in this block! I love the lime green! It is an almost impossible to find Robert Kaufman Blender. I ordered it from Australia 2 years ago (the only place I could find it) for $20/meter! But I love it so much! I will use it in all my blocks, though maybe I should have picked a different color, Cathedral Windows do use up a lot of fabrics! There are 5 layers to sew through on each side of this block. I pressed my seams open using my heaviest iron, lowering my board, applying a TON of pressure, and STEAM. The result is a nice flat block with no seam bubbles! Hurray!

A huge thank you goes out to Bree at My Crafty Crap for hosting this QAL, and to all the sponsors for the wonderful prizes! You can find the QAL rules, blog roll, and prizes there.

I can’t wait for the next block!

Happy Sewing!

Rainbows For Maranda

I am part of a couple mommy groups, and one of the other mommies came across this. I contacted Patricia, and the little girl is in her friend’s Brownie Troop.

I know I get some international readers, so I would like to encourage everyone to take part. It will cost you nothing but a stamp! Lets help make a little girl’s dream come true!

Could everyone, including you big kids, draw a simple picture of a rainbow and mail it to Patricia Verhelst Box 355, Radville, SK S0C 2G0 Canada, by next week and I will send them all in together. There is a little girl in Saskatoon who is sick who wishes to get a rainbow from everyone in the world. Please write your name and where you are from on it. Lets make a wish come true if it was your child you would want that! Thanks everyone and please copy and paste this to help spread the word!This little girl’s name is Maranda, she is 10 years old and I’m really hoping everyone will do their best to make her wish come true!

During my clinical training, I did a month long rotation through the BC Children’s Hospital. Even three years later, that month has stuck with me, even more so now that I have a child of my own. It takes something so simple to make these kids happy.The odds seem so stacked against them, yet they shine through the adversity with bravery, strength and smiles for those who care for and about them. I will always remember my time there, and I know it shaped part of who I am professionally with my patients and at home.
Please, share this with your friends, family, and other bloggers!

Here is the address again:

Patricia Verhelst

Box 355

Radville, SK

S0C 2G0

Canada

Starburst Quilt Tutorial from Happy Quilting…and Baking!

I wanted to share a delightful blog and tutorial from Melissa at Happy Quilting. Her patterns and tutorials are easy to follow, and she always has something fun going on.  I love that the quilt looks complex but the directions are super easy to follow!

Melissa's Starburst Quilt

And to sweeten your day, I came across a recipe for Cinnamon Scones! They are like the ones they sell at a very popular bakery here, Cob’s Bread. These scones are to die for! I have eaten three so far today….and I can’t promise that I’m done….but you can find the recipe here! I tweaked mine a tad and when I made my cinnamon flakes, I eliminated the corn syrup entirely. I HIGHLY recommend the parchment paper, and the flake mixture should be spread thin, it makes it easier to crumble afterwards!

Enjoy your scones while making Melissa’s lovely Starburst quilt!

And now for something fun…

My husband has recently quit smoking! I am very proud of him. He has been chewing a lot of gum to get through, so I bought him one of those big bottles of tablet style gum. Unfortunately its too big to lug around while he is working, so I made him a Gum Packet! I whipped it up in about 1o minutes. It’s super cute and hold 10 pieces of gum.

You can make one easily using scraps from your stash. You need:

2 pieces 5″x4″

1 strip 4″x4″ and a second strip 2″x4″ ( I used Kona White)

A button

a 1.5″ piece of 1/4″ elastic or elastic thread. You could also make a small loop out of fabric, make it about 2.5″ long to compensate for no stretch.

Instructions

Fold the 2 white strips in half and press. you will have a 2×4 and a 1×4 strip

Place the 1×4 strip on the right side of one of the 5″x4″ pieces, matching the raw edges along the 4″ side. Stitch across 3/4″ from the folded edge.

Place the short white strip on top of the tall white strip and pin.

Draw the lines for the ‘gum pouches’. Draw a line 3/4″ from the left side, then 3 more lines 5/8″ apart. Stitch on the lines from the top of the first folded strip to the bottom, backstitching at the fold for stability.

Fold the elastic in half and match the raw edges of the elastic to the raw edge of the gum pouches. Adjust the elastic so that it is in the middle of the gum pouches. The loop should be pointing to the folded edges. Sew the elastic in place securely by backstitching multiple times in the seam allowance ( within 1/4″)

Place the 2 4″x5″ pieces Right Sides Together.  Sew around the outside edge, leaving a 2″opening at the top (the top is the side with no gum pouches)

Trim the bulky corners around the gum pouches, and flip the Packet inside out. Close the opening with a whipstitch.

Press the Packet firmly, and edge-stitch around the entire Packet. Fold the packet in half lengthwise, RST. It should now measure 2 1/4″x 3 1/2″ and the gum pouches should be hidden behind the flap. Edge-stitch at the fold.

Sew your button to the center of the “flap”. The elastic should stretch over the button to keep the Gum Packet closed.
Tada! You are finished and have a funky fun packet for your gum! This will fit the regular size stick gums and the tablet gums.

The inside hold 10 pieces of gum

Fun Gum!

Since I whipped it up before hubby went to work I don’t have any tutorial pictures. You can always email me with questions!

Happy Quilting!

The UFO Problem

I don’t mean unidentified flying objects, I mean UnFinished Objects. And I have a lot. A LOT….the rule of thumb is no more than 3. Lately my brain has been in quilting overtime. I have so many ideas floating around and they are all coming out in different ways. The chaos of my sewing room is overwhelming to everyone but me.

Organized chaos is the key here……

I do love my sewing room. There is a special spot for baby H, a wonderful peg board installed by my father, a ton of space to stuff bins of fabric ( there are 10) and my Precious. A Janome 1600P Professional semi industrial sewing machine. It is a straight stitch only machine with 3 speeds: Fast, faster, and holy cow.

At the moment I have 5 projects going (that I can remember O.o;)

1. A reproduction of Claudia Clark Myers and Marylin Badger’s quilt Sparkle Plenty

2. Listen With Your Eyes by Jacqueline de Jonge

3. A wholecloth quilt design

4. A modern quilt for Quilt Con

5. 3×6 Bee blocks, Stars and Pinwheels

I also have the fabric collected for another Jacqueline de Jonge project, Circle of Life, and I have sketches for a quilt series (more on that to come!)

I am excited about the modern quilt. I have recently discovered a love of hexagons. I have ordered the Hexa-Go-Go book, written by the very talented Tacha Bruecher. She is a founding member of Fat Quarterly ezine (I highly recommend subscribing), and you can find her blog here. My block idea combines hexagons with my love of paper-pieced stars. There will be a sneak peak at the end of the month!

I also received a call from the Georgia Quilt Show. They received my entry. Fingers crossed that it gets juried in! I finally named the quilt Sapphire Star.

My patient husband acting as a display rack

Quilted by Julie House of Sculptured Threads Quilting

Until next time!

Happy Quilting!

Stardust Pinwheel Tutorial


This is the block I chose for my Pinwheel Block Swap on Flickr. There have been a lot positive comments and requests for the block, so I am posting the pattern here for everyone to enjoy. You will need to print 2 copies of each page to create the pinwheel. The templates are numbered in the order to piece them. They are also lettered but you can ignore the letters

You only need a basic knowledge of paper piecing to complete this block, which is why it is such a good one to start with. You get stunning visual results with any color combination! You can piece it anyway you like, or you can follow the tutorial below.

Instructions


Cut out your templates and place them into two piles as shown. 4 blocks will have corners, 4 will not. Pick out the fabrics you want for each part of the pinwheel.


I like to pre-cut my fabric strips. This way I know I have enough to cover the block, and I can chain piece my block. The templates with corners are numbered 1-6, the templates without corners are numbered 1-5. For the sake of the tutorial I will refer to the numbering for the blocks without corners. The templates are identical once the corner is sewn.

The numbers in the brackets indicate the position numbering for the templates without corners.

Cut your fabrics as below:

1 = 2 squares 4 ¼”x 4 ¼”” cut into Half Square Triangles ( yields 4 HST)

2 (1) = 8 strips 6″x 2″

3 (2) = 8 strips 3 ¼” x 2″

4 (3) = 8 strips 5 ¼” x 1 ½”

5 (4) = 8 strips 5″ x 2″

6 (5) = 8 strips 4 ½” x 3″

Start with the 4 templates with corners. Place the HST right side up on the unprinted side. Take strip #1 and place it Right Sides Together on the HST, as shown below. Hold the block up to the light, printed side facing you, so you can line up the seam allowance. Sew on the first line. Repeat for the remaining 3 templates.


Press the blocks ( no steam). Place a straight edge along the next sewing line, fold the paper back along that line (tearing paper from the previous stitched line as needed), and trim the seam allowance to ¼” using an Add-a-Quarter Ruler (or whatever your preferred method is). Set these pieces aside for now.


Take your 4 Templates without Corners and place strip #1 Right Side Up on the unprinted side of the template. Use the light trick to make sure the entire section is covered. Baste the strip in place on the dotted cutting line or in the extra paper outside the template. This will hold your fabric in place. Place your straight edge along the sewing line, turn the paper back, and trim the seam allowance. (It is the same line as shown above)

Light trick

From here on you can piece all 8 templates at the same time. It goes together quickly from here!

Take strip #2, place it RST with strip #1. Sew and press. Place your straight edge along the next sewing line and trim the seam allowance as before. Repeat these steps for the remaining fabric strips.

Here is a photo montage of the rest of the piecing process (‘Cuz everything is better with a montage! MONTAGE!) Enjoy!

RST

Sew

Press

Trim

(oops, no picture)

(oops, no picture)

Trim round the templates on the dotted line. Voila! 8 wedges ready to be sewn into your block!


Voila!

Place a no-corner wedge RST on top of a with-corner wedge. Pin together at the top and bottom by placing a pin through the points at the top (black) and bottom (white) so it is loose, as shown. Line up the seam allowances. Hold the bottom firmly so the pieces don’t move and secure by pinning normally.

At the top there is a lot of bulk because you have seams meeting as well as the paper. If you were to pin through all the layers you end up with a humped area that can be bulky and messy to sew through.

Bulk Hump

To avoid this you need to pin through the FABRIC ONLY. This keeps the pieces from humping up.

Through the fabric only

Sew the seam, pull the paper out of the seam allowance, and press your blocks in the same direction (this is important later!). You now have 4 quarters. Sew your quarter together into half blocks using the same process outlines above, making sure that the bottom points are well matched. Sew your seam and press in the same direction as before. Your points should match.

Sew your final seam, pinning at the corners and at the center point. If you want to make sure your points match, use the technique from the Wonky Compass Tutorial, or you can pin and sew just through the center, then open and check your alignment. If you are happy with the alignment sew your final seam. Press the last two seams in the same direction as the rest, and use the technique from the Wonky Compass Tutorial to press your center flat. Tear out your paper and do a final press with steam. Trim and clean up the edges of your block, and your done!