2025 Debut Designer Projects

It’s that time of year, where we close the chapter of the year and get ready to ring in the next. For me, that means making one last post of patterns! 2025 has been a busy one for quilts. I have been blessed to work with so many amazing new designers this year, as well as some of my usual favorites.

First up we have Adam Trest’s debut collection with FreeSpirit Fabrics – Backyard Wonder. Adam is a fine art painter and illustrator. Backyard Wonder is a fantastic collection of woodland flora and fauna with a large aesthetic range from soft and whimsical to bold and classic.

Promenade

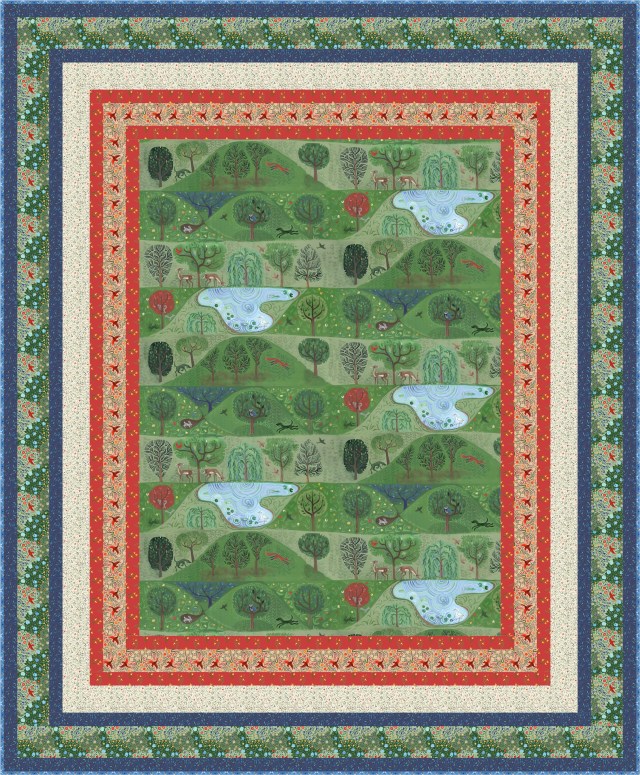
Promenade is a beginner level quilt featuring the Walk In The Woods print, which is versatile enough to use as a border stripe, a full panel, or individual fussy cut squares. The possibilities are endless.

Meadowbrook

Meadowbrook is an advance fussy cutting extravaganza. The corner squares are fussy cut from the Storyteller Patchwork print. This particular print has hundreds of small stamps/patches that I wanted to feature. The Walk in the Woods print is fussy cut, and makes up the center squares and borders.

Blue Garland

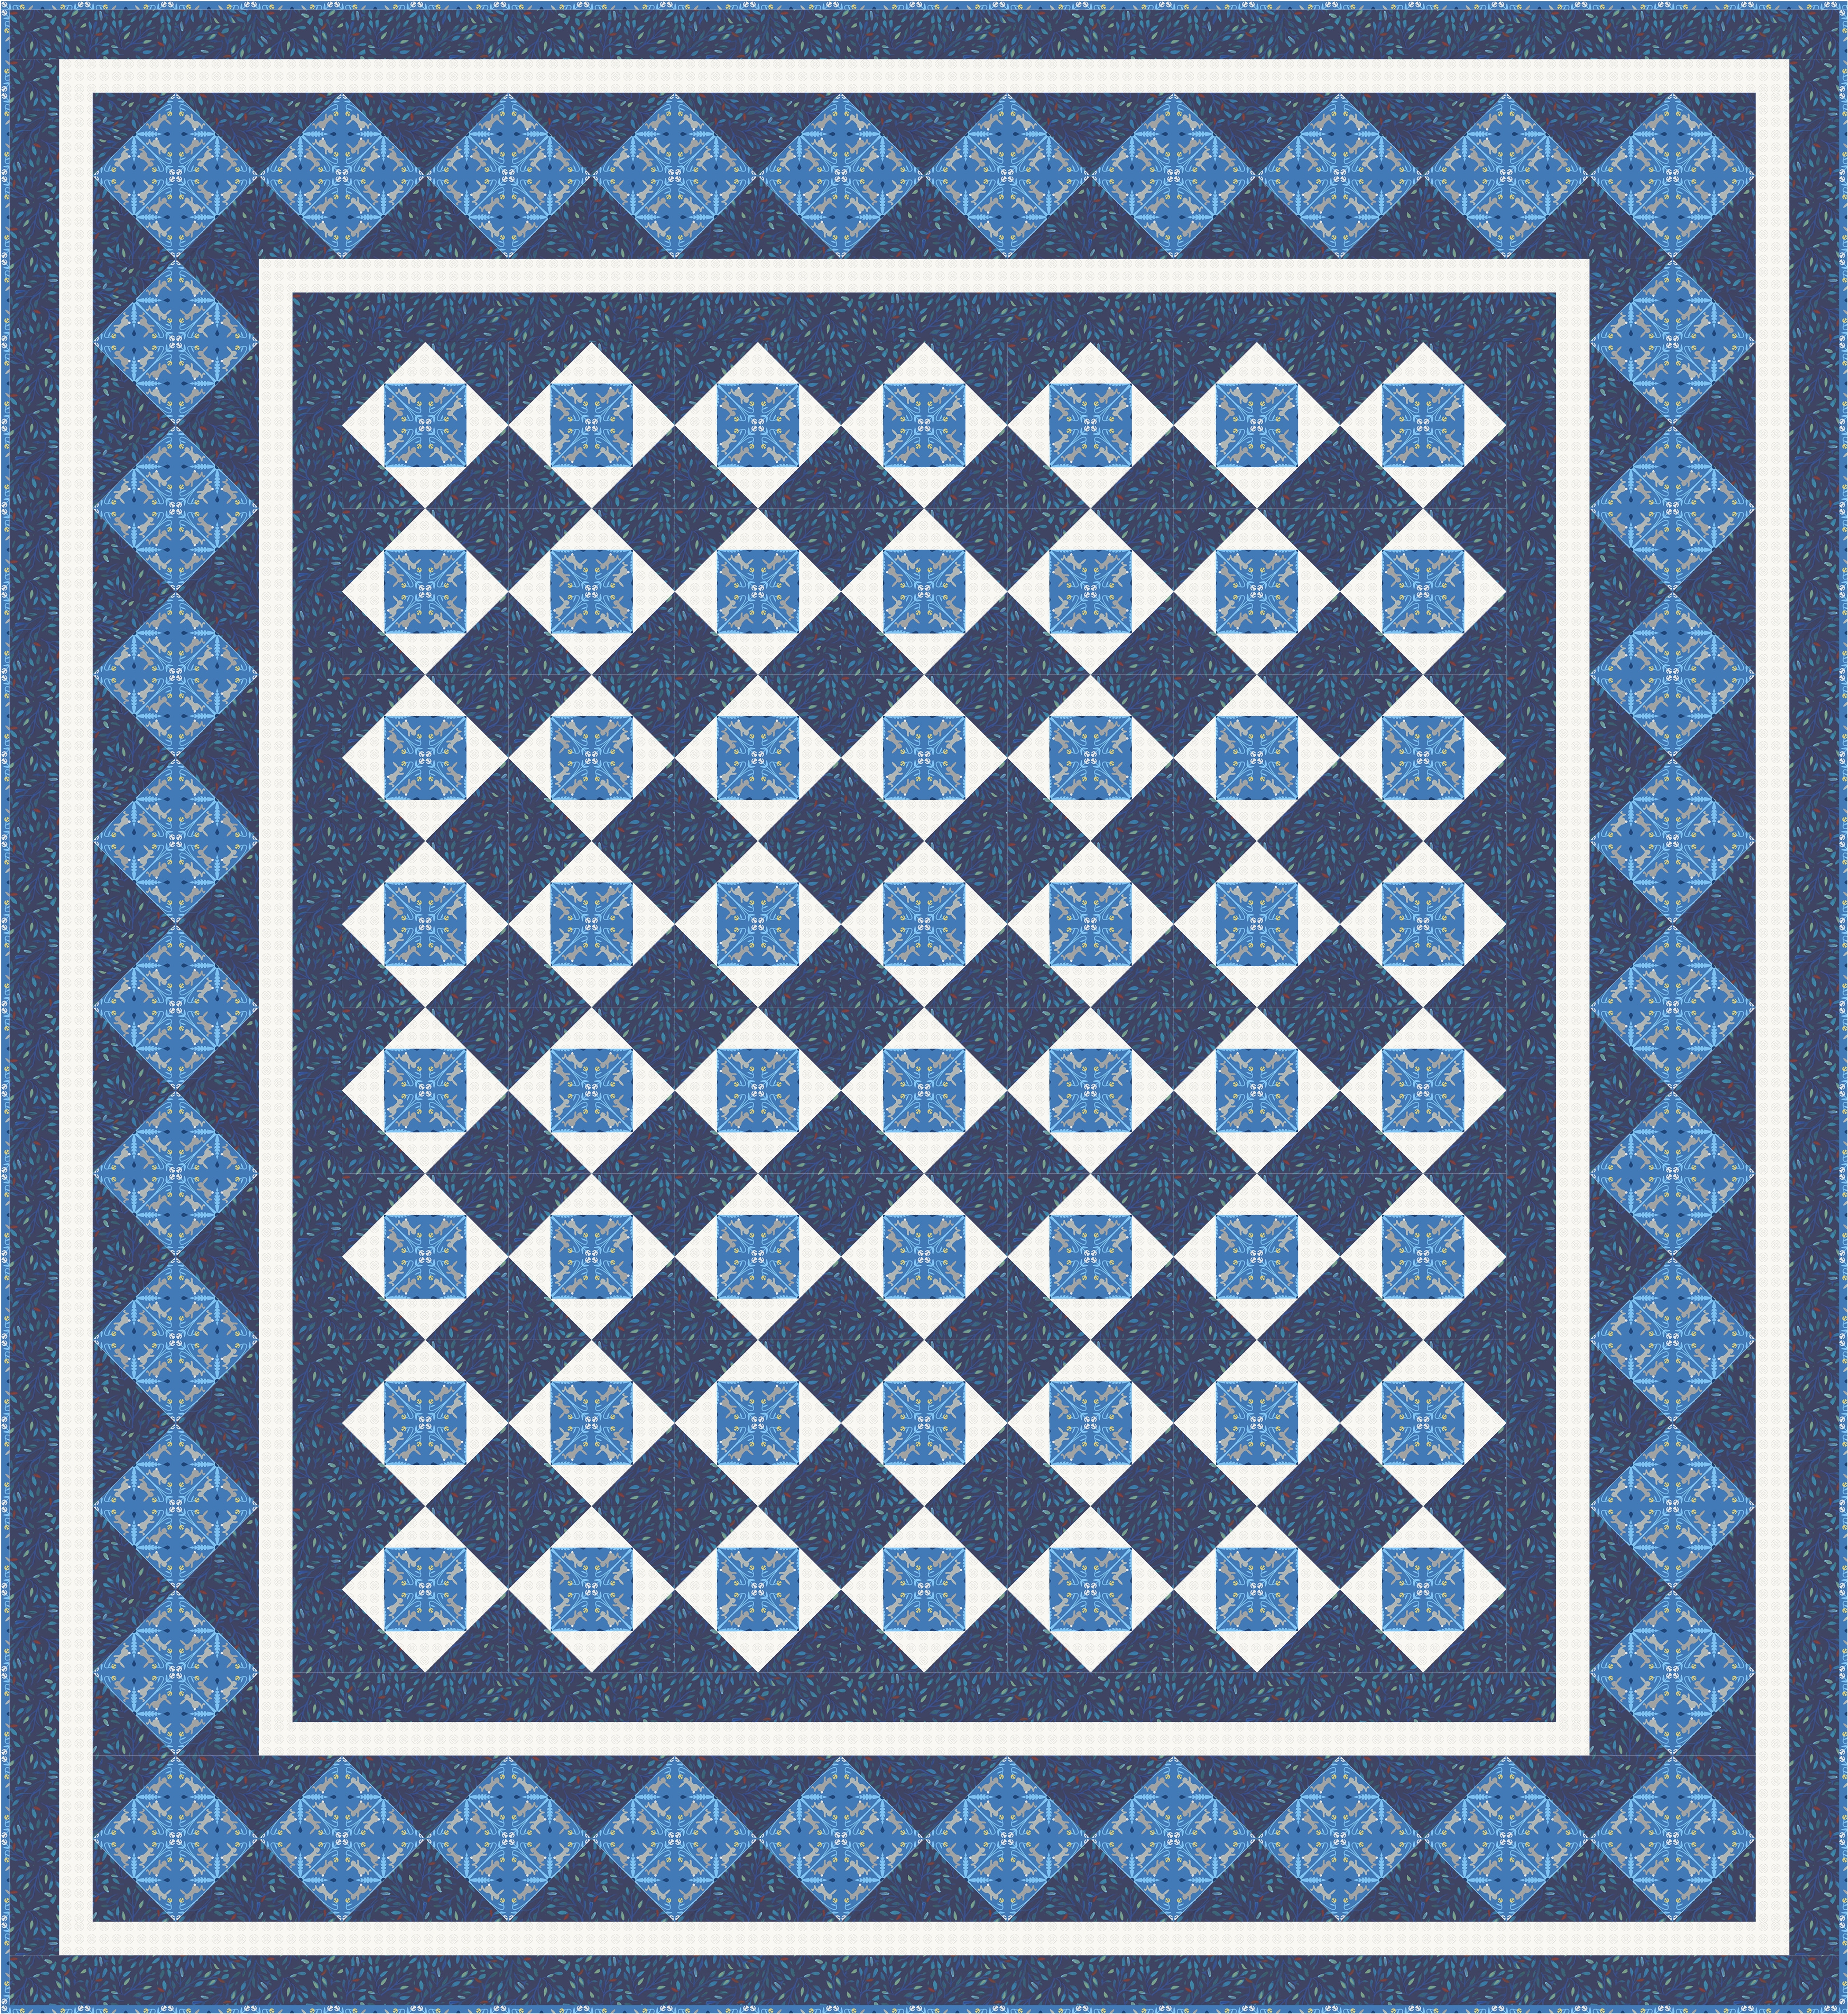
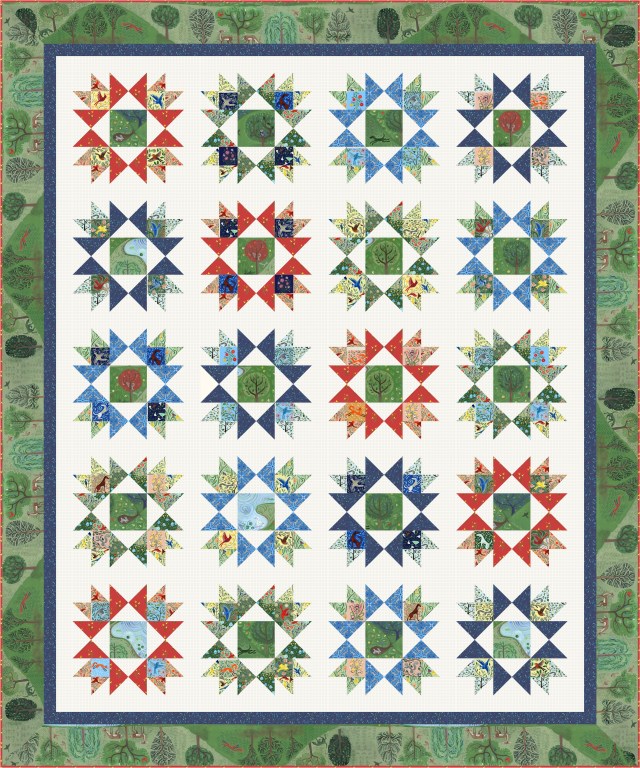
Blue Garland uses only three prints, and is also heavily fussy cut focus. The Racing Rabbits print is the focus of this quilt, and is that perfect classic blue and white quilt for the discerning quilter.

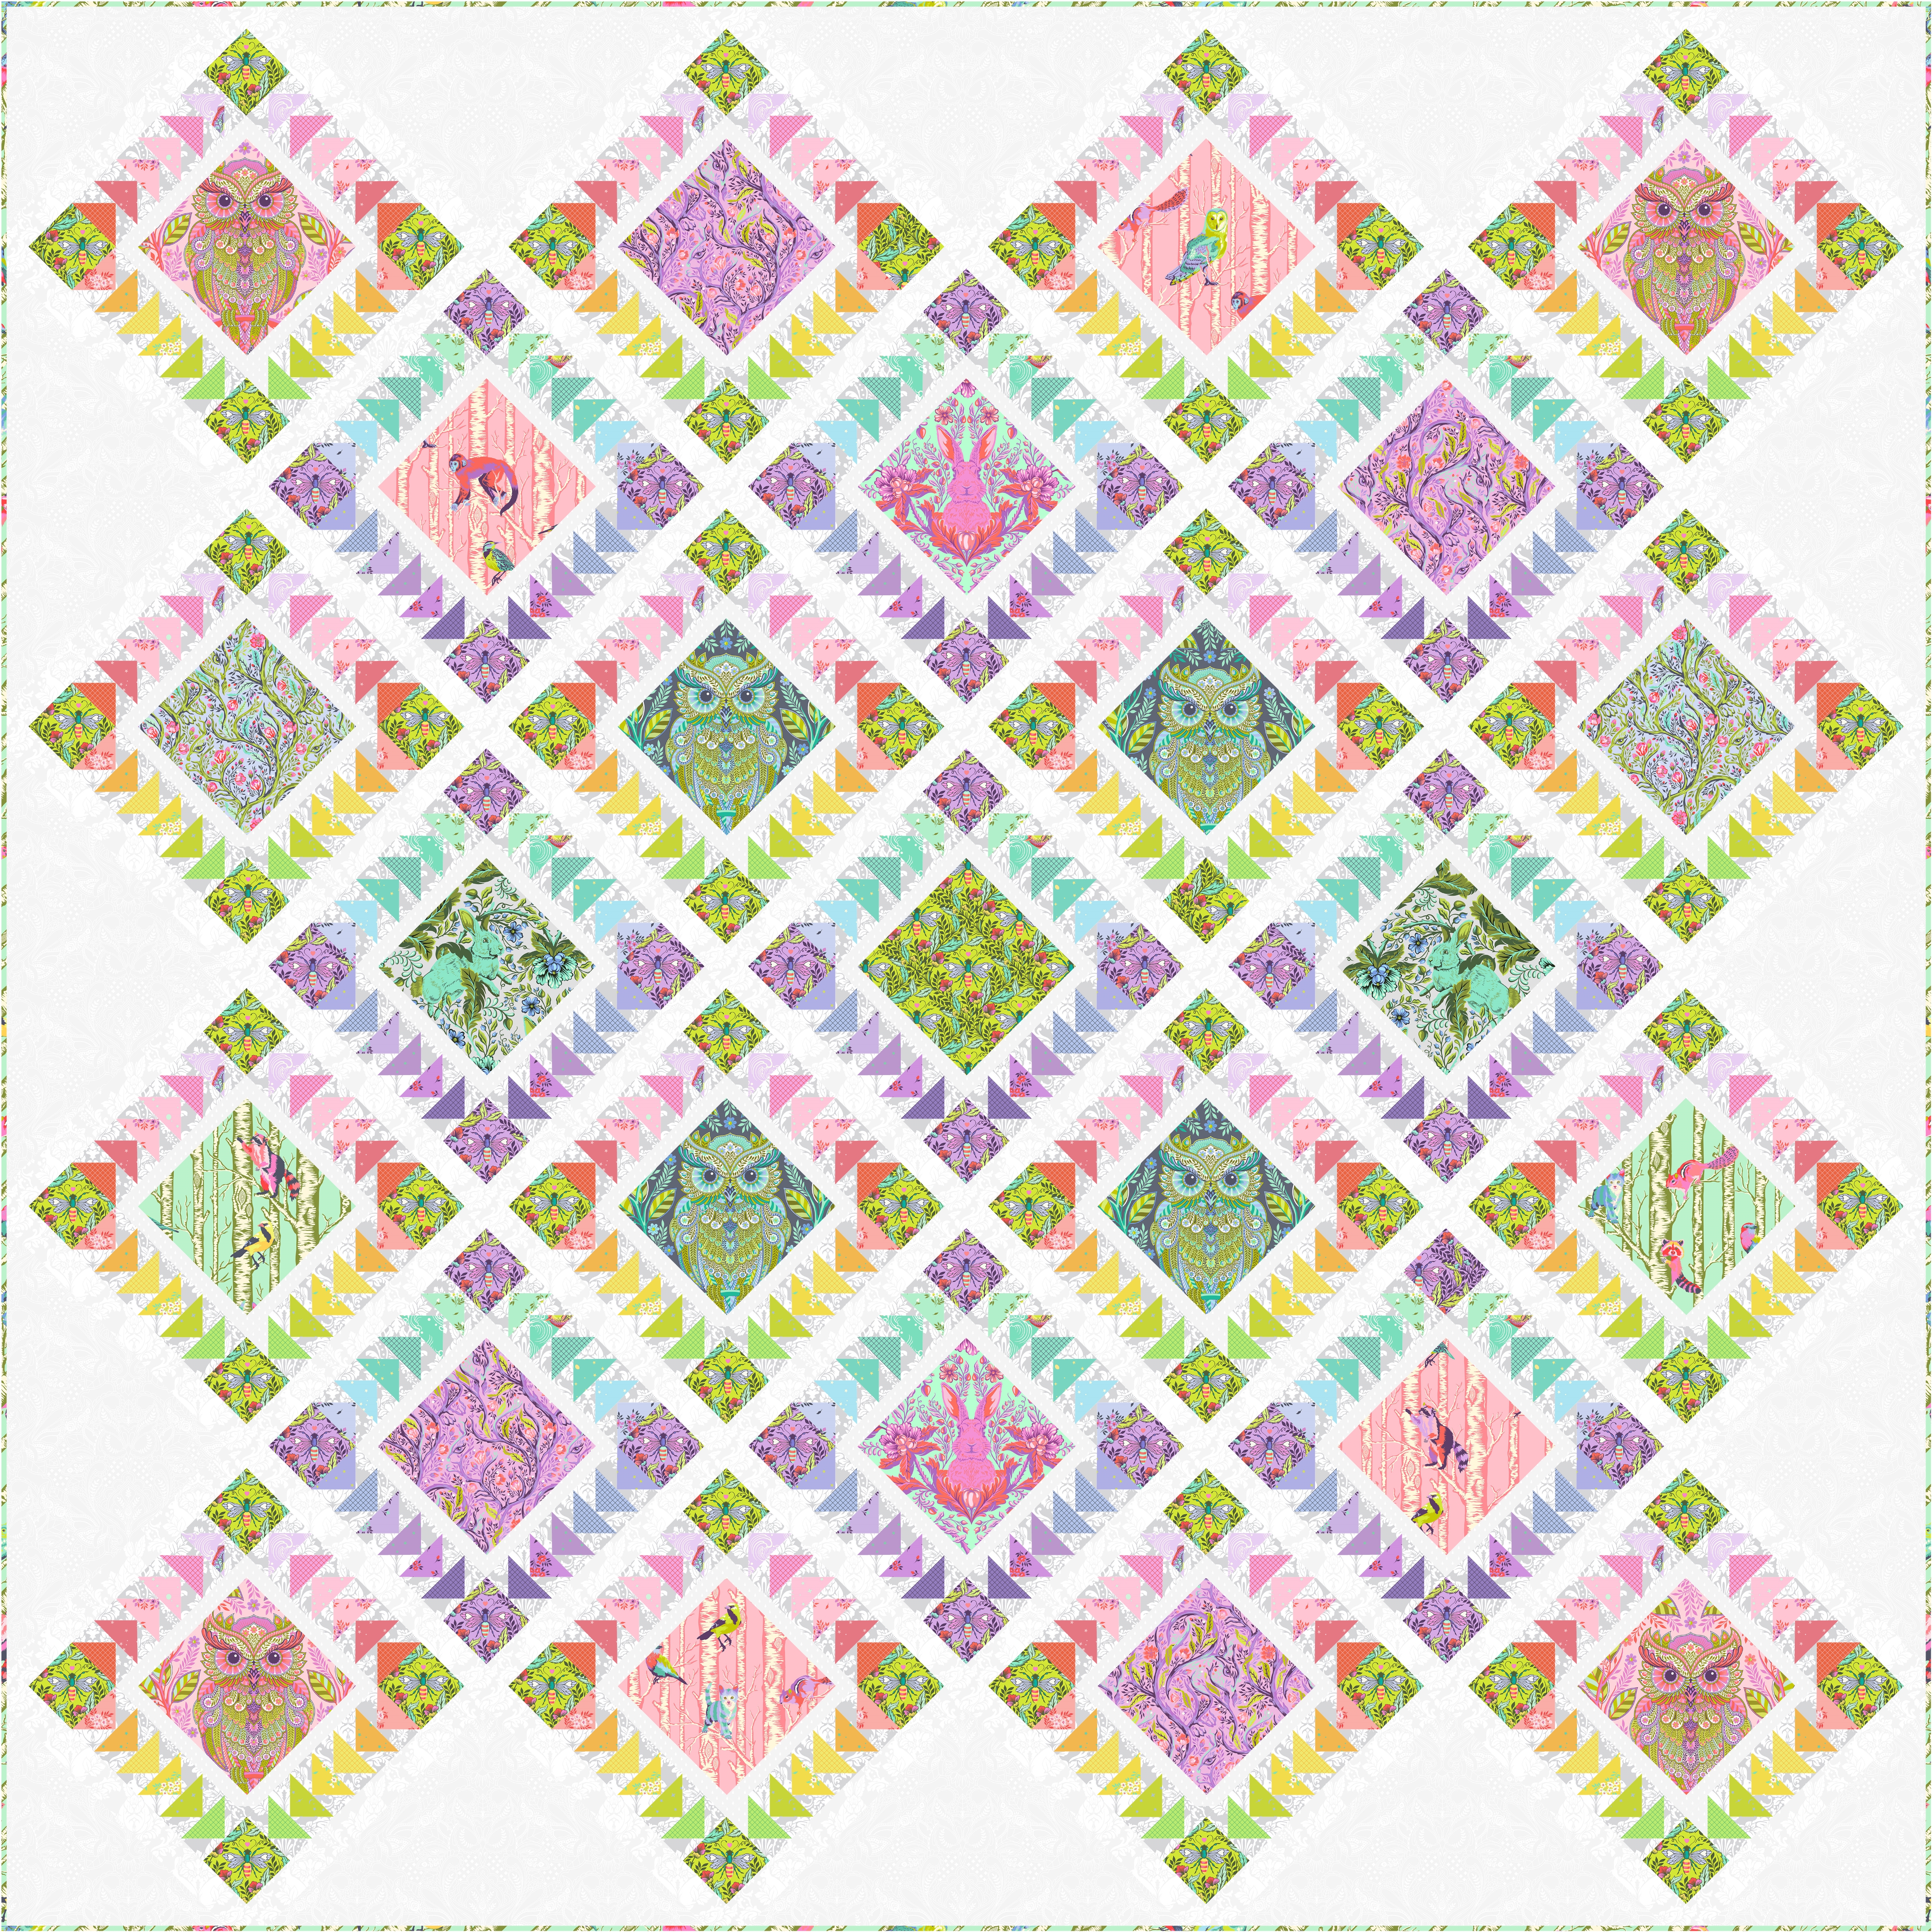
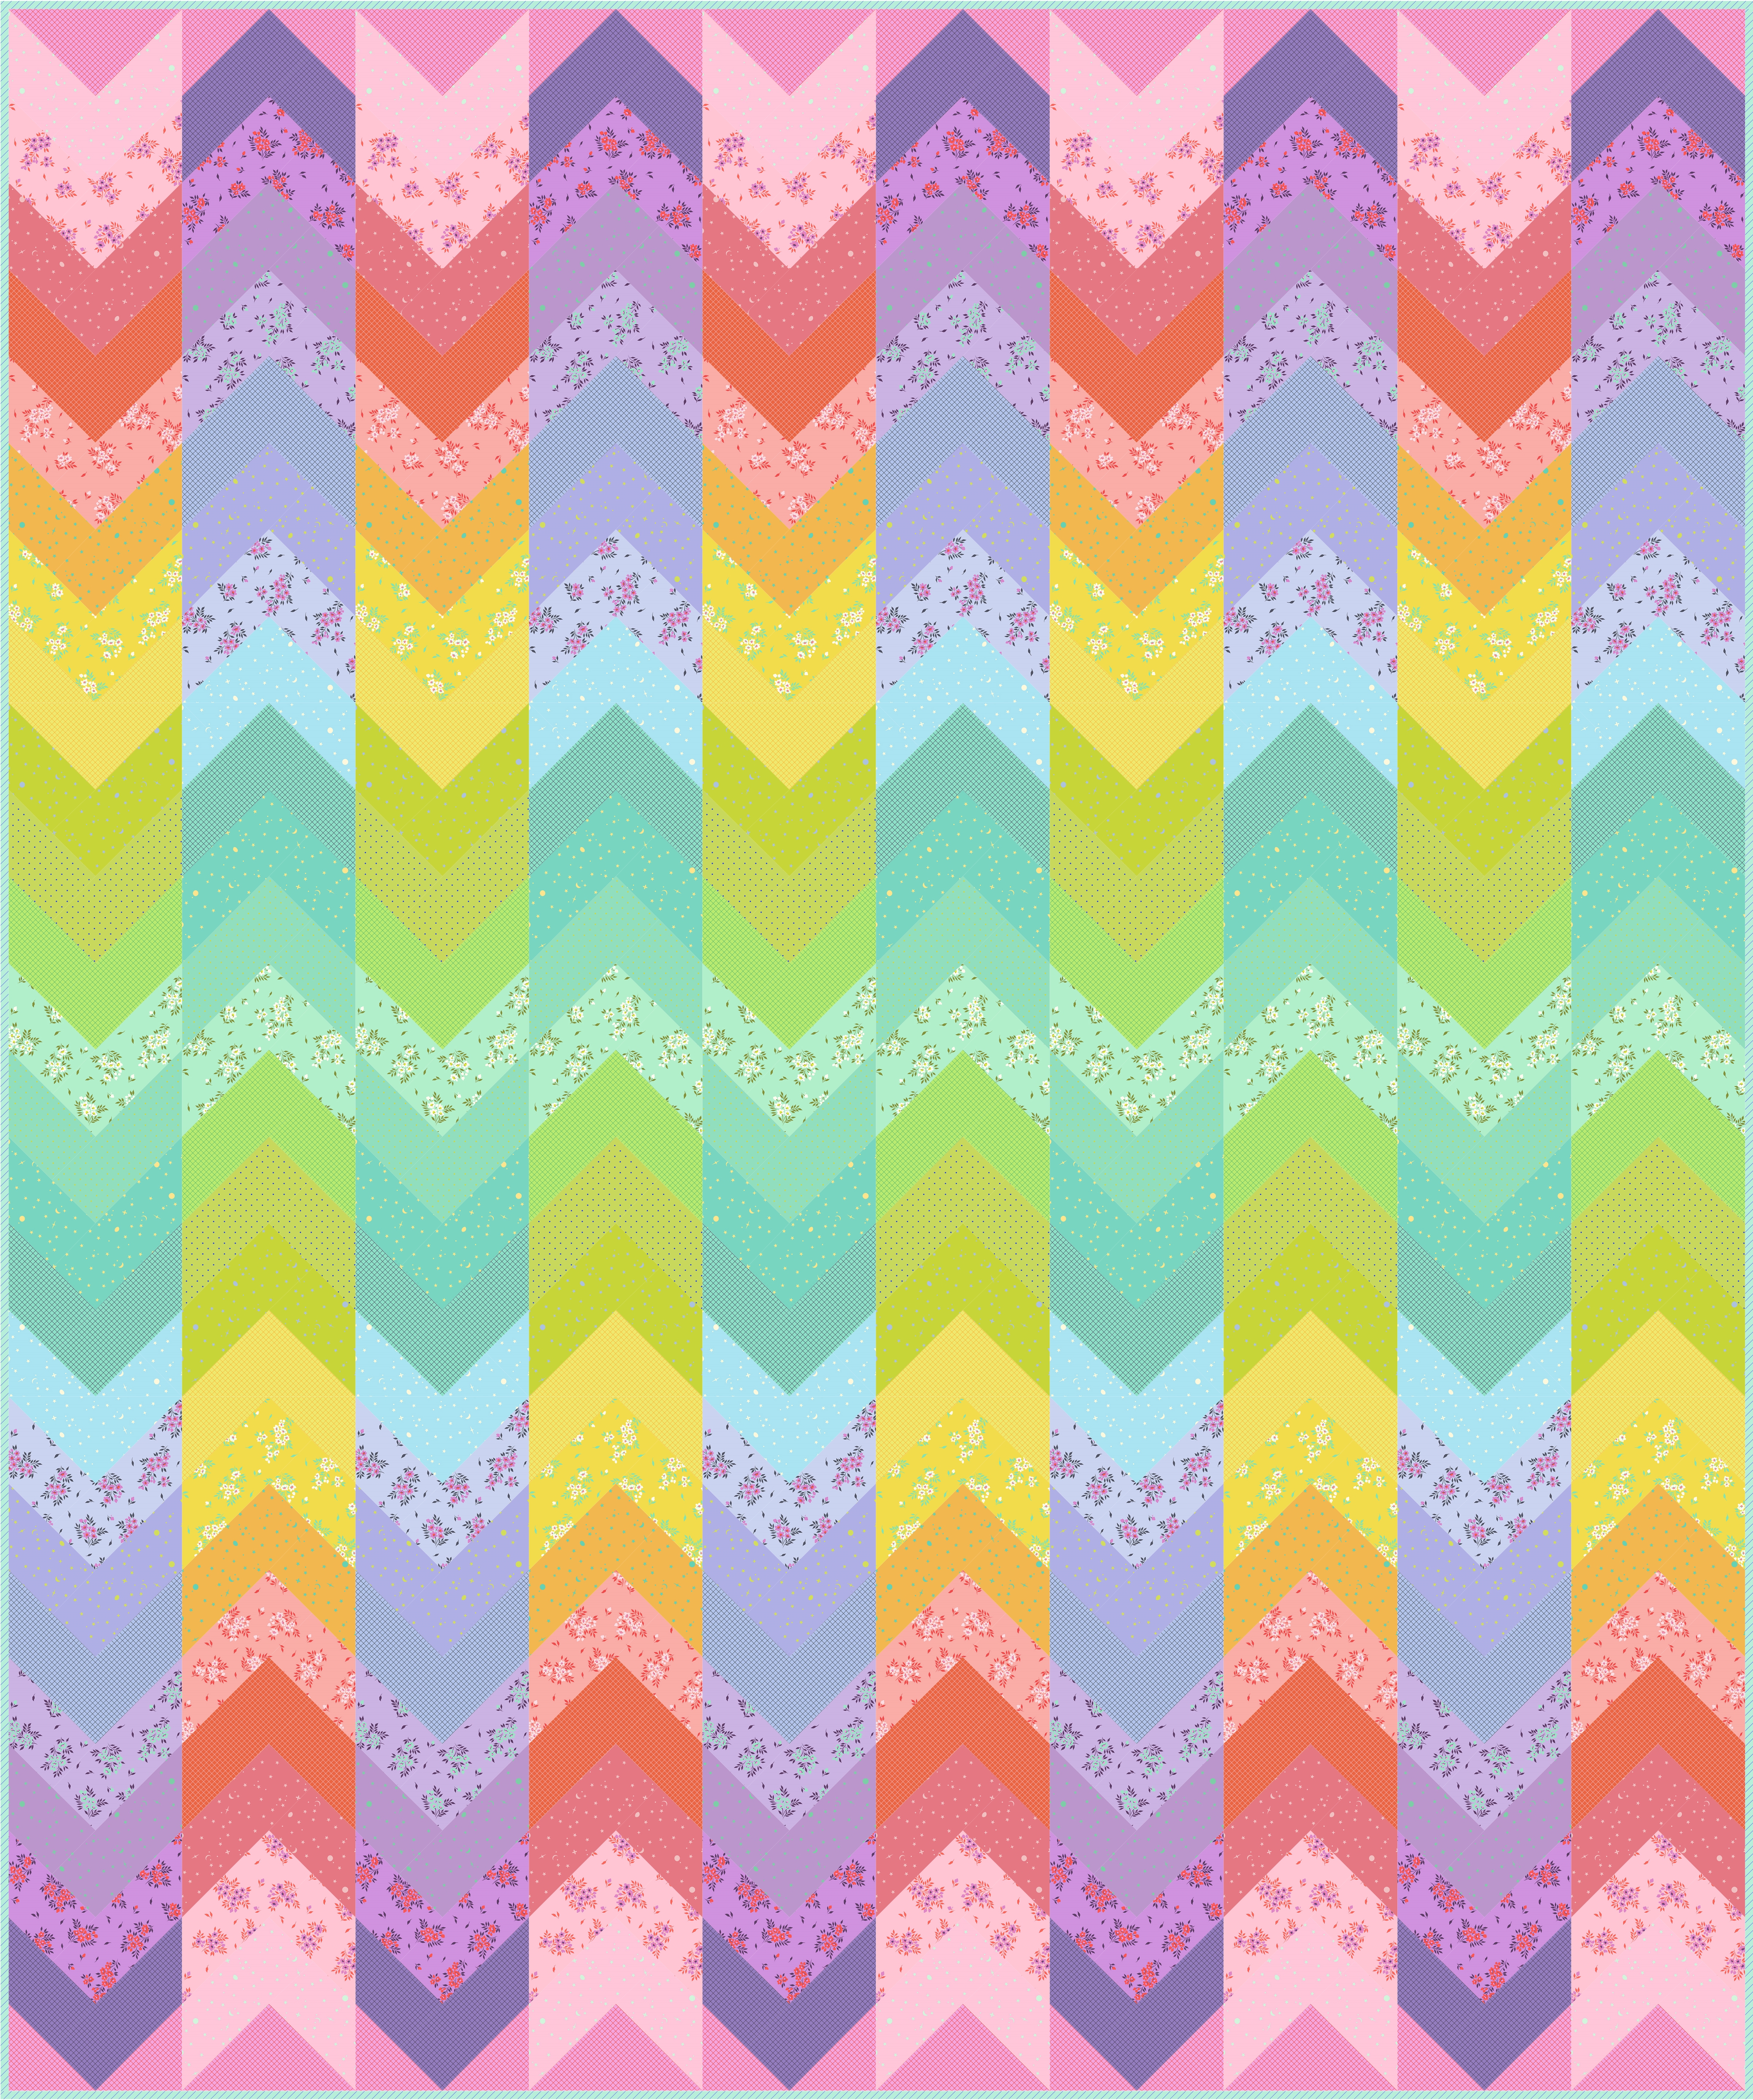
Next up is the debut collection for FreeSpiritFabrics from Katy Tanis – Love In the Wild. Katy is a children’s book author and illustrator. Her fabrics are bold, bright, colorful, and whimsical menagerie sure to capture the imagination.

Wild Love

The first quilt features the Love in the Wild panel from the collection. This quilt is the perfect baby gift, with its bright rainbow of colors and adorable creatures. It was designed with simplicity and gifting in mind.

Love for All

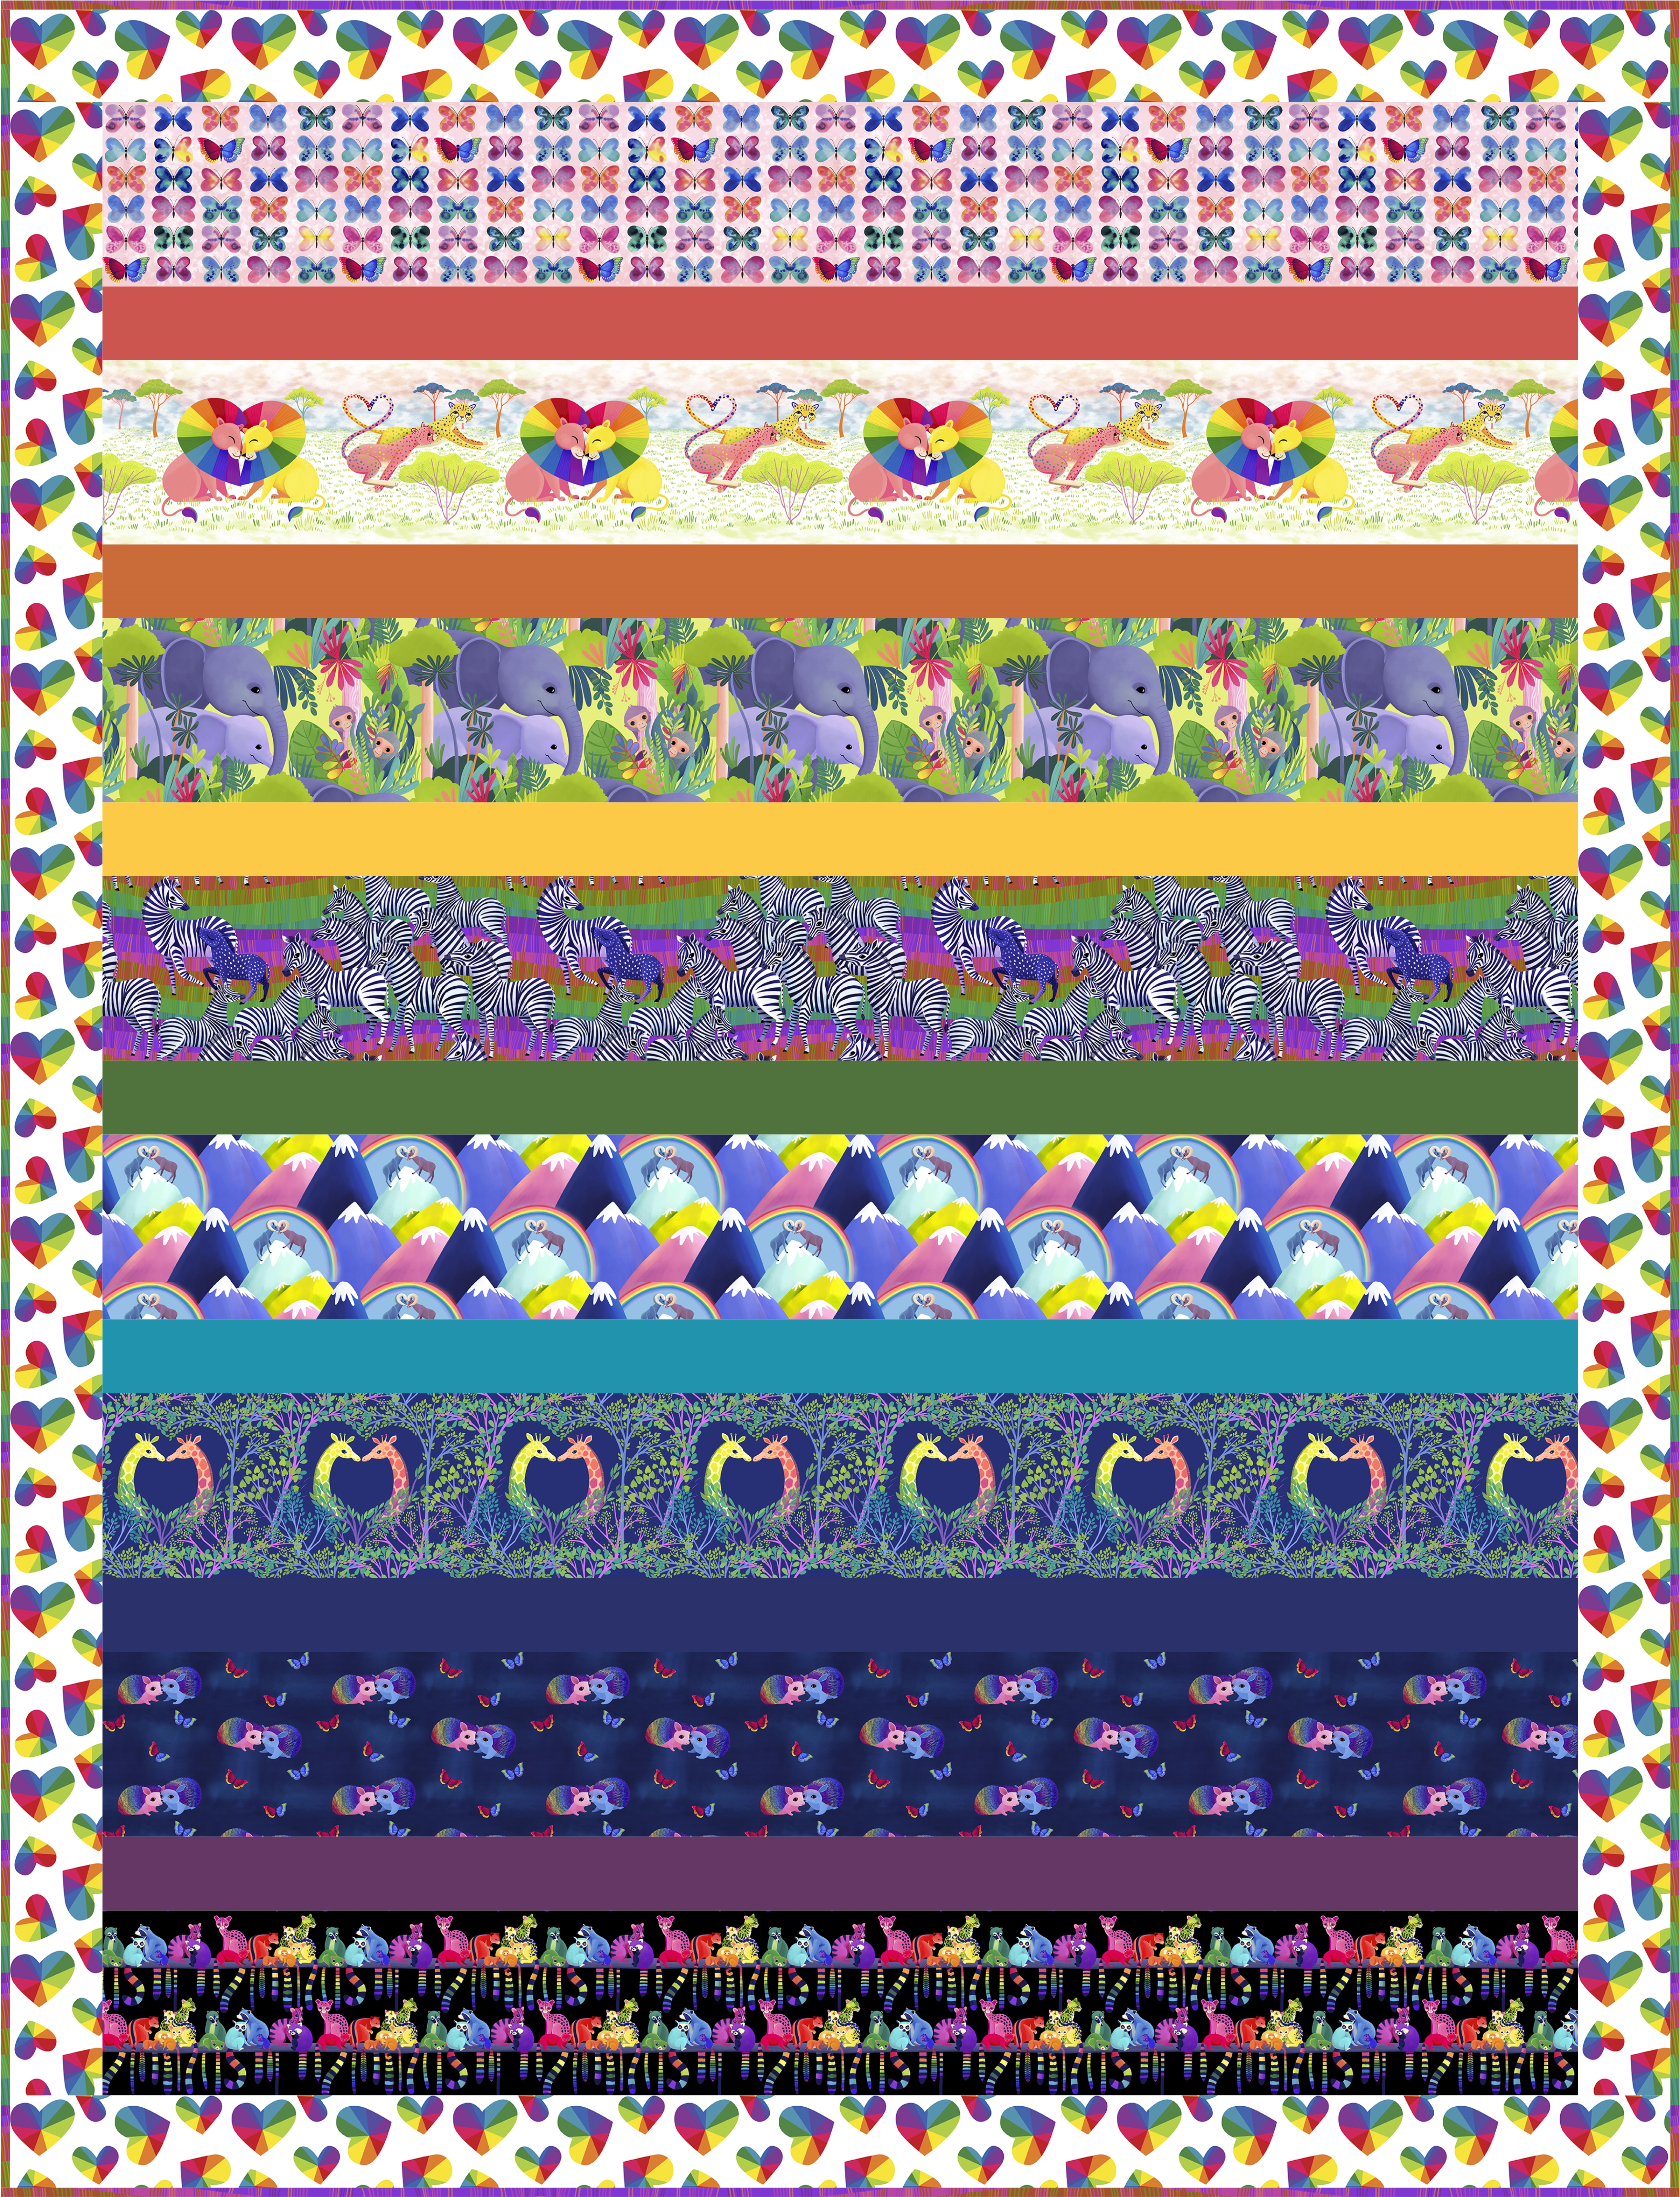
The next quilt is Love For All, an easy strip quilt. Its the perfect quilt to introduce quilting to a beginner, whether its your own child, niece, nephew, grandchild, or your best friend that you finally talked into sewing with you!

Let Love Shine

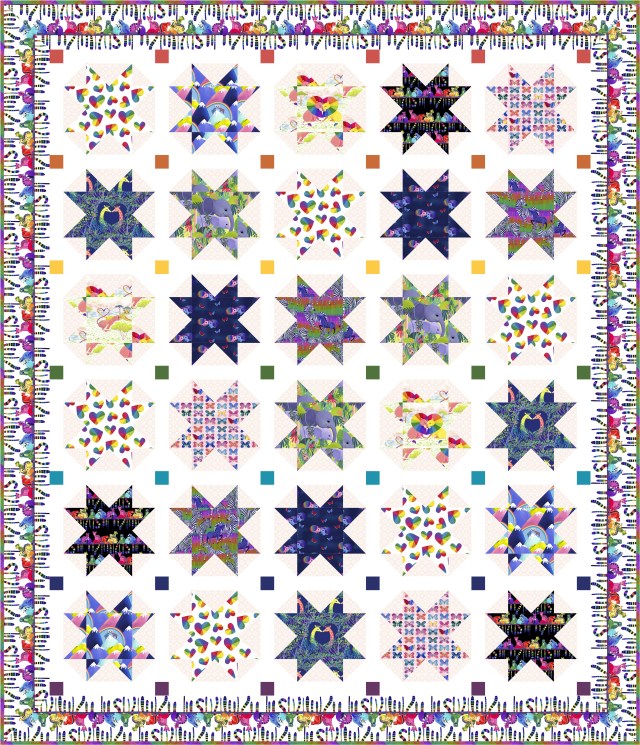
Lastly we have Let Love Shine. Designed with an older child in mind, and featuring the Ringtail Love Day border print.

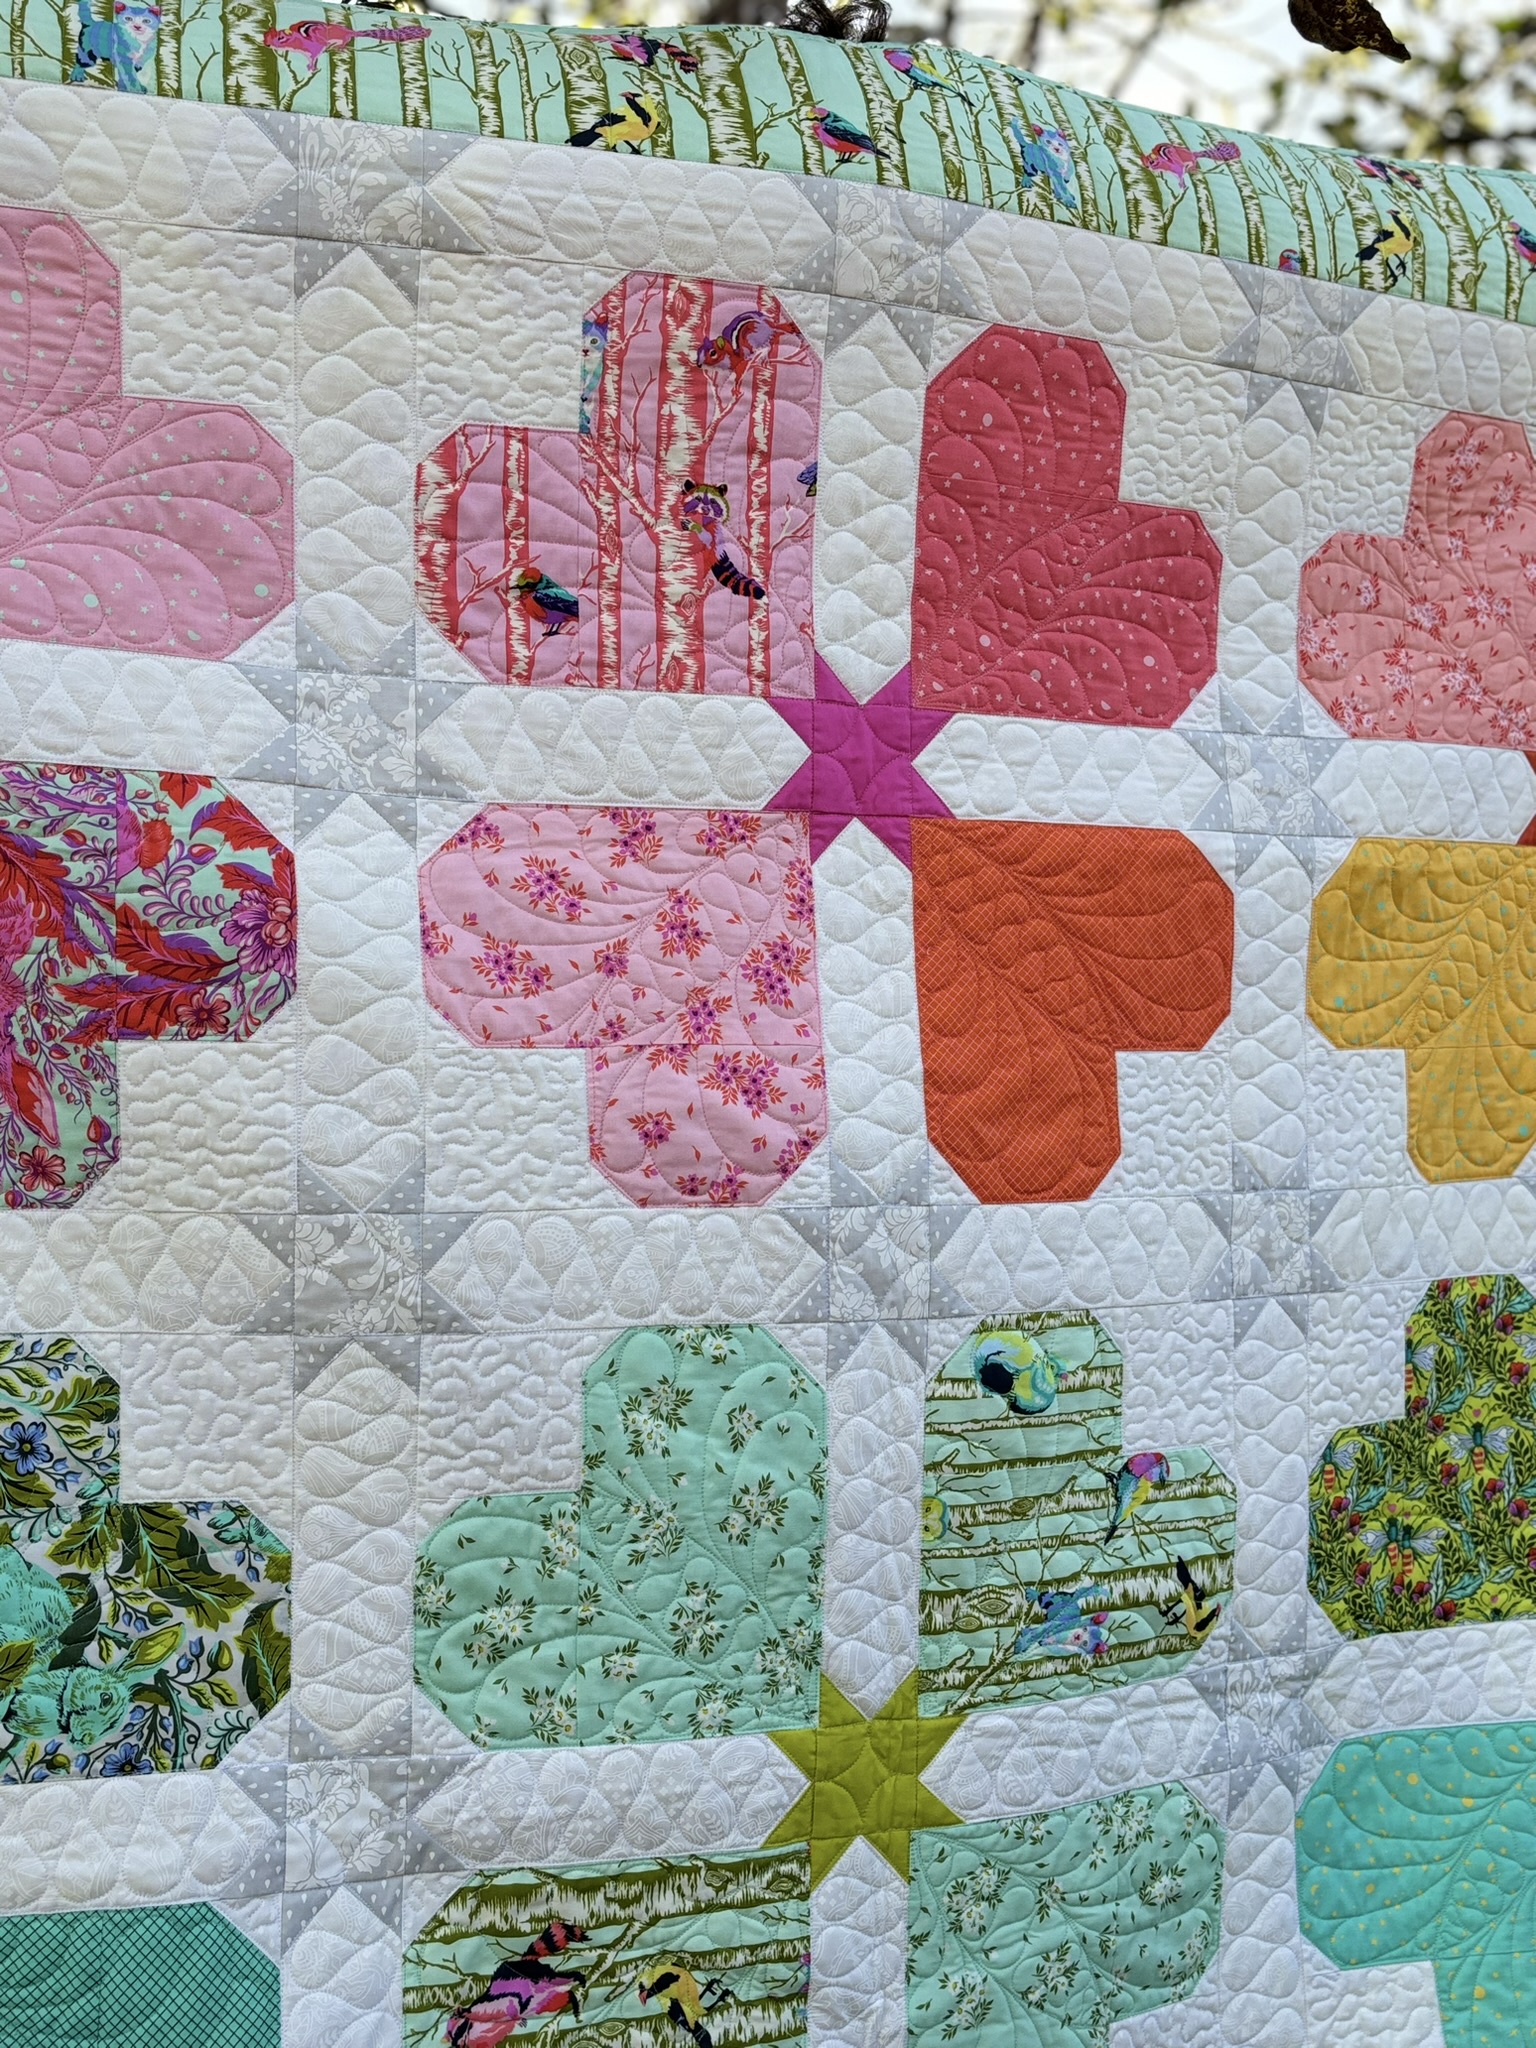
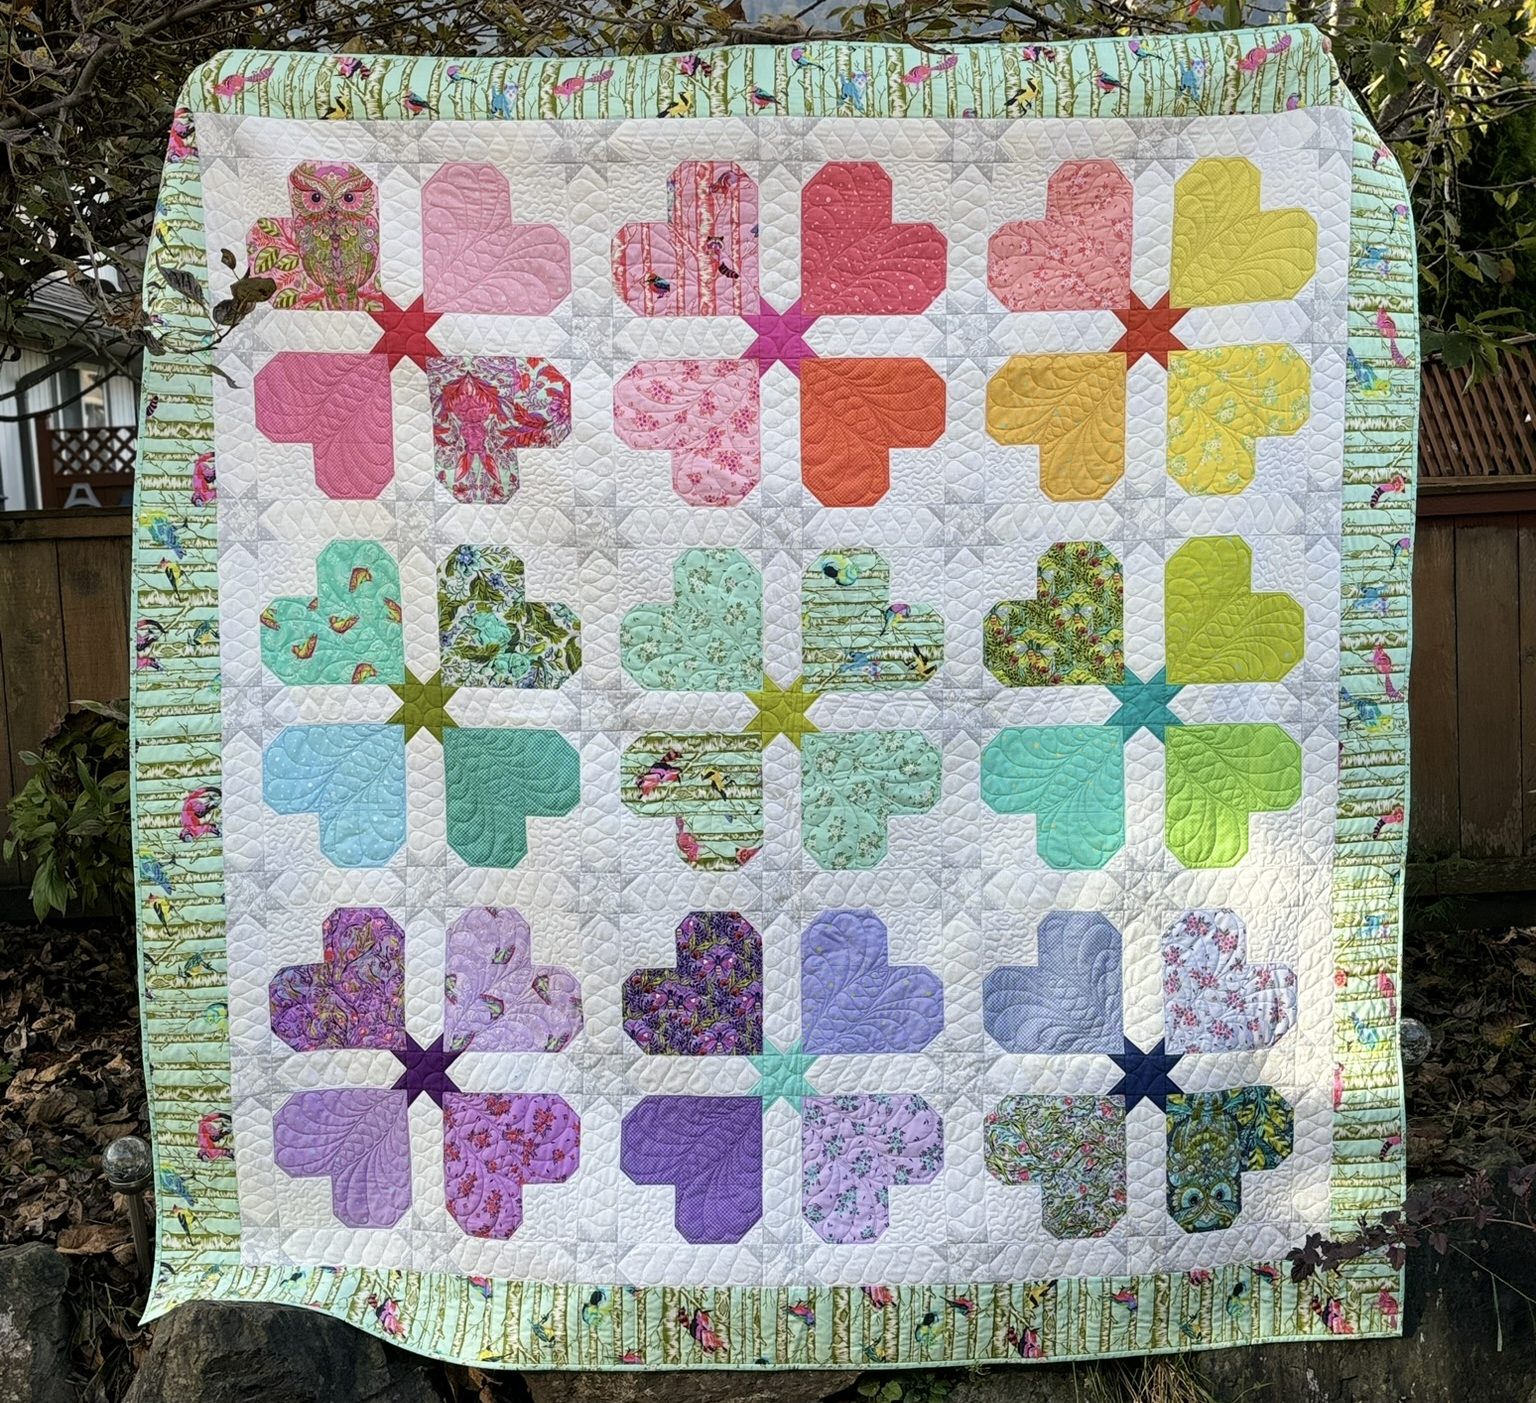
Finally we have Clare Youngs debut collection with FreeSpirit Fabrics – Flying South. Clare is an artist from the UK specializing in collage and paper crafts, as well as creating with different printing methods to make her art.

Which Way South

Flying South is a vibrant eclectic mix of birds of all varieties. From woodpeckers and owls to fantastical feathered friends straight from Clare’s imagination.

Each of these new designers has a very unique style, and it was a joy working with each of the collections. Which is your favorite?

Happy Stitching

Full Moon Forest II – 50th Anniversary

Today I am featuring the quilts for Tula Pinks 50th Fabric Collection. I have been working with Freespirit Fabrics and Tula pink for over a decade now. My first collection with Tula was Nest. I entered a jelly roll challenge with my Grandma at her LQS, and I was faster than she was and grabbed the brightest rainbow roll before she could. I was instantly drawn to Tula’s fabrics. They were like nothing I had seen before. Bright, colorful, bold, unique, and everything I had ever wanted to sew with. You can find the finished challenge quilt here.

When I decided that designing quilts was something I wanted to do, my goal was to design for Tula. I always made my best work with her fabrics, and I wanted to share my love of her designs with as many people as possible. My first design was released with FreeSpirit in 2015, and here we are 10 years, 31 collections, and at least a hundred patterns later. This collection was a celebration of 50 collections for Tula. For me, it was the realization of a dream, and I am so excited for what the next 10 years will bring!

The first quilt in the collection is Rainbow Forest. Its a classic SiS design – fussy cutting, flying geese, and rainbow layout! The centers of the blocks were large enough to feature the owl print, which is one of the largest motifs to date in a Tula collection. There are so many fussy cuttable elements!

Rainbow Forest Quilt

The collection consisted of 8 prints, and went wand in hand with the release of the next selection of True Colors prints – 22 rainbow blenders and 6 low volume. I adore the low volume prints, they are the original Full Moon Forest owls, bunnies, and raindrops. What a perfect way to show love for the original while celebrating the new! I made two quilts using the True Colors only. The prints were so pretty and make perfect rainbow quilts.

Forget Me Nots
Woven Ribbons

The final quilt is my personal favorite. It is a love letter to Tula’s fabrics, and the joy that designing quilts brings me. I am truly blessed to do what I love, and be able to share that love with others.

I custom quilted the entire thing. It took me hours. It was a labor of love, and I am overjoyed with the final result! The true colors blocks show the quilting the best, so I came up with a quilting design that would compliment the collection without overwhelming the pieces. I love feather quilting, so I played around on paper until the pattern emerged – a butterfly flitting through the colorful garden of the quilt.

Sweethearts

Thank you to all my readers and fellow quilters for sharing this colorful, wonderful, amazing journey with me. I can’t wait to share what’s next!

With all my love,

Happy Stitching!

Cathedral Window QAL

Yesterday marked day one of the Cathedral Window Quilt A Long Blog Hop! Sara of Sew Sweetness gave us our first tutorial, the Layered Cathedral Window,  and I love how her block turned out! I have decided to use a consistent color scheme throughout the QAL. I am going to be using Limes, Aquas, Teals and Yellows. There are 9 blocks in this QAL, so I hope I have enough fabric! Ha ha ha, like that’s really a problem for me…

Here is my finished block! I ended up ripping 2 portions apart and placing the fabrics in a different order, but I am so happy with the result. There is some definite movement in this block! I love the lime green! It is an almost impossible to find Robert Kaufman Blender. I ordered it from Australia 2 years ago (the only place I could find it) for $20/meter! But I love it so much! I will use it in all my blocks, though maybe I should have picked a different color, Cathedral Windows do use up a lot of fabrics! There are 5 layers to sew through on each side of this block. I pressed my seams open using my heaviest iron, lowering my board, applying a TON of pressure, and STEAM. The result is a nice flat block with no seam bubbles! Hurray!

A huge thank you goes out to Bree at My Crafty Crap for hosting this QAL, and to all the sponsors for the wonderful prizes! You can find the QAL rules, blog roll, and prizes there.

I can’t wait for the next block!

Happy Sewing!

Rainbows For Maranda

I am part of a couple mommy groups, and one of the other mommies came across this. I contacted Patricia, and the little girl is in her friend’s Brownie Troop.

I know I get some international readers, so I would like to encourage everyone to take part. It will cost you nothing but a stamp! Lets help make a little girl’s dream come true!

Could everyone, including you big kids, draw a simple picture of a rainbow and mail it to Patricia Verhelst Box 355, Radville, SK S0C 2G0 Canada, by next week and I will send them all in together. There is a little girl in Saskatoon who is sick who wishes to get a rainbow from everyone in the world. Please write your name and where you are from on it. Lets make a wish come true if it was your child you would want that! Thanks everyone and please copy and paste this to help spread the word!This little girl’s name is Maranda, she is 10 years old and I’m really hoping everyone will do their best to make her wish come true!

During my clinical training, I did a month long rotation through the BC Children’s Hospital. Even three years later, that month has stuck with me, even more so now that I have a child of my own. It takes something so simple to make these kids happy.The odds seem so stacked against them, yet they shine through the adversity with bravery, strength and smiles for those who care for and about them. I will always remember my time there, and I know it shaped part of who I am professionally with my patients and at home.
Please, share this with your friends, family, and other bloggers!

Here is the address again:

Patricia Verhelst

Box 355

Radville, SK

S0C 2G0

Canada

VMQG Pincushion Swap

My guild, the Vancouver Modern Quilt Guild, is participating in a nationwide pincushion swap! I am excited! I love swaps, its is so much fun to send your work out and get something back in the mail. Its like Christmas! You can find more information on the swap at the Vancouver Modern Quilt Guild Blog. You can also find information about the guild and how to join. We love to see new faces and quilts! Everyone is welcome, there is such a wide inspiring range of talents!

Holly, of (Holly’s Red Bike), Felicity posted a couple pincushion tutorials on the VMQG blog ( thank you Holly for the correction) and I was immediately drawn to the Cathedral Window Pincushion over at My Go-Go Life. I have always wanted to try a Cathedral Window quilt, but have never gotten around to it. This pincushion was the perfect way to the try the technique, and now I am hooked. I am going to tweak it a bit and try a couple of things out. I really enjoy all the tutorials Kim has on her blog, and I hope you all head on over and check it out!

For my pincushion I used a Kona Solid in Linen for my square, and used Moda Bliss for my pops of color. The grey polka dot in the center was a random fat quarter I picked out of my stash. It might be a Riley Blake fabric….

I had so much fun making the front and realized I has some good scrappy pieces left over so I decided to have fun with the back too! I also made a covered button with the leftover scraps from that, and voila! A Cathedral Window Pincushion. I am going to make some more for and exciting event coming up with the guild, but more on that later!

Enjoy the tutorial and as always,

Happy Quilting!

And now for something fun…

My husband has recently quit smoking! I am very proud of him. He has been chewing a lot of gum to get through, so I bought him one of those big bottles of tablet style gum. Unfortunately its too big to lug around while he is working, so I made him a Gum Packet! I whipped it up in about 1o minutes. It’s super cute and hold 10 pieces of gum.

You can make one easily using scraps from your stash. You need:

2 pieces 5″x4″

1 strip 4″x4″ and a second strip 2″x4″ ( I used Kona White)

A button

a 1.5″ piece of 1/4″ elastic or elastic thread. You could also make a small loop out of fabric, make it about 2.5″ long to compensate for no stretch.

Instructions

Fold the 2 white strips in half and press. you will have a 2×4 and a 1×4 strip

Place the 1×4 strip on the right side of one of the 5″x4″ pieces, matching the raw edges along the 4″ side. Stitch across 3/4″ from the folded edge.

Place the short white strip on top of the tall white strip and pin.

Draw the lines for the ‘gum pouches’. Draw a line 3/4″ from the left side, then 3 more lines 5/8″ apart. Stitch on the lines from the top of the first folded strip to the bottom, backstitching at the fold for stability.

Fold the elastic in half and match the raw edges of the elastic to the raw edge of the gum pouches. Adjust the elastic so that it is in the middle of the gum pouches. The loop should be pointing to the folded edges. Sew the elastic in place securely by backstitching multiple times in the seam allowance ( within 1/4″)

Place the 2 4″x5″ pieces Right Sides Together.  Sew around the outside edge, leaving a 2″opening at the top (the top is the side with no gum pouches)

Trim the bulky corners around the gum pouches, and flip the Packet inside out. Close the opening with a whipstitch.

Press the Packet firmly, and edge-stitch around the entire Packet. Fold the packet in half lengthwise, RST. It should now measure 2 1/4″x 3 1/2″ and the gum pouches should be hidden behind the flap. Edge-stitch at the fold.

Sew your button to the center of the “flap”. The elastic should stretch over the button to keep the Gum Packet closed.
Tada! You are finished and have a funky fun packet for your gum! This will fit the regular size stick gums and the tablet gums.

The inside hold 10 pieces of gum

Fun Gum!

Since I whipped it up before hubby went to work I don’t have any tutorial pictures. You can always email me with questions!

Happy Quilting!

Welcome to my Quilty World!

Welcome to Stacey in Stitches!

I have finally started The Blog. Blogging is a new experience. I had never read a blog until a few months ago, even though my fellow guild members all talk about all the wonderful things they find and friendships they have made. I kept thinking that bloggers were mostly angst-ridden teenagers who never grew up and use blogging as a medium to vent. I am sure many still do, BUT, to my delight and surprise (and embarrassment that it took me FOREVER to actually discover this), it is a wonderful way to meet people with new and inspiring ideas, and to learn new things about the things you already love! Like QUILTING!

I love to quilt. I have been quilting for 10 years now, and there is no foreseeable point in the far future when I might ever stop. Maybe if I lose both hands, but as long as they have helper monkeys to run the fabric through for me I will be fine! I can’t even run out of room for my fabric stash, because let’s face it, that is what Rubbermaid containers and crawl spaces were made for! Thank goodness for understanding husbands and partners, though I think they all secretly think if they complain too loudly that we will hem all their pants 3 inches too short!

So about me…..I am a founding member of the Vancouver Modern Quilt Guild, an although my quilts are not what many would call modern, they certainly aren’t “traditional” either. I design and sell quilts and quilt patterns.  I am also a new Mom to my cute-as-a-button needs-more-quilts son who was born in March of this year, so if I devote a blog post or two please bear with me. He is my first after all.

As I get started into the world of Modern Quilting, blogging, and all that fun crafty stuff, I hope you enjoy the journey with me!